Start by opening a new page in silhouette software and set your page size to match the media you will be using.

Measure the diameter of your bobble, and create a circle on your virtual mat to match.

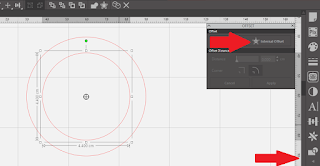
Use the offset feature to create a circle within your circle, this will be the path for your text.
 |
| If this symbol is not present click anywhere on the text and it will appear. |
This line of text will be the first line of text on the bauble, ensure it reads correctly after you have placed it. Lower the slider bar until you are happy with the look in the text. Remember you are looking at the top of the bauble. If you want your text to be read fully from the front when hung only allow your text to cover half the circle.
Right-click on the text and select "make compound path" the text may now be moved away from the circle without losing its shape. Use the same circles to create your bottom line of text, placing the text on the opposite edge of the circle. This will ensure the text continues to read correctly.
Using only the outer circle, you can now add your center line of text or image.
For some added interest I am using part of a design from the Silhouette store, the file has a Stylized word "Angels" after opening this file to my workspace I right clicked on the file and selected ungroup this allowed me to use the word Angels without the rest of the file. Details on the file used are at the bottom of the page.
Open the "warp" panel. Click on "warp selected shapes" and a grid and various edit points will appear over your text or image.
Using your circle as a guide, manipulate the image to match the contour of the circle. Remove the circle from your virtual mat, leaving only the items to be applied to your bauble.
Load your chosen media onto your cutting mat and load into your machine.
Click on send and choose the appropriate material from the drop-down menu and carry out a test cut to ensure a clean cut, adjust the settings where necessary. Click send and allow the cut job to complete.
Unload your mat from the machine, as we are using a small font I would advise reverse weeding.
Apply transfer tape over the cut area and peel the vinyl from its backing and remove the waste vinyl.
Snip lines may also be necessary to allow your vinyl to contour to the shape of your bauble.
The center piece will be easier to apply as it has a gentler curve.

Continue until all the text has been added to the bauble. A feather or glitter can be added to the inside of the bauble before closing.
Add a bow and a string or hook to finish your bauble.
Use the same process for different sizes of bobbles by starting the process with the appropriate sized circle. For this project I have used a 6 cm clear bauble, the project works just as well with coloured baubles. Consider the size of your bauble when creating the design you wish to add, remember you will have to weed it.


No comments:
Post a Comment