Thursday 31 January 2019

Transluent Vinyl Butterfly Mirror


Here at Helens Craft Studio I've been doing some spring cleaning (we're nearly in spring!) and whilst doing that I really like to reorganise and repurpose anything that hasn't been used in a while. This mirror has been stacked in the corner of the bedroom since we last moved as it didn't have a place in the new house and I thought it would be great to give it a revamp and put it into my daughters room! I really like the result so here is how I did it.

Materials Needed
Step One
The translucent vinyl is a really lovely material, quite thick and in some beautiful colours. As its quite thick it is better used for simpler designs rather than intricate ones as it was quite difficult to weed.  Once I had decided which files I wanted to use to decorate the mirror I downloaded them and opened in Silhouette Studio. There were two different versions of the file in the download. I selected the top one and 'ungrouped' it from the bottom image. I then made sure they were the correct size for the area that I wanted to cover with the mirror. I just did this by resizing the file by selecting it and clicking and dragging on the corners of the file to make it larger. Once I was happy with the file size I went on the 'send' tab to cut the design. 


Step Two
I used the 'Vinyl - Matte' setting to cut the translucent vinyl and it worked really well but I did need to make two passes over it. I had cut the butterfly out in the pink material I decided that the design really needed some leaves. The leaves I liked where on the Hollyhocks file but I only wanted to cut out the leaf part of the file. To do this I pulled a large square over the parts I didn't want to cut out and use the subtract tool to leave just the area I wanted to cut still visible. Then I sent this to cut in the same way as the butterfly file. 

Step Three
Once I had cut the designs out I weeded them and used transfer tape to stick the designs to the mirror. 


Thanks for reading this post. If you liked the project or have any questions leave me a comment below. 

Helen :)

Monday 28 January 2019

Unboxing and assembling the silk Screen starter kit


Hello, it's Verity here from Pretty Little Button. Today's post features a slightly different kind of inspiration. Recently I received the silkscreen starter kit that Silhouette came out with and I want to film an unboxing of the kit and assembling the screen to give you all an idea about what it comes with and how to assemble it. It is very easy to assemble, even more so when you read the instructions correctly. But as you will see in the video, it is so easy to reassemble if you go wrong and don't check the instructions properly the first time.

I hope to have another video next week show how to cut a design and print with the screen. Enjoy!

Unboxing and assembling the silk Screen starter kit video: 

Unboxing and assembling the silk Screen starter kit photos:

In the kit, you receive 1 Hook for weeding the HTV, 1 black fabric paint, 1 paint squeegee and a card to access 10 free designs.


In addition, you receive the frame dismantled and 3 sheets of heat transfer vinyl and silkscreen sheets. 


If this has inspired you to try this out, please post below. I would love to see it!

Until next time,

Verity


Profile Pretty Little Button Blog | Instagram | Facebook


PRODUCTS USED:


Sunday 27 January 2019

Sunday's with Steph - 12 x 12 Scrapbooking layout - Paige Taylor Evans cutfile


Hi Scrapbookers and welcome to this weeks blog!

After my daughter took a recent trip to New York I had some great photos for me to scrap!  I started off with this Aztec background design https://www.silhouettedesignstore.com/designs/271529?search=aztec+background&sortby=relevance&submitted_search=true by Paige Taylor Evans.  I used my favourite Bazzill Diamond card on the cardstock heavy setting and set the pass to two as I find that this ensures every last piece has been cut through properly.


I backed the whole sheet with another sheet or Bazzill basics paper in a moss green colour.  I then put a 1 inch torn strip about three inches above the bottom of my page before layering other bits of paper down.


I backed a rose gold frame with another scrap of paper before popping my photo on top of that.  I had printed my photo like the retro style of the old polaroid cameras and then put a pompom photo frame on top of that on the diagonal.


I added my title then I embellished the layout with a piece of ruffled crepe paper under the photo, some plastic perspectives, some 3D hearts and lots of lovely sequins.

I hope you've enjoyed this weeks blog post...until next week...happy scrapping!!

Steph xx


Saturday 26 January 2019

You are my Cup of Tea - make Card Toppers from Dingbats

You (really) are my cup of tea. A Lori Whitlock Wiper Card made by Janet Packer using card toppers made from a Dingbat font. https://craftingquine.blogspot.co.uk for GraphtecGB Silhouette UK

Hello, Janet here again from the Crafting Quine Blog. This week I was very exited to see that one of my favourite designers has released a new style of card in the Silhouette Design Store. Lori Whitlock has a new range of fun Valentine's wiper cards which have a central swipe up part which appears once the card is opened. There are quite a few of these interactive cards to choose from, but I wanted to make one with a tea theme, and so used a couple of other files by Lori including the Tea Time Dingbats font to make teacup and teapot toppers. Cutting and sticking these tiny pieces was speeded up by using Silhouette Adhesive-Backed Cardstock and gave such a neat finish.


You (really) are my cup of tea. A Lori Whitlock Wiper Card made by Janet Packer using card toppers made from a Dingbat font. https://craftingquine.blogspot.co.uk for GraphtecGB Silhouette UK


DESIGNS USED:
Wiper Card Valentine Balloon Card by Lori Whitlock (#285948)
You Are My Cup of Tea phrase by Lori Whitlock (#267429)
Tea Time Dingbats Font by Lori Whitlock (#279453)

MATERIALS USED:
Textured Cardstock - 12" x 12" in white, mint and navy
Patterned Scrapbooking Papers - 6" x  6"
Scrap of Clear Acetate
Silhouette Adhesive-Backed Cardstock in mint, sea mist, grey and strawberry
Silhouette Sketch Pens in red and pink
Silhouette Cameo 3

The designer has a full video tutorial on how to put these cards together, so I am just showing you the small changes that I made. I used the Valentine Balloon Card as it has a pop up sentiment in a rounded rectangle shape (some of the pop ups are animals or other more specific shapes).

Changing the Message
I used Lori's You Are My Cup of Tea phrase to replace the existing one. The phrase needed to be re-sized a little and I added the word "really". I drew the "really" using the sketch pens, first in pink and then over the top in red to get a good match with the strawberry-coloured cardstock. I cut the other letters and the outside in white cardstock and removed the letter interiors (retaining the interiors of the larger letters, O, P and A). I cut the 'TEA' letters from red cardstock and added them into the holes marquetry-style. Small rectangles of navy and mint cardstock were added behind the other words and the interior of the larger letters were carefully adhered.

You (really) are my cup of tea. A Lori Whitlock Wiper Card made by Janet Packer using card toppers made from a Dingbat font. https://craftingquine.blogspot.co.uk for GraphtecGB Silhouette UK


Tea Pot Topper
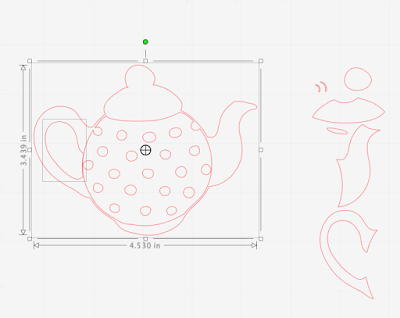
The teapot was selected from the Tea Time Dingbat font. I separated the pieces by releasing the compound path (right mouse click, and select Release Compound Path) and removed the pieces shown on the right. I then selected the whole exterior and the handle interior and made them into a new Compound path (right mouse click, and select Make Compound Path).

You (really) are my cup of tea. A Lori Whitlock Wiper Card made by Janet Packer using card toppers made from a Dingbat font. https://craftingquine.blogspot.co.uk for GraphtecGB Silhouette UK


The round body of the teapot was enlarged slightly (select, hold down Shift on the keyboard, click and drag one of the white corner boxes) to match the exterior of the teapot. I doesn't matter if extends beyond the teapot outline slightly. The teapot outline was then moved away and the remaining circle and dots made into a compound path.

You (really) are my cup of tea. A Lori Whitlock Wiper Card made by Janet Packer using card toppers made from a Dingbat font. https://craftingquine.blogspot.co.uk for GraphtecGB Silhouette UK


Both the resulting pieces were then turned to face the other way (select, Right mouse click, select Flip Horizontally).  A heart was taken from the 'j' and enlarged to suit the size of the teapot. Once sizes were ascertained the teapot outline was cut from navy cardstock, the round body from mint adhesive cardstock and the heart from strawberry adhesive cardstock. See below for a hint on determining the sizes.

Teapot 'Steam'
The teapot steam was taken from the letter 'b', flipped, and resized to suit the teapot (to separate these pieces the path was released and then ungrouped). To make the acetate piece to support the steam, an offset was made of the group of steam pieces at 0.15 (Offset panel, change amount to 0.15, click Apply). Draw a rounded rectangle and weld it to the offset shape (select, Right mouse click, select Weld). The steam would be cut from grey adhesive cardstock, and the support from thin acetate. It was adhered behind the teapot spout and any protruding pieces trimmed away.

You (really) are my cup of tea. A Lori Whitlock Wiper Card made by Janet Packer using card toppers made from a Dingbat font. https://craftingquine.blogspot.co.uk for GraphtecGB Silhouette UK


Teacup Topper
The teacup was made in a similar way to the teapot using the remainder of the pieces from the letter 'b'. I made the exterior shape and the handle interior into a compound path, then also made the saucer pieces a compound path with the cup exterior.

You (really) are my cup of tea. A Lori Whitlock Wiper Card made by Janet Packer using card toppers made from a Dingbat font. https://craftingquine.blogspot.co.uk for GraphtecGB Silhouette UK


My cup exterior was cut from navy, the exterior minus the saucer pieces cut from mint, then the hearts from red, and the cup interior from grey. It is worth cutting out a few duplicates, some with pieces cut out and some entire, in different colour combinations and trying both the positive and the negative pieces.

You (really) are my cup of tea. A Lori Whitlock Wiper Card made by Janet Packer using card toppers made from a Dingbat font. https://craftingquine.blogspot.co.uk for GraphtecGB Silhouette UK


Size and Placement of the Decorative Elements
Prior to cutting out the elements I found it really useful to cut them out in some scrap card first. It really helps to check where the elements will be going, and if the sizes are right relative to the card and to each other. Initially I had the cup over to the left of the pop up and the pot on the right, but realised that the pot looked so much better tipping into the cup.

You (really) are my cup of tea. A Lori Whitlock Wiper Card made by Janet Packer using card toppers made from a Dingbat font. https://craftingquine.blogspot.co.uk for GraphtecGB Silhouette UK


To finish the card I adhered the teapot directly to the card, and the teacup was raised up on adhesive foam pads. I experimented with some extra hearts, but settled on just the ones on pot and cups.


You (really) are my cup of tea. A Lori Whitlock Wiper Card made by Janet Packer using card toppers made from a Dingbat font. https://craftingquine.blogspot.co.uk for GraphtecGB Silhouette UK


I'm so pleased with how this turned out and urge you to experiment with your dingbat fonts. They open up so many possibilities.

Bye for now,

  Crafting Quine Blog@CraftingQuine


DESIGNS USED:
 Wiper Card Valentine Balloon Card by Lori Whitlock  You Are My Cup of Tea phrase by Lori Whitlock  Tea Time Dingbats Font by Lori Whitlock


PRODUCTS USED:
 Adhesive cardstock in Mint,  grey and Strawberry  Adhesive cardstock in Mint, and Stawberry


Friday 25 January 2019

Using cutfiles in pocket pages..

I am trying to do an album of the everyday for 2019 using pocket pages. I had all the page protectors, the album and several packs of 3x4 and 4x6 cards but I needed a bit more.

Looking through the design store there are plenty of pocket page card cutfiles to choose from. I needed some for January and came across the set of 2 resolutions journaling cards which were perfect. 


Next up I chose the divided story 4x6 life cards and cut one that fit in with my photo and design.


Finally I wanted to add one more and used hello there from life card quotes


I cut all the cards on white cardstock and used coordinating cards and embellishments in teal and yellow. So managing to use up more of my excess stash again

I came across these cute paperclips and had to add the heart one to the top of my page


I haven't completed my journaling but will write down my resolutions and add the other stories from the first week of January...


I always find it hard to take photographs of the finished page maybe I will take it without the page protector next time!

Does anyone else make pocket pages using cutfiles?  I would love to see them and get some more inspiration.

Have a great week

Ruth xxx


Wednesday 23 January 2019

DOTW - Frosty Mornings & Toasty Mugs - 22 January 2019 - Making a cut file into print and cut.


Hello, hello Karen here wishing you a happy Wednesday.

If I am being honest (now keep this to yourselves) sometimes when I see the free Design of the Week I am somewhat stuck for what to do with it.  I have to admit that when I saw this week's one I exclaimed, out loud, "You Must Be Joking"!


But I put on my 'big girls pants' and my 'thinking cap' and decided to use it for a post on how to change a cut file into a print and cut file.

When I opened the design I was pleasantly surprised to see that most of the work has been done for me.  It was already coloured and the position of most of the elements was correct.

So to start I will show you how to add colour to this colourless design and then get on to working with this weeks design.


Once you have opened your design  click on 'SEND' and change the outline to 'No Cut' - as the title says this will tell your machine not to cut the outline of the design.


Now comes the exciting bit - choosing the colours of your design. Firstly ungroup the design.


Now this has been done you can colour the sections of the design using the colour palette.  Open the colour palette - to make the leaves green I simply clicked on the wreath and then clicked on the green colour I wanted from the colour palette.


Do the same for the butterflies.

Drag your butterflies to where you want them on the wreath and group the design.


On the 'Line Style Palette' change the lines to white.


The final step is to add an offset outline and registration marks to the design for cutting.

To add an offset go to the offset panel and once you click on it an offset will be added to your design, this will not show until you change the line colour back to red.


To add your registration marks simply choose the size of paper/card you are using (I only have a standard printer so have to choose A4) and registration marks from the Page SetUp Menu.


On SEND check once more that only the offset lines are going to cut.


Now you are ready to send your design to print and then cut out on your machine.

I changed the colours again (my printer was out of red ink) and printed out the design to make a birthday card.


Now back to this week's design. I arranged all the elements to make the design complete and added 'Wishing you' as I decided to make it into a card.


All that was left for me to do was to print and cut the design and add to a card with some foam pads.