I Thought I would share with you a tip for lining up your pieces after you have them all cut out.
As we get braver with our cutting machines we like to push the boundaries with our designs. maybe using a few different colors within the same intricate design. How do we realign the design without placing and replacing each layer over and over again? Every time we reposition our vinyl it loses some of its sticking power.
If a design is busy we can get distracted by too many pieces, making it difficult to line up correctly. Pie is my favorite answer to most problems. For this demonstration, I have used this cute little lion I picked up in the design store. It is a simple design to show you the process.
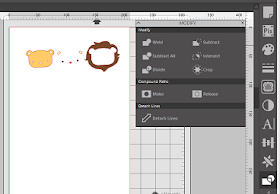 After the process is complete the pieces can be separated as shown in the image on the right you can separate them to check you have the correct pieces and simple use the undo button to put them all back together again.
Next, I create my alinement wheel my "pie". From the store I have purchased a file called "Pie Charts" this file has a number of different pie charts with different numbers of slices. Which pie you use will depend on how many colors you have in your design. I recommend that you use two slices of pie for the main color of your design, it will make lining up the subsequent slices easier.
After Purchasing the pie design open it from your Libary to the mat and delete the "pies" you won't be using. For my design, I used the 6 section pie and colored the pie pieces to match the colors in my image. If you can't remember which color you used, select a piece of pie then select the dropper tool and click on one of the colors on you image this will change the color to match for you.
 Apply a piece of transfer tape over the main section of your design and rub over to ensure good contact. peel back the corner of the backing paper beneath the "pie". Align the section of Pie on the next section of the design. when you are happy with the position, peel back the backing from the first sheet and allow the two pieces to come together Be careful not to allow the "Pie-corner" to move.
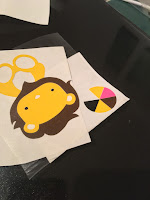 repeat this process until you have all the sections of your design placed back together. All is left to do now is apply your decal in the desired location or if you sending it to a friend leave the last layer of backing on and the transfer tape so they can easily apply it themselves.
Designs Used
PRODUCTS USED:
If a design is busy we can get distracted by too many pieces, making it difficult to line up correctly. Pie is my favorite answer to most problems. For this demonstration, I have used this cute little lion I picked up in the design store. It is a simple design to show you the process.
I layered the lion pieces up and filled in the sections with the different color I wanted to use. As this is an ordinary cut file all the pieces would cut out separately, so if I were to leave the image like this I would end up with a lot of cuts in places I don't want them. To turn it into the pieces I need I use the modify tool. by selecting overlapping sections and clicking subtract all (Hold down Shift to select more than one piece at a time).This tool removes all the bits of the design that are hidden from view and are not needed.
 After the process is complete the pieces can be separated as shown in the image on the right you can separate them to check you have the correct pieces and simple use the undo button to put them all back together again.
Next, I create my alinement wheel my "pie". From the store I have purchased a file called "Pie Charts" this file has a number of different pie charts with different numbers of slices. Which pie you use will depend on how many colors you have in your design. I recommend that you use two slices of pie for the main color of your design, it will make lining up the subsequent slices easier.
After Purchasing the pie design open it from your Libary to the mat and delete the "pies" you won't be using. For my design, I used the 6 section pie and colored the pie pieces to match the colors in my image. If you can't remember which color you used, select a piece of pie then select the dropper tool and click on one of the colors on you image this will change the color to match for you.
Your image is now ready to cut. Click the Send button in the top right of the software. For media, I selected glossy vinyl and clicked next this brought me to the action window. within the action, section select the "Fill" tab. All of the boxes will have a tick in them, as we are cutting each color separately we will click on each tick to turn off the cut function. One by one click on a box to activate the cut function on each color and load the matching color into your machine. you will see that when you select the color of different pieces of your design the matching piece of pie will also cut out. Send each color cut job to the machine until you have cut all your pieces.
When you have cut your pieces remove the unwanted areas of vinyl from the backing sheet leaving only the pieces of your design and the piece of pie
 Apply a piece of transfer tape over the main section of your design and rub over to ensure good contact. peel back the corner of the backing paper beneath the "pie". Align the section of Pie on the next section of the design. when you are happy with the position, peel back the backing from the first sheet and allow the two pieces to come together Be careful not to allow the "Pie-corner" to move.
  repeat this process until you have all the sections of your design placed back together. All is left to do now is apply your decal in the desired location or if you sending it to a friend leave the last layer of backing on and the transfer tape so they can easily apply it themselves.
This one is going in the post!
Designs Used
animal set
by Rivka Wilkins
Design ID #5353
Published: 11/27/2009
pie charts
by Silhouette
Design ID #26383
Published: 4/24/2012
PRODUCTS USED:
 |  |  |  |  |  |


