Traditionally, blown eggs are covered with rectangles of intricately patterned washi paper, with cuts made at 1/4" intervals up to a margin running around the width of the egg, and every piece fashioned to a point. Each section is applied to the egg in turn with wet glue and then varnished to a glossy finish. Here I have used the Silhouette Studio® software to design a file to mechanise the cutting process and by using the self-adhesive Silhouette Washi Paper sheets, have eliminated the need for messy wet glue or varnish.
STEP 1: MAKE THE FILE
These are the instructions for making the paper covering with the Silhouette Studio® Designer Edition. It could be done in the Basic version, just follow these directions and replicate the pointy pieces singly, or in groups of 3 or 4, until you have sufficient.
- Draw two rectangles - one a fraction bigger than the height of your egg (approximately 3.5") by the measurement around it's widest part (around 5.5") - and the other 0.5" by the widest part (this is the margin with no cut lines). Align both rectangles (select all, then Align > Centre). I changed the line colour of the smaller rectangle to blue.
- Draw a thin rectangle from the bottom of the small rectangle to the bottom of the larger rectangle. Stretch it to overlap with the blue rectangle slightly and adjust the width to 0.25". Then align it to the left of the large red rectangle (select both red rectangles, then Align > Align Left).
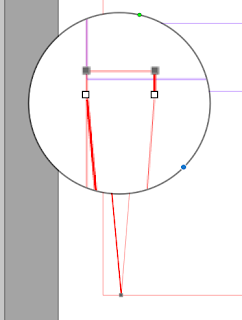
- Now to taper the section, select the small red rectangle and click on Edit Points. Zoom in and click half way along the bottom, this will make a new point and shows as a white box.
- Now select the original points at the bottom (either side of the new one), and holding down the Shift key, use the up arrow on your keyboard, or carefully slide the points upward toward the top of the rectangle, stopping just short of the top.
- To make the edges curved, select the point labelled a and Make Curve, and then select point b and do the same.
- Open the Replicate Window, click advanced options, select 20 copies, set position 'to the right' and Click replicate.
- Now group all the pointy pieces and copy them above (choose Replicate, then Mirror Above) Select everything except the large red rectangle and weld it together (Modify, then Weld). Then delete the large red rectangle and you have your cut file.
STEP 2: CUT THE WASHI
If you haven't used the washi sheets before, I recommend that you cut the sheets apart and cut the egg covers one at a time, using the recommended settings and remembering to do a test cut first. Then peel away the waste parts of the washi with a weeding tool.
STEP 3: COVER THE EGG
Peel away just a little of the paper at a time, centre the egg and smooth down the curved pieces in turn, overlapping near the top. Complete one section, both top and bottom, before moving on to the next until the egg is completely covered.
And there you have it, lovely covered eggs, with no glue in sight! I hope you have as much fun making these as I did.
FILES USED:
None
PRODUCTS USED:


Amazing, and beautiful. Where do you get the eggs from please?
ReplyDeleteI bought the eggs online - search for "matt white craft eggs". Their matt finish allows them to take paint well, so you can cut templates and masks and paint over. They also have a thin shell at the ends, so can have a thread put through for hanging or you can mount them on a stick to make a spring bouquet.
ReplyDeleteSaw this on your blog...these turned out so fun!!!
ReplyDeleteSaw this on your blog...these turned out so fun!!!
ReplyDeleteI'm glad that you made them and they turned out well Sue.
Delete