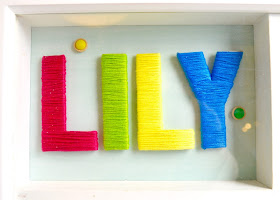
Hiiii
Caroline here with a fun tutorial!
We'll be making these letters and incorporating them in to some home decor.
What you will need:
- Silhouette chipboard
- Silhouette cameo/portrait
- Embroidery Floss
- Cellotape
- Wet Glue
- Hot Glue Gun
- Box Frame
- Patterned Paper
- Ephemera/Embellishments
- A peg (optional)
How to make the letters:
Now for quite a lot of you this will seem quite a basic use of the silhouette but this blog is for all skill levels I think it's important to include it!
First of all you will need to create your text in the silhouette software. To do this click the text button on the left...
Then on the cutting are begin to type your letters. Once you have typed them you can double click the text and highlight it and a panel will appear on the right. Use this to edit the style and the size of the text...
As I knew I wanted my letters to be wrapped in the embroidery floss I made them large enough to do this as it can be a bit fiddly, yet not too big to fit in my box frame.
The silhouette chipboard is fantastic as it cuts like butter but I wanted mine to be super sturdy so I needed to make quite a few layers of the letters. They needed to be the exact same size as each other so I highlighted the text and then went to the edit button where I clicked copy...
Then I pasted the letters 6 times...
The next step was to run them through my silhouette cameo on the following setting...
Here are the cut out letters:
Now we want to make them very strong so each of the letters need to be glued together...
Now for the fun part, grab some embroidery floss and start by attaching it to the letter using cellotape then wind around as neatly as possible, you will see that I always keep mine going in one direction no matter what the shape of the letter is and when you reach the end use more tape to secure the thread...
You can obviously use any colours you want, I chose these to match in with the papers I wanted to use. You could also change the colour of the thread part way through the letter and create a pretty ombre effect, or stripes.
I've chosen to use my letters in a shadow box but you could create a large letter and hang it on the wall, or use them on a scrapbook page.
The next stage for me was to decorate the box...
The simplest way was to lay the frame down on some thick card and draw around the shapes inside and outside of the frame sections and then i could measure what size these boxes were and cut the paper to the right size and stick it directly on to the piece of card, it was very easy.
Now have fun choosing embellishments and memorabilia to match. I wrote little notes and wishes for Lily and made a little wish jar with glitter.
I wanted to have the option for her to change the photo whenever she wanted or as she grew, so I used a glittered peg which I hot glued in place.
Then I again used hot glue to stick the letters in place and make them very secure. I LOVE how they look HA!
Finally here is the whole boxed image again...
I hope you like it and that you have a go, it's such a fun and individual project that you can put your own spin on!
Thanks for taking the time to read this and I'll see you again soon with another project
C x
Blog
Products Used:
PRODUCTS USED:


Love this! where did you get the box frame with the dividers from? i cant seem to find any :(
ReplyDeleteHiiiii thank you Sarah, I am sure it was from the Range! C x
Delete