Hi there, Nadine here with a tutorial all about your Silhouette Blade. A while back I was lucky enough to have a long chat with an expert on cutting here in the UK called Harry. Harry's company manufacture the premium etching tool for the Silhouette Curio. His tips, along with those from Brian, the fantastic technican at Graphtec, have made me more confident with how I use my blade and settings, ultimately giving me better cuts.
How the Blade Work
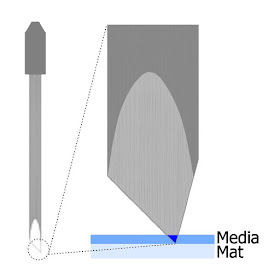
The Silhouette machine slides the blade left and right, whilst simultaneously feeding the mat in and out. This combination of left and right, up and down means that it can cut any shape - remarkably accurately too! The blade is on a spindle that rotates on a bearing. When the cutter changes direction the blade rotates around for the cutting edge to face forward so it can cut the media. All of the cutting is done by the small triangle at the tip of the blade. |
| Image based on diagrams from Harry at Edward Mathias |
Cutting Pressure
How deeply you cut is controlled by two things - the amount of the blade exposed and how much pressure is applied.Imagine you have a large orange with a thick peel and you want to cut the skin but not the flesh. You have a long dagger and you can adjust the crossguard. If you set the guard to expose only a short length of blade, the same as the thickness of the peel, you can apply a lot of pressure and happy cut away knowing you are cutting to exactly the right level. Compare that with setting the guard back so you have a much longer blade. In this scenario, you'd need to apply a very precise pressure to ensure you don't accidentally pierce the fruit.
I've made a little animation which hopefully illustrates this. Notice how the blade on the right has the blade exposed to the correct depth, at low pressures, the blade won't cut through, but as long as the pressure is sufficiently high, it will cut correctly. Contrast this with the overexposed blade on the left, here the pressure has completely perfect, otherwise it'll cut far too deeply.
Golden Rule - Use As Little Blade as Possible
Taking what we've learnt from the orange analogy, we want to set our blade to the mimimal length that is needed to cut through the media. We want the white nose of the blade holder to be pressed down on to the surface to give a consistent cutting depth.In the diagram below you can see that the blade on the left is set too short and won't cut through the media. In middle blade is just right and the right hand blade is too deep.
Here are some reasons why this isn't a good idea:
- Notice how the triangle is much larger onthe overexposed blade on the right? This means that a bigger the surface area that needs to be rotated, making the quality of your cuts less accurate.
- The machine too will be under more wear, as all the pressure is on the blade itself and not the white nose of the blade holder.
- If the pressure is too high, which we know is hard to perfect with an overexposed blade, this will cause:
- the mat to be cut into and damaged shortening it's life
- backing paper on vinyl or stickers will be cut, making it harder to weed and remove.
Top tip
Your blade comes with a little grey ratchet to change the blade setting, but the machine also has one, just to the left of the mat loading position - handy!!
Cut Settings In Silhouette Studio
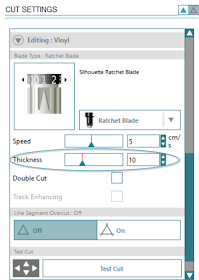
The blade pressure is controlled within Silhouette Software, within the cut settings. Referred to as Thickness, it ranges from 1 to 33 and each increment equates to 7 grams of force, so can cut with a maximum of 230 grams of force.
Harry's top tip
Think more about DEPTH rather about than pressure – don’t be afraid to use more pressure than the blade needs to cut the media - if only the correct amount of blade is exposed it simply cannot cut too deep because the nose of the cutter (if correctly set) will act as a stop and prevent it from penetrating further.
Test Cuts
There is a test cut button in the Cut Settings window(see the screenshot above). When pressed, the machine will cut a little square with a triangle inside it. You want to will be able to lift the triangle from within the square of the test cut but have no marks from the test cut on the cutting mat itself, or at most a very light outline just on the adhesive. Start with a light thickness, say 8 and work up from there with some test cuts to get the perfect pressure.Top tip
The arrow keys to the left of the test cut button on screen are just the same as the ones on your machine. They will allow you to navigate the machine to the position that you'd like to make your test cut on.
Separate Blades for Different Media
My mum and granny used to despair if they caught me cutting paper with their fabric scissors. The same principle applies here as paper is very abrasive, so a blade has been used on paper, will not cut fabric well.Top tipYou can take this principle a little further, so for example I have a separate blade for vinyl, paper and fabric.
This is exactly the same as the regular black ratchet blade. Silhouette have just made the housing blue to help you keep them separate. Even if you don't cut fabric, but find these blades on sale cheaper, you can use it just you would the regular one.
Blade choices
Along with the regular black ratchet blade and the blue fabric one, there is a premium blade that lasts three times as long. The Curio and Cameo 3 have a deep cut blade for thicker media such as foam.The Cameo 3 also hase an auto-blade which automatically adjusts the blade by “punching” itself up and down in the corner of the material until the right blade depth is achieved. I'm excited to say I'm the proud owner of the new Cameo, so if you guys are interested in some tutorials on the new features of the Cameo 3, comment below and we'll be happy to oblidge.
Blade Care
All machines have limits – if you try to cut media that the machine does not have the power to cut exposing more blade will not help you will just damage blades. This is why it is not possible to cut metals such as silver or steel.Blade are fragile and any most damage can't even be seen with the naked eye. Don't allow anything to touch the blade other than the media that you want to cut. I read that running the blade along a ball of tin foil would clean and sharpen it - this is very bad idea! For more information, this link is useful http://www.edwardmathias.com/plotterbladecare.html
Masterclass complete
I started this tutorial to cover the basics, but I think it became more of a masterclass! As Harry says, you can have the most luxurious fountain pen in the world, platinum decorated with diamonds and rubies, but if the nib is chipped, the end result is ruined. So, your machine is only as good as your blade.I hope my tips will help you care for your blade, allowing you to produce high quality cuts and also save time weeding. For extra info click here to see Graphtec Brian's Guide for Setting the Initial Depth.


Excellent information Nadine - thank you.
ReplyDeleteWow. That was absolutely fascinating Nadine. I am sure I hang onto my blades far too long. I think it is time to change to a new one today. In fact I think I should start keeping a record of when a blade goes in, maybe painting on a date.
ReplyDeleteVery informative Nadine thank you
ReplyDeleteThank you for this excellent information Nadine - it all makes perfect sense. Replacement blades are not cheap so it will pay not to misuse them.
ReplyDeleteVery clearly explained. Thank you!
ReplyDeleteI wôuld lovesomw viseo usinf the Cameo 3
ReplyDelete