Hi Silhouette fans, Niki here and this month it's my turn to play with the Silhouette Mint machine. I started off by simply downloading the software from Silhouette America which installed itself with no drama, and then I plugged in the Mint - it plugs into the wall for power and by USB into my laptop, so very easy. I opened up the software on screen - it looks similar to Silhouette Studio, same format really but with different icons. I spent a little time hovering over each one to familiarise myself. I then set about designing my first stamp: I opened a new size canvas 15mmx60mm, selected the Sail Away font and wrote 'this moment'. I played around with the character spacing until I was happy with what it looked like and then moved the words over to the right size of the canvas.
I wanted to create a heart shape at the front of my wording, so selected the heart from the shape menu
I drew the heart, re-sized and angled until I was happy and positioned it in place.
I then copied my little heart and pasted another of the same. I made it slightly smaller, coloured it white (by clicking the colour swatches at the bottom of the screen) and placed in on top of my existing heart. This gave me an open heart shape.
Now happy with my design I sent my design to the Mint. Doing this flips the design on the screen (such a relief that this was done for me as it hadn't entered my hear to work backwards lol) and all I had to do was insert the stamp card into the back of the machine and the rest was done for me. Being new to the Mint Machine, I wasn't quite sure what to do next though - turns out that you break the stamp you have just created out of the card that just went through the machine, and stick it on one of the stamp holders that comes in the stamp kits. The stamps are sooooo clever - you squirt a little ink over your design, leave it for 5 minutes to absorb the ink, and then wipe of the excess (and stamp a few times until you have a clean image). The stamp is now self-inking so no need to use an ink pad - how wonderful :)
I got a little braver at this stage and tried another design. I chose a square format this time and selected a circle outline shape fro the shape menu. I created several circle shapes in different sizes and I offset them around each other until I had a messy looking doodled circle.
When happy with my doodled circles, I sent it to the Mint and created another stamp - so cool!
and finally I opened up an exisiting PNG image I have of a cute little arrow with a heart, resized it and sent that to the Mint too. No designing required for this one, I simply opened the image on screen and sent it to Mint - fabulous.
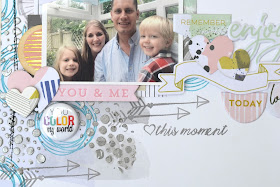
I then created a layout using my lovely new custom stamps:
My opinion: I love the Silhouette Mint machine, I am so impressed with this little machine. Thank you to Silhouette UK for allowing me to have a play with it...I can see one in my future lol!
Designs Used:
Sail Away font
PRODUCTS USED:
 |
 |
 |


No comments:
Post a Comment