Hello again, Janet here with a post to show how to add custom media to your list of cutting materials in the Silhouette Studio® software.
It doesn't sound very exciting, but adding custom settings can really be a HUGE time saver. I'm ashamed to say that I avoided doing this for ages because it didn't seem to work quite the way I expected. Now I think I've got it sorted (I couldn't find up-to-date instructions anywhere at the time of writing). I'm hoping this will help you, so that you don't have to spend time figuring it out.
The media I'm adding today is glitter wallpaper; NOT a Silhouette product, and obviously NOT in the list of media when you activate the Send panel.
Here is my step-by-step guide (I'm using version 4.1 of the Silhouette Studio® software).
1: Click the 'send' tab.
2: In the material list, click the down arrow to the right to reveal the list of material cut types.
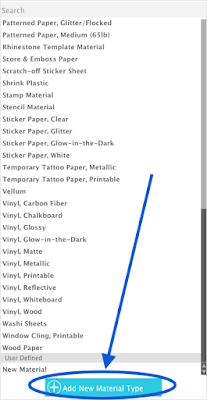
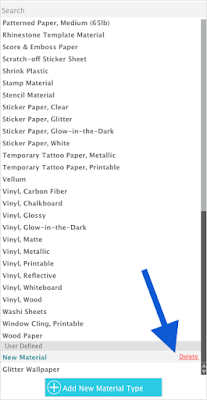
3. Select and Click on the grey 'New Material' listing near to the bottom of the list (below 'User Defined') and Click on the '+' sign. Then type in a suitable material name (avoid duplicating existing names, or if you need to, add something before the word, such a new, my, or your initials). I typed 'Glitter Wallpaper' as it didn't already exist.
If there is no New Material heading in the list click on the blue '+Add New Material Type' button.
4. Adjust the cut settings to suit your media. I set the blade to 2, speed to 5, force to 15, and passes to 2 (settings I had previously used). Ensure that the symbol above the blade settings wheel is set to cut. Then click the small red 'save' button.
5. The new material type will now display under 'User Defined' in the list. You can also adjust other settings if necessary:
Line Segment Overcut This makes straight corners cut with a slight overcut. Use for thicker materials or regular materials when cutting small things with lots of straight lines (has no effect on curved lines). Once ticked, the start and finish positions of the overcut can be adjusted.
Track Enhancing This moves the mat back and forth prior to cutting to make a track. Use for thicker materials where the material slips during the cutting or a second cut is misaligned.
Platform is applicable only to the Silhouette® Curio.
6. Click the 'X' at the top of the Material Settings panel to return to the regular send panel.
7. To choose the new media scroll down the material list and click on it.
The default cut setting is 'No Cut' so ensure you change this to 'Cut' or Cut Edge' before cutting. Check also that the Action is set to Cut and that the correct type of blade is selected. You can turn Overcut on or off here, and access the previous panel by clicking on the row of three dots.
8. You may need to fine-tune your settings depending on the age and condition of your mat and blade. Test you settings once the material is loaded by clicking on the 'Test' button. If you want to make these temporary changes available the next time you turn on your machine, click 'save'.
A successful test cut should look something like this (here the outer square has been removed to show the test cut).
9. If you have made extra unwanted 'New Material' headings, you can delete them by clicking on the '-' sign and then click the underlined red 'delete'.
I hope you find this a useful time-saver. Do leave comments if you have discovered anything extra about adding new cut settings.
Bye for now,
DESIGNS USED:
 |


I will prob have a go at doing this due to the winter nights and pj days. Thanks for the picture instructions too. So much easier for following. Keep up the good work and tutorials Janet xx
ReplyDeleteThank you for taking the time to comment. I’m glad you like our tutorials and have found this one useful.
DeleteThanks for this - I have to admit I didn't know you could save a new material. I have a paper stock I cut on all the time (we have loads of it in the recycle bin at work every day) and it's thicker than the regular Card Stock setting, but not as thick as the Heavy Card stock setting so I end up overriding one of those settings every time. With your help, I've been able to add my very own "Super Susan Card Stock" setup, and now don't have to take that extra time when I send.
ReplyDeleteI’m so pleased that you’ve found it useful Susan.
Delete