Hey there, Niki here today with some super cute winter gift boxes. I wanted to make these for little Christmas gifts but I don't do traditional Christmas colours, it's just not my thing, so I made something wintery, rather than Christmassey.
These little boxes came out super cute, they didn't take too much time to make (and I made 20 of them!) and they were easy to put together. I used them as table gifts for people at a crop I went to, and they also served as teacher and teaching assistant appreciation gifts too. I filled them with chocolate coins.
I initially went looking for a cute box 3D cut file in the store that I would be able to make 20 of quite easily but I got sidetracked by all the really gorgeous designs in there! I eventually decided upon this Christmas Candy Box House:
But when I opened the design on my screen it looked like this:
I find complex designs like this to be really daunting and my initial reaction is to immediatly close down the design and pick something else. The best thing to do when faced with a design like this is to use the Fill tool.
On screen I figured out what each part of the design was and used the drop down Fill menu (top left) to colour each shape. Whilst doing this I decided to do away with the chimney (that was going one step too far!) and choose to cut some of my pieces in the same colours ie the bows, trees and candy canes were all going to be the same colour. From this point, it is then, visually, very easy to see what needs cutting and how it will all fit together.
I focussed on the main body of the box first of all and arranged it so I could cut two on a sheet. I then cut 20 of these...
I then arranged the white items and cut 20 of each...
These are the white bases...
and then I moved onto the nows and trees. I decided to cut the bows from white glitter paper and the trees from teal spotted card so I needed to arrange them on the mat in such a way that I could load the two different materials onto the mat at the same time.
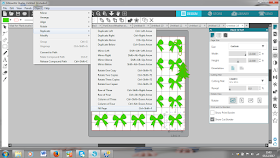
Needing 20 bows, instead of copying and pasting 20 times, I selected one bow then went to the Object Menu, Replicate and selected Fill Page at the bottom. This filled my mat with bows, 25 in fact. The are all nicely spaced apart but this wastes cutting material so I re-arranged them so they were all close together. 

Here are my bows all squashed together. I releated the same action for the trees and sent it to cut.
and finally, these were the windows.
With all those pieces cut all I then had to do was assemble and fill the boxes, my favourite part.
I absolutely loved making these little boxes and loved giving them away as gifts too.
What 3D box files take your fancy from the Design Store?
Happy scrapping xx
Find me on my own
blog: Being Scrappy and on
Instagram as @nikiclaire
DESIGNS USED:
 |
 |
 |
 |


No comments:
Post a Comment