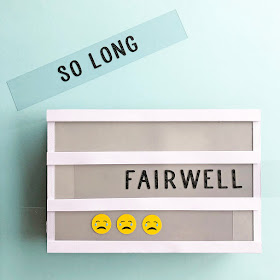
Hello, Janet from the Crafting Quine Blog here using the Silhouette Carbon Fibre Vinyl and saying farewell* with a 3D Lightbox design. This speciality vinyl is available in black with a pattern that gives the look and texture of carbon fibre in an easy to apply material. For this project I have applied the vinyl to cardstock which I then used to make the box. I also used it in a more conventional way to make the letters.
The lightbox design (#251632) is from the Silhouette Design Store. I adapted it to take three rows of letters, which allows for longer words and then cheated on the letters, putting the words onto long strips. Far quicker and less fiddly to change out than individual letters. Finally I added a string of led fairy lights inside.
 |
| Design ID #251832 in Studio and SVG format |
DESIGNS USED:
Lightbox by Nilmara Quintella (#251632)
LW Perfect Type font by Lori Whitlock (#55159)
MATERIALS USED:
Black & White Cardstock
Shiny/Mirror Card, Paper or Vinyl
Strong Tack Transfer Tape
Liquid Craft Adhesive
Strong-Tack Tape Adhesive
Vinyl Scraps for Emojis
Silhouette Premium Carbon Fibre Vinyl
Silhouette Vellum
Set of Battery-Powered LED Lights
You'll find instructions for assembling the box on the designer's website and there is a link from the file's description in the Silhouette store. I'll just highlight the things I did differently.
HINT: The designer's instructions are in Brazilian, for English instructions just copy the link into a Google search and you get the option to translate the page.
Preparing & Cutting Carbon Fibre Cardstock
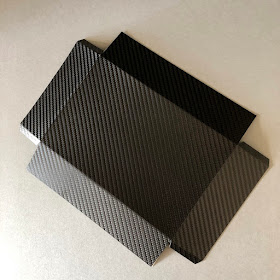
Cut a piece of vinyl slightly larger than the box base and smooth it onto a piece of black cardstock. Cut the piece, increasing the blade depth and force as necessary, to cut all the way through. Use a bone folder to make crisp fold lines.
Adding Reflective Panels
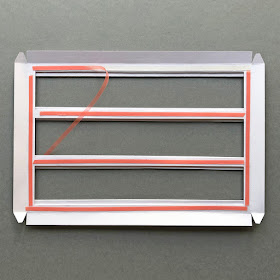
Use the panel pieces cut from mirror card to line the reverse of the box if you have it. I didn't, so I used some sticky-backed reflective paper that I had on hand. In this photo I've left the backing on at the ends of the long strips. When assembled these can be removed so the reflective paper hides the box tabs on the inside also giving a bigger reflective surface.
Add Extra Supports
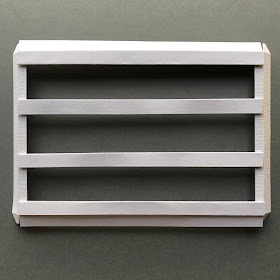
The translucent part of the lightbox is effectively an adapted box lid. In order to add an extra line of text it is necessary to cut an extra centre support bar. I'd also recommend cutting extras of all of the bars in case they don't all fold straight. It is also necessary to add one extra aperture and reduce the height of the existing apertures in the lid. Check they are all of the same height, evenly aligned, and are equally spaced using the alignment and spacing tools in tools in the transform panel.
Applying Vellum
Vellum is applied to the reverse of the lid. I recommend a strong adhesive tape so that no excess glue can get onto the vellum.
Adding Lights
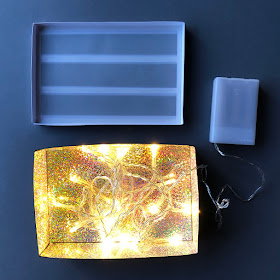
Here are the assembled top and base parts of the box with the fairy lights inside.
Arrange the lights around the edges of the inside, adhering them to the box sides using adhesive tape. For an even neater effect, adhere the battery pack in the box (with double-sided tape) and cut a small slit and a rectangle out of the side so that the controller can be switched on and off with the lid in place (then no-one has to see the light 'spaghetti').
Instead of cutting individual letters and mounting them on small acetate rectangles, cut strips of acetate and mount the words in carbon fibre vinyl directly to the strip. This isn't quite so versatile, but you can just cut more strips and vinyl when you need new words. So much quicker and less fiddly to change them out. With this method you can choose just about any font you want. I picked LW Perfect Type as its quick to weed and easy to read, but any cuttable font will do, even script fonts work (don't forget to weld any overlapped letters together before cutting though).
HINT: For ease of application, cut your letters in weeding boxes of the same size as the acetate strips. Place your acetate strip on a card strip cut to the same size so that is easier to see. Align your transfer tape with the top of the weeding box, lift the word, then align the top of the transfer tape with the top of the strip and burnish it onto the strip.
Layered Emojis
These crying emojis were made using layered vinyl. Using transfer tape, pick up the blue 'tears' first, then the yellow faces next, and finally the black circles (with weeding box the same height as one of the acetate strips as for the words). Then they are easy to align onto an acetate strip in the same way as the letters.
You may have realised, if you've been following the Silhouette UK Blog for a while, that I have a passion for adding lights to my projects. If you have a weakness for lights too, you might like to check out these earlier projects.
|
|
|
|
|
*Saying Farewell
This is the last regular post I'll be doing with the Silhouette UK Blog Design Team. I've been on the team since it started in 2016 and I'm away to do a real world job which won't allow me as much crafting time. I may be back with a special post now and again. Meantime you can catch up with my crafty creations (Silhouette and otherwise) at the Crafting Quine Blog.
Bye for now,
Crafting Quine Blog | @CraftingQuine
DESIGNS USED:
 |
 |
PRODUCTS USED:
 |
 |
 |








Always such clever projects from you Janet. Sorry to hear you shan't be here much, but I wish you well in your new job.
ReplyDeleteFaith
Thank you Faith - I start the new job today!
Delete