I've always adored origami, but was somewhat intimidated about giving it a shot. I don't know why I waited so long as it's based on some simple foundations and is incredibly addictive. I started one weekend and was so totally absorbed that my partner Robbie laughed when he came into the room and I was grinning amist a sea of paper. He grimmanced, "Oh no, Nadine has found another new hobby"! I knew immediately though, that I could make my designs easily in Silhouette Studio and use my trustee Silhouette Cameo to make all the necessary cuts and scores.
These little lanterns are incredibly versatile. Here are some suggestions that friends have made on how to use them:
- Can be used as pretty party decorations and double up as party favours to house some chocolates, sweeties or small toys
- Add jokes and hang on a twig tree for an evening BBQ
- String as cute bunting decoration
- Lit up with fairy lights (make sure to spray with fire retardant)
- To hold clues for a scavenger hunt.
- Stacked vertically, they make lovely wedding decorations
- Use vellum or translucent acetate for garden lanterns
- Fold flat Christmas tree decorations
- Scaled up as a bedroom lampshade
What you’ll need:
- Silhouette CAMEO
- Paper
- Free Silhouette compatible cut file
STEP ONE: Prepare and Cut the Design
Download the free cut file and open the Silhouette compatible file from within Silhouette Studio. Cut on the reverse side of your paper. Red lines are cuts, black are scores. To score, you can use the blade on a very low setting or a sketch pen. I used a sketch pen, thickness 33 on double cut. For thick scrapbook paper, I sent the score lines to the silhouette twice to get a good deep fold line.STEP ONE: Mountain, Valley and Universal folds
I'm sure as kids we've all made accordian fans. This is the foundation of origami. A fold towards you is called a valley fold and one away from you is a mountain fold. Folding a valley fold then making it into a mountain fold creates a universal fold.Make univerals folds along the parallel running score lines.
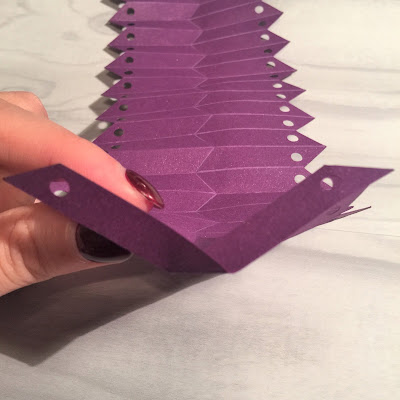
Then make mountain folds for all of the centre zig-zag scores. This should be easy as the back of the paper has already been scored, meaning it'll naturally want to become a mountain fold. I find the easiest way is to pinch the centre line and create the zig-zag fold my pushing into the point as in the photo below:
Once repeated along the length of the centre folds, you paper should look like this:
STEP Two: V-Pleats
V-Pleats are where the magic happens as they allow the shape to stretch and become 3D. The angled lines are mountain folds and they allow the parralel lines runing through the V to change from mountain to valley folds.To create a V-pleat, bring edges of the V together, as shown below:
If you turn the paper and look from the edge, the first completed V-pleat will look like this:
Starting the first pleat is the hardest part, after that the paper will guide you somewhat automatically.
Once repeated along the length of the zig-zag, the shape will look as below:
The piece can be folded flat - a bonus for storage.
STEP Three: Thread and Glue
Flatten an edge and apply some doubles-sided tape.I find it easier to thread the ribbon through the holes when the shape is flat, so feed through all holes apart from the two end holes.
Bring the two ends of the paper together, overlapping the last concertina . Feed the thread through the last two holes into the centre.
DESIGN TWO: Double V-Pleats
For the second design, a rectangular shape that has two sets of zigzag lines, I start by following steps one and two above.Repeat on the process on the second zigzag. The shape should look as below:
The shape folds flat as before, but this time in a U-shape. Repeat the steps to glue and thread the holes as above.
EXPLORE VARIATIONS
Moving the zigzag line off-centre will create a pear-shaped lantern.Making the zigzags wider will make the shape longer, whilst a narrow zigzag will create a fatter lantern.
The lanterns can be made fuller by cutting two strips and taping them together, overlapping by one concertina tab.
Paper is the obvious choice for this project, however I experiemented with folding Silhouette vellum that I printed a pattern onto. It worked well and would be very cute with fairy lights.


These are fabulous Nadine. I am now thinking how cute they would be made with my stash of old Christmas scrapbooking paper and hung on our tree. Love the idea of putting lights in them too.
ReplyDeleteYes, they are so perfect for Christmas Karen, you could even hide a wee stash of choccies or mini pressies if you have little people who visit :)
DeleteFabulous project, and great design. Thanks for sharing your cut file, I can't wait to try them out!
ReplyDelete