Monday, 30 April 2018

Rose Gold Adhesive foil Jar labels


Hi everyone. It's Verity here from Pretty Little Button bringing you another project. This week the design team has been asked to use rose gold foil in a project, so I have created this fun Jam Jar label using the printable adhesive foil sticker sheets. This is a very quick post showing how quick and easy it is to use to inspire you to create some beautiful labels for your handmade goods. I used the Crossed Arrows Frame by Sophie Gallo, making this a very quick project as most of the hard work was already done! The adhesive foil sheets have a decent thickness to them, so it makes quite a substantial label, great if you decided to sell any of your handmade goodies....your labels will look very professional!

Rose Gold Adhesive foil Jar label details:

First of all, add the print & cut registration marks to your design window. Load your design into the design space - as I said I have used the Crossed Arrows Frame by Sophie Gallo. This frame has a great space inside to add the writing to the label.


Send this to the printer and load the printed sheet onto your mat. Before sending this to cut, you need to decide how you want to cut it out. You could cut the exact outline to the label, or alternatively, you could add a small offset to the design. This will give a small border around your label, which I think looks more professional. 

Load your mat into your machine and make sure the area around the blade is well lit. This will help the machine to register the marks when you send it to cut. If you are struggling with the machine registration your marks even with manual registration, move the light around slightly until it registrars.

To cut the label, I selected the Printable foil option in the material drop-down list. Make sure you do a test-cut first as the cutting settings may vary depending on the quality of your blade etc. The more the blade is used the duller it will be and therefore you may need to adjust your settings slightly to get the best cut.  


Once cut, you need to adhere the label to your jar. Before you do so, I would advise you to clean the surface of the jar. If there is any sticker residue left over from an old label, you can use nail varnish removed/alcohol wipes to help remove it this. Adhere the label and burnish down for a good seal. 


 If this has inspired you to try this out, please post below. I would love to see it!

Until next time,

Verity


Profile Pretty Little Button Blog | Instagram | Facebook

DESIGNS USED:


Crossed arrows frame by Sophie Gallo - Design ID #141785

FONTS USED:

PN peach preserves solid by ScrapNfonts - Design ID #128942

PRODUCTS USED:


Sunday, 29 April 2018

Sunday's with Steph - Vinyl for the terrified!


Hello and welcome to another blog post from me!

So today I decided to make the massive step (it felt that way for me any way!!) from cutting paper with my lovely Silhouette Cameo to cutting vinyl!!  Ok I'll admit I was really super scared about using it for the first time, but I needn't have been, as it was really rather easy and I absolutely cannot wait to do some more!!

So here goes.  I opened up my design template.  Typed in Mrs S (which is what the children at school call me) picked out a lovely scrawling font which is called Blossom Script Font and changed the lettering.  I then grouped the letters and welded them together.


Once this was all complete I loaded my vinyl.  So with materials with backing you will not need to use a cutting mat, which also worried me. 

So instead of just sending it to cut, I decided to do a "test cut" first.  I hadn't bothered using this before, I think I will from now on, before every cut I make!!  As you can see the machine cut a tiny little square and a triangle on the top left hand side of my vinyl So I knew that it would be ok to cut my name.


I moved my design down ever so slightly to take into account the test cut and then sent it to cut.  I was so super excited when the machine had finished cutting.  I unloaded the vinyl and cut out my name so that it was on a strip and I didn't waste any more vinyl then I needed too.

I then set about pealing off the unused vinyl and weeding out the bits inside the closed letters.  What I was left with was beautiful 😍 and beauty is in the eyes of it's beholder and I was chuffed to bits with it!!


So at this point I should have got my transfer tape out, rubbed the vinyl onto it then transferred it onto my bottle but I was way too excited for that - I pulled it off gently like it was a big sticker and then carefully laid it on to my bottle.  In my excitement I put on and rubbed down the "Mrs" part of the design I then didn't have enough room for the "S" grrr.  If I'd used the transfer tape as I was meant too  it all would have fit lovely.  As it happened I added the "S" underneath and it all worked out well any way!


So after my first successful vinyl mission I ordered a stack load of plain water bottles to make literally every person I know a personalised one (I am obviously grossly exaggerating my level of purchasing power if my dear sweet husband is reading this blog and have only bought one or two 😜)

Anyway until next time - happy vinyl cutting!!

Best wishes

Steph x


Saturday, 28 April 2018

#Get Crafty - HTV Aprons


Ops! I have noticed that my e in pretty needs the centre taking out - I will put it back into the heatpress and rectify that. 


Hello, hello - Karen here to show you a little surprise project I made earlier in the month.

I go to a retreat, twice a year, with a group of friends.  All nine of us are there at the April retreat but usually only seven of us go to the October one.

As we were all going to be together I wanted to give all the girls a little surprise so I bought some black aprons and added decoration with pink sparkly htv.  We call our little group 'the Makers of Pretty thingS' (yes the capital letters are in the right place) and so I made a file with this on and added the cut file #getcrafty to the bottom.

You can see us all modelling the aprons in this photo


and in this photo they are all in use. 


I am so glad I made them as my one saved my new jeans from an epic spillage of gold texture past and Helen's saved hers from a Glossy Accents spillage!


Friday, 27 April 2018

Decorative Kitchen Stool - Adhesive Vinyl or Heat Transfer?

Decorating a wooden IKEA kitchen stool with heat transfer (HTV) or sign vinyl. By Janet Packer (Crafting Quine) on the Silhouette UK Blog.


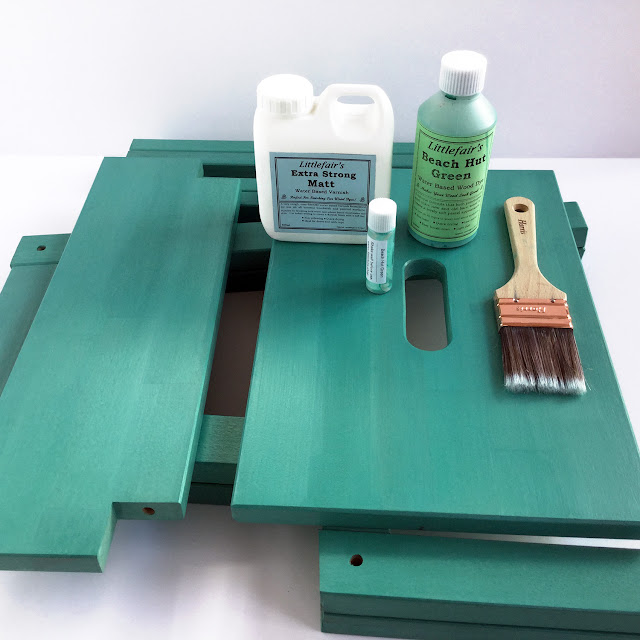
Hello,  Janet here with a great home decor idea, a decorative kitchen stool. I've used vinyl to decorate a self-assembly wooden stool that was previously sanded, but otherwise untreated. I firstly applied water-based wood dye and varnish to colour and protect the wood, and then came the fun part ... the decoration.

I knew I wanted to use the Hollyhocks designs by Nic Squirrell from the Silhouette Design Store, but I didn't know whether to use regular permanent vinyl (adhesive sign vinyl), or heat transfer vinyl. I decided to do a little experimentation to see which I liked best. I'll take you through my testing and decision making process.


Materials Used
Silhouette Smooth Heat Transfer Material, Heat Resistant Sheet, and Iron, OR
Silhouette Glossy Permanent Vinyl, Burnishing Tool, and Transfer Tape,

Hook Tool
Silhouette Cameo® 3
(optional) Silhouette Large Cutting Mat (12" x 24")
Flat Pack Wooden Stool (e.g. IKEA Bekvam)
Water-based Wood Dye and Varnish


Preparation

I treated the stool parts with water-based wood dye and water-based varnish.  Using water-based products is important, not least because of the lack of strong odours, especially when I applied heat to the heat transfer vinyl. I've included more details about the preparation process over on my Crafting Quine blog, so pop over if you want to learn more about that.

Decorating a wooden IKEA kitchen stool with heat transfer (HTV) or sign vinyl. By Janet Packer (Crafting Quine) on the Silhouette UK Blog.


Which type of Vinyl?

I had cream vinyl in both heat transfer and regular adhesive vinyl, and having done a bit of research I considered the pros and cons of using each one.

I'd used both types before, so knew that both would be suitable for cutting and weeding my chosen design. I thought the adhesive vinyl would probably adhere to the surface ok, but didn't know how long it would last or if I could apply it bubble-free. I'd heard that heat transfer adheres well to surfaces treated with acrylic varnish but hadn't tried it for myself. I had an idea that it would probably stand up to wear and tear better than regular vinyl. Lastly, I didn't know which one would look better.

Carrying out a little test was the obvious course of action, so after I'd allowed the surface to dry and harden I tested out the two types of vinyl on the on the underside of the stool top using this little rose design.


Decorating a wooden IKEA kitchen stool with heat transfer (HTV) or sign vinyl. By Janet Packer (Crafting Quine) on the Silhouette UK Blog.

The heat transfer (on the left) adhered fine when ironed, and the adhesive vinyl, on the right, adhered perfectly with some rigorous burnishing. The design surface of the heat transfer was more raised, but was less shiny. There seemed to be a slight amount of shrinkage on the heat transfer, but there was only a tiny difference when measured. At any rate, I opted to use the heat transfer as I preferred the more matte appearance.


Preparing the Design

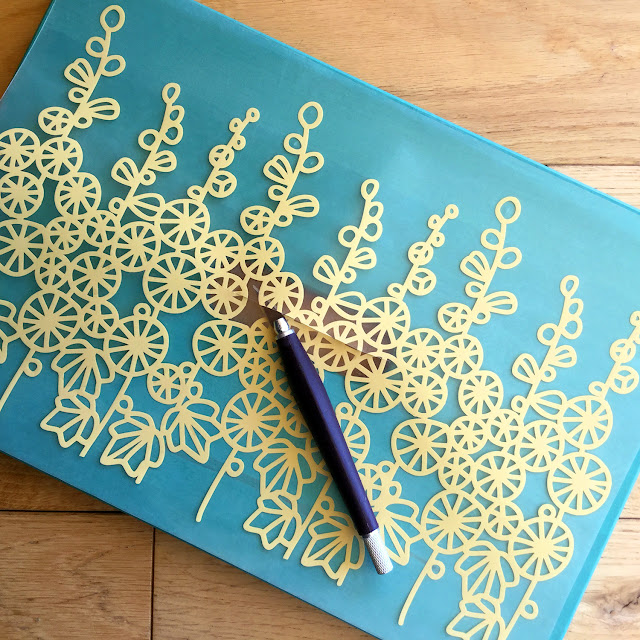
I selected the Hollyhocks Repeating Border by Nic Squirrel, (available in SVG as well as STUDIO format) for the stool top, just increasing the size to fit. For the lower step I used one of the Hollyhocks Papercut Flowers, using the knife tool to cut away a small part of the design.


The two designs were arranged onto the large cutting mat. The rectangle on the left represents the top of the stool, placed there to gauge the scale of the designs. I still prefer to use a mat when cutting vinyl, mainly because I don't want to bother moving the rollers. The default cut settings for 'Heat Transfer - Smooth' cut perfectly, your ideal settings may differ.


Preparing the Heat Transfer Vinyl Decals

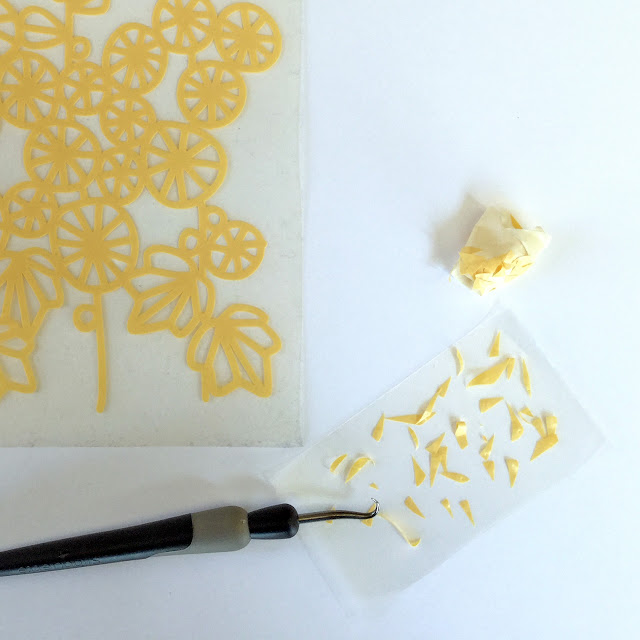
I won't pretend that weeding this design was a quick job, but well worth the time spent. Initially, I removed the unwanted parts from around the outside of the design and then the interior parts, working methodically from one end to the other. I found having a piece of sticky transfer tape to hand was useful for capturing the newly weeded pieces. For other small pieces I wrapped a piece of masking tape, sticky side out, around my index finger, and used it to remove larger pieces that I'd lifted by bending the design.


Decorating a wooden IKEA kitchen stool with heat transfer (HTV) or sign vinyl. By Janet Packer (Crafting Quine) on the Silhouette UK Blog.


Adhering the Heat Transfer Vinyl

Rather than cut the shape of the hand hole out of the design on the Silhouette, I chose to cut the design intact, but to make a slit in the design before applying heat.  The slit allowed me to trim away  the design inside the hole with a craft knife and scissors once the design was adhered. Then I was able to fold the remainder of the design over the bevelled edge and use the tip of the iron to adhere the edges inside the hole.

Decorating a wooden IKEA kitchen stool with heat transfer (HTV) or sign vinyl. By Janet Packer (Crafting Quine) on the Silhouette UK Blog.


I used an iron on medium/high setting (steam turned off) and covered the design with a heat resistant sheet, applying pressure to one section to a count of ten before onto the next section. I repeated this three times across the whole design and allowed the piece to cool slightly (WARNING - It gets very HOT, a good reason to use non-solvent based wood products). Then I cautiously peeled back the edge of the backing. Where the design hadn't adhered completely I pressed it again. When it was all stuck I carefully peeled away the backing sheet, then cut away the centre, and ironed the decal edges onto the bevel edge of the hand hole.

Decorating a wooden IKEA kitchen stool with heat transfer (HTV) or sign vinyl. By Janet Packer (Crafting Quine) on the Silhouette UK Blog.


When the steps had cooled I assembled the stool.

I was so pleased with how it turned out. It looks great at the end of this kitchen unit and matches my blinds and kitchen clock perfectly.  I'm not sure how hardwearing it will be, but I intend to mainly use it as a decorative piece.


Decorating a wooden IKEA kitchen stool with heat transfer (HTV) or sign vinyl. By Janet Packer (Crafting Quine) on the Silhouette UK Blog.


Have you decorated wooden items with heat transfer? We'd love to see them. Why not share pics on the Silhouette UK Facebook page?


Bye for now,
  Crafting Quine BlogInstagram @CraftingQuine


DESIGNS USED:


PRODUCTS USED:
Wednesday, 25 April 2018

Design of the Week - Puppy Face - 23 April 2018


Hello, hello Silhouette fans, Karen here with how I used this week's free design - Puppy Face.

This was another fortunate turn of events as my daughter and her partner have recently acquired a new Curly Coated Retriever puppy.  Also, as they had been away to the Lake District for a few days there were plenty of photos of them with 'Baby Isla'.

I decided to use the design as a border for a scrapbook page and wanted to backfill the ears and tongue so after downloading and resizing the design changed the outline of the ears and tongue to a blue line.  I then repeated it around my page.

I used this design as my title


Remembering from above that blue lines = cut and red lines = sketch pen, I changed the outline to blue and gave it an external offset, changing the colour of this to red.

Lastly I added some journaling using Sister's Sketch font and a line border around my page.


This is how my design area looked with the red and blue outlines.


After sketching and cutting my design I backfilled the title and ears in black and the tongues in pink. I also decided to colour the eylashes, nose and spots with a black pen.


All that was left to do was to add my photo and fussy cut some elements to add to my page.


Monday, 23 April 2018

Bullet journal pencil case HTV Decal


Hi everyone. It's Verity here from Pretty Little Button bringing you another project. This week the design team has been asked to use Heat Transfer Vinyl in a project. I decided this was a perfect time to decorate a burlap zipped pouch I had been given as an Xmas present and wanted to use this to store pencils in for my bullet journal. Now I have used HTV before, however, not the Silhouette brand, nor have I layered before. So this project had a few new experiences for me. I did find that the Matt white HTV to feel thinner than previous brands, however, I found it adhered very quickly with an iron, much better than previous brands I had used. Another new experience for me was Glitter HTV. When I first cut it, I didn't think it had cut, but when held at an angle in the light I could see it had. One thing to note, I found it more bothersome to weed than the matte white but it still gave a good end result. So read on to pick up any tips and pointers on my first try at layering HTV.


Bullet journal pencil case HTV Decal details:

To start off, draw a shape the same size as the area you wish to add your HTV too. Mine was a pencil case, so a fairly straightforward shape. To adjust the measurements accurately, you can use the aspect ratio button on the top bar (looks like a double ended diagonal arrow). To see this icon, you must have you shape selected.


Next, place your design inside the shape and adjust the size according. I wanted to layer a shadow outline of vinyl to my design, so I added an offset as seen below with the offset panel. This is the 'Double star' icon on the right-hand panel. You can adjust the size of your offset by changing the distance. When happy, click apply. 


Separate your two designs, the main text and the offset from one another and group individually. Now you can add a little box around your design as this may make it easier to weed, but you don't need it. At this point, you can also discard the blank shape you used at the beginning. From an old habbit before the feature was added to the programme, I always flip my design horizontally at this point. Remeber with HTV you need to mirror/ flip your design horizontally, as when the machine cuts, it will cut into the back of the design. This back will the be place down on to your item to HTV and your design will appear the correct way round. 


However, if you forget or don't mirror at this point, the programme will now remind you to mirror when your have HTV set as your material to cut . As you can see below when I press the send button, it asks 'Have you mirrored?'. I selected 'send as-is' as I have already flipped my design, but if you have press 'send mirrored' and it will cut it mirrored for you.


My tips on ironing with HTV:

I don't have a lovely heat press for HTV, I don't do enough to warrant buying such a machine, so I still use an Iron and it works well for me. However, I have learnt a few things to improve my press with an iron. I turn my iron on full heat and allow this to warm up for quite a few minutes before I even contemplating it. I use a hard surface to iron on, by ironing board has quite a bit of giving in it when you press down on it. Not ideal for pressing, as you want to press on a very solid surface for a good press. So I find a towel folded over several times on top of my table works very well.

I also like to press with a piece of baking parchment over the top. This means I won't melt the plastic backing onto my iron or project. When I can see the HTV has started to adhere, I peel the back off and then cover with the paper again to continue my heat press until I can see the grain of the fabric showing through the HTV. When I see this I know I have a good seal and the HTV has adhered.

As I was wanting to layer my items, it was important not to overheat and press the first layer - the white matte HTV. I pressed this just enough to see a little of the grain showing - only ever so slight. This was enough for me to remove the plastic backing from the HTV. Then before pressing the white again, I layered the gold glitter HTV over the top and pressed this like normal.


I hope this saying will remind me to continue to have a passion and my bullet journal is where the passion will have a purpose....if I make sure I use it!

 If this has inspired you to try this out, please post below. I would love to see it!

Until next time,

Verity


Profile Pretty Little Button Blog | Instagram | Facebook

DESIGNS USED:

Purpose fuels passion by Sarah Hurley -Design ID #249316

PRODUCTS USED: