Hello, Janet here with a post that just might help you out if you've left your party preparations until the last minute.
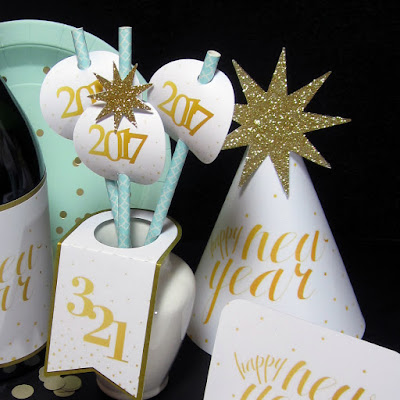
These ready-made New Year's Printable files are almost ready to cut - simply use the Silhouette software's ability to Print and Cut to create the items to make your party table and guests look super festive and then enhance them with some glittery bling! Even better, print them on to pearlised paper for an even more glamorous look.
WHAT YOU'LL NEED
Printable Paper or Card (pearlised paper is optional)
Pearl or Metallic Gold Paper
Silhouette Glitter in Gold
Silhouette Double-Sided Adhesive
New Year Bottle Kit by Amy Robison (#53314)
New Year Party Kit by Amy Robison (#53315)
STEP 1: PREPARING THE FILE
Open up the Bottle Kit file in the Silhouette Studio® software. The kit consists of a bottle wrapper and a set of 3 tags.
a. Firstly check that the label will fit around your bottle. Mine was a little short so I mounted it onto a longer piece of plain gold paper. Conversely, if it is too long, you can chop a bit off using the knife tool.
Use the eraser tool to remove the '2014' (note the extra eraser options in the designer edition and above). If a line is visible around the erasing, set the line colour to clear.
Move the '2017' into it's place.
STEP 2: PRINT AND CUT THE KIT
a. Set your paper size and turn on the registration marks. Fit your printables onto the page within the cut lines, check line thicknesses are set to zero and print out.
b. Check your cut lines are on and ensure that lines around the patterns and date are set to No Cut. Secure the printed page on to your mat, set cut settings for your media and cut out. If you have a problem with getting the registration marks to register follow the hints and tips in this post (Top 10 Tips to Troubleshoot Print and Cut).
c. For an extra bit of glamour cut an offset of the tags in gold paper.
The other kit contains a set of party printables to match. These include matching party hats, straw toppers, place cards, gift cards, confetti and mini envelopes. The file also includes a nine-pointed star which can be cut in various sizes from card and double-sided adhesive. I cut out a sheet of each and stuck them together then added a generous covering of gold glitter for extra bling.
My favourite is the mini envelope, cut from vellum, and filled with gold circle confetti. What fun your guests will have throwing the confetti to welcome in the New Year. I love to give these to the children who have managed to stay awake just before midnight to keep them occupied and allowing the adults to do some serious 'toasting in' of the New Year!
STEP 3: ENJOY THE PARTY!
I'm sure you'll have a fun and successful party and would like to wish you a very HAPPY NEW YEAR.
Here's hoping 2017 will be your best crafting year yet!
DESIGNS USED:
 |
 |
 |
PRODUCTS USED:
 |
 |
 |
 |
 |
 |
 |


