Wednesday, 31 January 2018

Design of The Week - Valentine Party Garland


Hello, hello Karen here to show you how I used this week's free DOTW - Valentine Party Garland.


Rather than use it as a party garland I decided to make a circle of the lip shape and outline them in red.

I also made a little garland of lips across the bottom of my page and stitched these into place with red thread.


How fortunate that one of the filters on Snap Chat today was lots of red lips - so I took a quick photo to add to my page and once I had added a plentiful supply of embellishments, my page was finished.


My Blog

Tuesday, 30 January 2018

Make Custom Photo Panels using Print & Cut and Large Cutting Mat

Use Print & Cut and the large Silhouette Cutting Mat to make custom photo panels for your light box. Designed by Janet Packer (Crafting Quine) for the Silhouette UK Blog for


Hello,  Janet here again, with a post using Print & Cut with the large cutting mat. I've customised a light box with a large photo, using my Silhouette® Cameo to make perfectly sized panels.

I'm a bit late to the light box party, but have been looking at getting one for ages, so I was really pleased to receive this one as a Christmas gift.  I've seen that you can buy photo panels to go in the light boxes, but I wanted to make one with a photo of a place dear to my heart. Because of the size of my light box, a tad over A4 size, I used A3 paper and the larger Cameo cutting mat  (the Silhouette 12-Inch x 24-Inch Cutting Mat).  With the larger mat I was able to make a giant Print & Cut and make panels that were the perfect size for my light box. The instructions below will show how you can do it too (and maybe help with any large-scale Print & Cut projects you are thinking of undertaking). Of course, if you have a smaller lightbox, you could make the panels with the regular cutting mat.


SUPPLIES REQUIRED:

A3 Printer Paper
Large Format Printer (A3 or bigger)
Silhouette 12-Inch x 24-Inch Cutting Mat
Silhouette Cameo® 3


INSTRUCTIONS: 


STEP 1. Bring in Photo and Adjust Page Settings. Open the Studio software and then bring in your digital photograph (File > Open, then navigate to your photo, select and click OK {or drag it onto the mat if you have Designer Edition or above}).  Adjust the page and mat settings for A3 paper and the 12" x 24" cutting mat (Page Setup panel, Page Size tab, choose A3 page and Cameo 12" x 24" mat).

Custom Lightbox Panels by Janet Packer (CraftingQuine) using Print & Cut and the Silhouette Cameo Large 12" x 24" cutting mat. Tutorial written for the Silhouette UK Blog.


STEP 2. Adjust Printer Settings. In the same panel and tab, click the 'Show Print Border'. In the main menu (at the top of the page), click File and select Page Setup Menu. Choose your printer and change the paper size to A3. Ensure printer paper size is set to 100%, or Actual Size, NOT Borderless (if you have that option). A grey box indicating the print boundary should be displayed on the virtual cutting mat. NOTE: If the grey box aligns with your paper edge you've got borderless turned on, turn it off!

Custom Lightbox Panels by Janet Packer (CraftingQuine) using Print & Cut and the Silhouette Cameo Large 12" x 24" cutting mat. Tutorial written for the Silhouette UK Blog.


STEP 3. Adjust Photo Dimensions. Measure the height and width of the front face of your light box. Draw a rectangle, select it and then open the Transform panel and the Scale tab, enter the light box dimensions and click Apply.

Custom Lightbox Panels by Janet Packer (CraftingQuine) using Print & Cut and the Silhouette Cameo Large 12" x 24" cutting mat. Tutorial written for the Silhouette UK Blog.


Holding down the shift key, reduce (or enlarge) the size of the photo until it is slightly larger than the lightbox rectangle.
Custom Lightbox Panels by Janet Packer (CraftingQuine) using Print & Cut and the Silhouette Cameo Large 12" x 24" cutting mat. Tutorial written for the Silhouette UK Blog.


STEP 4. Prepare the Strips.  Measure the height of one of the letters that fits in the light box (assuming your light box came with some letters, if not measure one of the gaps from the side to see the full size of the opening ). This is the height that you'll make each strip. Enter the dimensions with the padlock open (width remains unchanged) in the Transform panel and press Enter.

Custom Lightbox Panels by Janet Packer (CraftingQuine) using Print & Cut and the Silhouette Cameo Large 12" x 24" cutting mat. Tutorial written for the Silhouette UK Blog.


STEP 5. Make a Printer Gutter. Create an external offset of the rectangle (select the rectangle, pen the Offset panel, select Offset and click Apply). The default of 2 mm is perfect. The inner rectangle will be the cut line, and the outer rectangle is the extent of the printing.

Custom Lightbox Panels by Janet Packer (CraftingQuine) using Print & Cut and the Silhouette Cameo Large 12" x 24" cutting mat. Tutorial written for the Silhouette UK Blog.


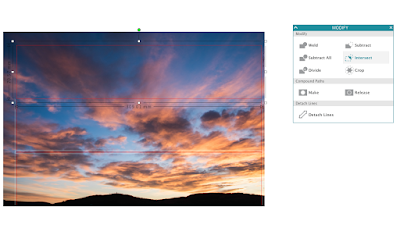
STEP 6. Make the Strips. Duplicate the rectangle twice and align all three on the photo with minimal gaps, but no overlaps. Discard the large rectangle. Copy the photo and paste it twice (right mouse click, select Copy, select Paste in Front, select Paste in Front again), now you have 3 copies. Send them to the back (select photos, right mouse click, select Send to Back).  Open the Modify panel, select one of the outer rectangles and one of the photos and click Intersect. Repeat for the remaining rectangles. You'll now have 3 strips. Change line colour of the outer edges of the strips to clear whilst leaving the inner rectangles red.

Custom Lightbox Panels by Janet Packer (CraftingQuine) using Print & Cut and the Silhouette Cameo Large 12" x 24" cutting mat. Tutorial written for the Silhouette UK Blog.

STEP 7. Prepare to Print. Turn on the Registration Marks (open Page Setup panel and Registration Marks tab, select Style, Type 1). Select all the strips and rotate them, and position them on the virtual mat.
(Optional) To save paper and reduce the distance the mat needs to travel, open the Advanced Options and use the slider on the Bottom Inset to move the lower registration mark closer to the strips. 


Custom Lightbox Panels by Janet Packer (CraftingQuine) using Print & Cut and the Silhouette Cameo Large 12" x 24" cutting mat. Tutorial written for the Silhouette UK Blog.


STEP 8. Send to Print. Check that the strips are within the Cut and Print borders (turn them on if necessary). Send the file to your printer ensuring that A3 paper is selected in Print Page Setup.


Custom Lightbox Panels by Janet Packer (CraftingQuine) using Print & Cut and the Silhouette Cameo Large 12" x 24" cutting mat. Tutorial written for the Silhouette UK Blog.


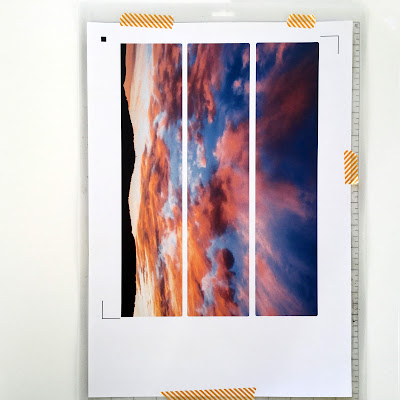
STEP 9. Prepare to Cut. Mount your print onto the mat and secure it with additional tape if your mat is getting less sticky. Load your mat.

Custom Lightbox Panels by Janet Packer (CraftingQuine) using Print & Cut and the Silhouette Cameo Large 12" x 24" cutting mat. Tutorial written for the Silhouette UK Blog.


In the Send tab select Cut by Line. Set the red lines to Cut and deselect the clear lines so that they won't cut. Select your media, adjust cut settings if necessary, and click the blue Send button.

Custom Lightbox Panels by Janet Packer (CraftingQuine) using Print & Cut and the Silhouette Cameo Large 12" x 24" cutting mat. Tutorial written for the Silhouette UK Blog.


The optical eye should first detect the registration marks, then auto-adjust the blade and commence cutting.
Custom Lightbox Panels by Janet Packer (CraftingQuine) using Print & Cut and the Silhouette Cameo Large 12" x 24" cutting mat. Tutorial written for the Silhouette UK Blog.


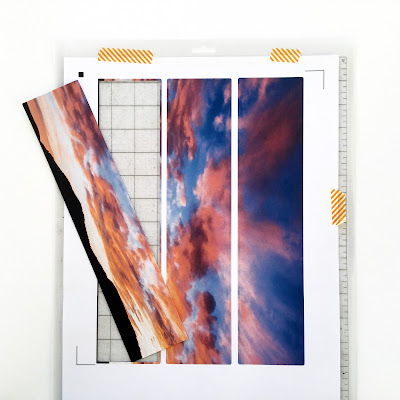
STEP 10. Install the Strips. Remove the strips from the cutting mat and simply slide them into the slots on your light box.  

Custom Lightbox Panels by Janet Packer (CraftingQuine) using Print & Cut and the Silhouette Cameo Large 12" x 24" cutting mat. Tutorial written for the Silhouette UK Blog.


Add letters as required.

Custom Lightbox Panels by Janet Packer (CraftingQuine) using Print & Cut and the Silhouette Cameo Large 12" x 24" cutting mat. Tutorial written for the Silhouette UK Blog.


This photo, of the view from our house, was taken by my husband (there are SOME advantages of living in north east Scotland)!  I'd love to see what photos you put in your light box. Why not share them on the Silhouette UK Facebook page?


Bye for now,


   Profile | Crafting Quine BlogInstagram @CraftingQuine


PRODUCTS USED:

Sunday, 28 January 2018

Catch you later!

Hello and welcome to my blog post!

I've been using my Silhouette Cameo a few weeks now and loving it - my last cutting machine was one with a crank handle so you know what type of upgrade this is!

Whilst I was cutting a card for my Mum's birthday this week.  I selected a cut file from the store https://www.silhouettedesignstore.com/view-shape/57428 , sent it to print as normal and I noticed there were places where the blade had caught the paper.  I made up the card and my Mum loved it but I wasn't totally happy with the little catches (she didn't even notice, but you know how critical us crafters are!!)


So I decided (after taking some advice from some of my design team) to adjust the auto blade (as some card stock is thicker than others)


I used a different cut file this time:

https://www.silhouettedesignstore.com/view-shape/232300


I was pleased with the result, as I had chosen a fiddly design (are you noticing a theme here??) it had noticeably less catches and had cut through my card stock very well. 


A Design Team member mentioned doing a double pass also but for some reason when I was using this it wouldn't cut in the same places so ended up in a bit of a pickle, but it has given me food for thought and I need to perfect this process to use it for a future blog post!
I'm going to have to keep this weeks short and sweet. I'm off for a weekend getaway with my lovely crafting ladies.
Until next week, happy crafting.
Steph xx


Saturday, 27 January 2018

Winter Gift Boxes

Hey there, Niki here today with some super cute winter gift boxes. I wanted to make these for little Christmas gifts but I don't do traditional Christmas colours, it's just not my thing, so I made something wintery, rather than Christmassey.


These little boxes came out super cute, they didn't take too much time to make (and I made 20 of them!) and they were easy to put together. I used them as table gifts for people at a crop I went to, and they also served as teacher and teaching assistant appreciation gifts too. I filled them with chocolate coins.

I initially went looking for a cute box 3D cut file in the store that I would be able to make 20 of quite easily but I got sidetracked by all the really gorgeous designs in there! I eventually decided upon this Christmas Candy Box House:

But when I opened the design on my screen it looked like this:

I find complex designs like this to be really daunting and my initial reaction is to immediatly close down the design and pick something else. The best thing to do when faced with a design like this is to use the Fill tool.

On screen I figured out what each part of the design was and used the drop down Fill menu (top left) to colour each shape. Whilst doing this I decided to do away with the chimney (that was going one step too far!) and choose to cut some of my pieces in the same colours ie the bows, trees and candy canes were all going to be the same colour. From this point, it is then, visually, very easy to see what needs cutting and how it will all fit together.


I focussed on the main body of the box first of all and arranged it so I could cut two on a sheet. I then cut 20 of these...

I then arranged the white items and cut 20 of each...

These are the white bases...

 and then I moved onto the nows and trees. I decided to cut the bows from white glitter paper and the trees from teal spotted card so I needed to arrange them on the mat in such a way that I could load the two different materials onto the mat at the same time.

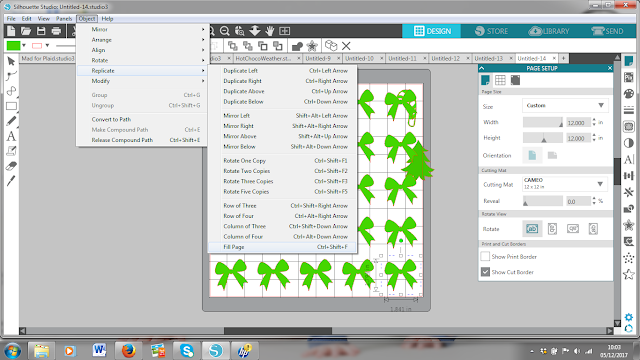
Needing 20 bows, instead of copying and pasting 20 times, I selected one bow then went to the Object Menu, Replicate and selected Fill Page at the bottom. This filled my mat with bows, 25 in fact. The are all nicely spaced apart but this wastes cutting material so I re-arranged them so they were all close together.

Here are my bows all squashed together. I releated the same action for the trees and sent it to cut.

and finally, these were the windows.

With all those pieces cut all I then had to do was assemble and fill the boxes, my favourite part.


 I absolutely loved making these little boxes and loved giving them away as gifts too.

What 3D box files take your fancy from the Design Store?

Happy scrapping xx 

Find me on my own blog: Being Scrappy and on Instagram as @nikiclaire


DESIGNS USED:


PRODUCTS USED:


Friday, 26 January 2018

Making A Bespoke Snowflake Background.


Hello, hello - Karen here with a tutorial about a background I made recently.  Well truth be told I was stuck in a hotel room with a husband in the throws of a migraine and nothing to amuse myself with but my tablet, which of course has Silhouette software on it.

I decided to try and make a bespoke background using circles and snowflakes.


  • The first thing I did was to draw a series of different sized circles and arranged them on my design space. 

  • I then added an offset of 0.125


  • This was the result. 

  • The next step was to highlight all the shapes and make them into a compound path. 
  • I then filled each circle with a snowflake, making sure that the points of the snowflake overlapped the edge of each centre circle. 

  • Once all the circles were filled I selected all and merged the shapes and this was the result.


All that was left to do was to cut my design from adhesive backed cardstock, add to a piece of patterned paper and it was ready to make my page.


My Blog


PRODUCTS USED:


DESIGNS USED: