Sunday, 31 March 2019

Sunday's with Steph - 12 x 12 Scrapbooking layout - Mixed media stencil


Hi there scrapbookers!

Welcome to this weeks blog post!!  So I am all geared up here to go off on a lovely weekend scrapbooking retreat and kick started my weekend by completing some of the pre retreat challenges.

My first challenge was to use some mixed media so I made a full back ground stencil from this cutfile https://www.silhouettedesignstore.com/designs/56922?search=bouquet+overlay&sortby=relevance&submitted_search=true and true to form I cut it on my regular favourite Bazzill basic white paper , cardstock textured heavy which passed through the blade twice.  Once cut I positioned my cutfile over my back ground card and spread texture paste all over the cut out areas.  I peeled the cutfile off immediately and put aside to dry.


Once dried I flicked gold paint across the paper and then added a floral border.  I added my photo just off centre and added some fussy cut flowers around the edges and tucked a piece of coordinating spotty white and blue paper to the top right hand corner.


I found some navy flowers and added them around the photo and added a small title to the top right hand corner before adding my main title to the page.


I really liked making this layout of my Dad and I... the reason for the title is that's what he calls me as I'm his eldest child!! Thank you for reading....until next time scrapbookers…

Steph xo

Thursday, 28 March 2019

How to create a personalised calendar using carbon fibre vinyl


Hello everyone. Here at Helens Craft Studio we love to try and be organised and our white board calendar needed a bit of love and attention. In this video tutorial I show you step by step how to create a beautiful personalised white board calendar.

Thank you for watching our video. We love how well this calendar turned out. I cant want to get it hung up in the craft room! 

Helen :) 

How to Screen Print a T-shirt with the Silhouette Screen Printing Kit

Hi everyone :) Today I am going to share a video with you on how to use the Silhouette Screen Printing Kit. Here at Helens Craft Studio I have enlisted my 10 year old niece to have a screen printing day to make some cute personalised t-shirts for her.


Materials Needed 

Silhouette Cameo
Blank t-shirts (we used two from ASDA)
Cute fox design number 274512


As you can see we had an amazing time creating this project. It is a great little kit to start your screen printing journey with your Silhouette. We did have a few problems but these were easily resolved by changing our technique and also completely avoidable next time we use the kit.

If you have any questions about Screen printing or tell us about your experiences then please leave a comment below.

Helen :)

Wednesday, 27 March 2019

Design of the Week - 3D Flower - 26th March 2019


Hello, hello - Karen here with my Wednesday DOTW post.

The DOTW is a really lovely 3D flower with leaves.


As you can see I constructed mine a little different to the one above as I wanted to use it on a layout and when I folded it how it was intended it was a little too bulky even for me!


When you open the file the flower is huge so I wonder if it is intended for home decor rather than for cards or scrapbook pages. 

I started by reducing the size of the design using the scale panel and then copied them and reduced them again to 80% for the smaller ones.


I also reduced the size of the leaves and added a line along the centre of each one which I set my Silhouette to score. 


I decided not to use the centre of the flower but to added a small cabochon to the middle of my flowers. 


I started constructing my page by firstly adding a sketch pen border to my page using this design and making it 11.5 ins square.


I also used this design form my title and photo frame.  


All that was left was to put my page together - I curled each layer of my flower


then I added some gems and rose gold splashes.


Monday, 25 March 2019

Silkscreen printed cushion - Create Happiness


Hello, it's Verity here from Pretty Little Button. This week is Silkscreen week, so I have another post for you using the Silkscreen starter kit from Silhouette. I have done two previous posts on using the kit, one the unboxing showing you what comes with the kit and also how to cut and print your first design. Check the links at the end of the post to both of these posts for more details. Now I had in mind to create a cushion, however, I knew the design I wanted would be a one of design - I wasn't going to be printing this more than once. Instead of using heat transfer vinyl to create a permanent screen I have used regular adhesive vinyl for a temporary screen which is removable. This allows you to apply another design to the screen and print through that as well. Now, bear in mind, you will get ghosting, which I have pictures below, but the screen is still usable.  If it stretches your supplies, there's no harm!


Silkscreen printed cushion - Create Happiness process:


To start off, add your design in your design space. I use the Antelope font for 'create'. The aperture of the screen measures a US letter size, so select this in the paper size drop down menu in the Page stupe window. 


As I wanted my text as large as I could, I wanted to orientate my page in the landscape orientation which is in the same Page Setup window.  


The beautiful of making these adjustments to the page size allows you to position your design within the centre of the page using the transform window. 


Now I decided, I wanted my text even bigger and therefore separated the two bits of text from one another. The using the rotate feature (little green circle above the text), I could rotate the word at a diagonal across the design space. This gives more room to enlarge the design. 


Now I recently did a mini screen printing workshop and notice that they use adhesive vinyl for their screens but placed the vinyl on the underside of the screen - so it is positioned between your fabric and screen. This allowed for a much smoother pull of the paint over the screen without your scraper catching on any vinyl edges. 

Therefore I flipped my design horizontally so I could adhere the design onto the back of the screen and for the word to print the correct way round. If you design to adhere your design to the top of the screen you do not need to do this. 

Once cut, weed out the positive aspect of the design as seen below. 


I then adhere this down to the underside of my screen. I had a few areas where there was no vinyl cover the screen around the edges. To prevent pain accidentally going through where it isn't wanted added non-porous wash tape around the edge to seel the screen. 


Once flipped over, you can see the vinyl through the screen and the phrase reads correctly. My wooden slats were a little loose on the edges, so I kept them in place with some micropore tape. 


Once I had printed the first design, I removed the screen from the frame and removed the adhesive vinyl. Next, I washed the screen and dried it. As you can see below, you can see a 'ghost' of the screen I just did. The screen is coloured but this does not add affect the screens ability to print in those areas as long as you wash your screen straight away. 


Below I adhered my second design to the screen - you can see the ghost of the previous screen but you are able to see the newer design over this. 


Silkscreen printed cushion - Create Happiness photos:


The gold fabric paint printed beautifully and is such a strong opaque gold. I had a little slippage with my screen when printing and unfortunately got a double printed 's'. Oh well, it's just for my craft room anyway!

 Unboxing and assembling silkscreen started kit      

 Cutting and printing a design


If this has inspired you to try this out, please post below. I would love to see it!

Until next time,

Verity


Profile Pretty Little Button Blog | Instagram | Facebook

FONTS USED:

ANTELOPE by Polem, Design ID#251515

PRODUCTS USED:
     

Sunday, 24 March 2019

Sunday's with Steph - 12 x 12 Paige Taylor Evans scrapbooking post


Hello!


Welcome to this weeks blog post!!  I am just loving scrapbooking at the moment and rarely do anything else...it's soooo much fun!!


I made this layout at a recent re-treat, I was especially pleased with this layout as I had managed to join my daughters love for travelling and her love of Disney using the song from Aladin "A whole new world" as  a title.  


Again I have used a Paige Taylor Evans cut file.  This one is of a globe, I've seen it used lots...it's so versatile!  https://www.silhouettedesignstore.com/designs/237205?search=page+evans+globe&sortby=relevance&submitted_search=true Anyway I cut this out on my absolute favourite paper Bazzill Basics (cardstock, heavy with two passes) and then set to work on my layout.


I used a sheet of bobble textured paper also from Bazzil which I gutted to create a border and then trimmed the pink gingham paper down to 11 x 11. 


I centrally placed the globe on the paper some layers on foam risers to give the layout some depth.  Then I started on my main cluster.  My photo was a polaroid style photo which I popped on top of a strip of green and white paper that had been rounded at the edges.  This piece of paper acted almost as a "shelf" for my embellishments and I then started stacking in front and behind it layering up the flowers, type writer and sequins.  


I then popped the heading on and added a few banners to the top right hand corner, a heavy dashing of sequins and some enamel dots, which I thought looked like destinations but were actually positive sayings and that was it!


Thank you so much for reading my blog post this week....


Until next week, happy crafting!!


Steph xo 

Saturday, 23 March 2019

Make a 3D Lightbox using Carbon Fibre Vinyl

Make your own 3D Cardstock Lightbox - Using Silhouette Carbon Fibre Vinyl - by Janet Packer https://craftingquine.blogspot.co.uk for GraphtecGB Silhouette UK Blog.


Hello, Janet from the Crafting Quine Blog here using the Silhouette Carbon Fibre Vinyl and saying farewell* with a 3D Lightbox design. This speciality vinyl is available in black with a pattern that gives the look and texture of carbon fibre in an easy to apply material. For this project I have applied the vinyl to cardstock which I then used to make the box. I also used it in a more conventional way to make the letters.

The lightbox design (#251632) is from the Silhouette Design Store. I adapted it to take three rows of letters, which allows for longer words and then cheated on the letters, putting the  words onto long strips. Far quicker and less fiddly to change out than individual letters. Finally I added a string of led fairy lights inside.

Design ID #251832 in Studio and SVG format


DESIGNS USED:
Lightbox by Nilmara Quintella (#251632)
LW Perfect Type font by Lori Whitlock (#55159)


MATERIALS USED:
Black & White Cardstock
Shiny/Mirror Card, Paper or Vinyl
Strong Tack Transfer Tape
Liquid Craft Adhesive
Strong-Tack Tape Adhesive
Vinyl Scraps for Emojis
Silhouette Premium Carbon Fibre Vinyl
Silhouette Vellum
Set of Battery-Powered LED Lights

You'll find instructions for assembling the box on the designer's website and there is a link from the file's description in the Silhouette store. I'll just highlight the things I did differently.

HINT: The designer's instructions are in Brazilian, for English instructions just copy the link into a Google search and you get the option to translate the page. 

Preparing & Cutting Carbon Fibre Cardstock
Cut a piece of vinyl slightly larger than the box base and smooth it onto a piece of black cardstock. Cut the piece, increasing the blade depth and force as necessary, to cut all the way through. Use a bone folder to make crisp fold lines.

Make your own 3D Cardstock Lightbox - Using Silhouette Carbon Fibre Vinyl - by Janet Packer https://craftingquine.blogspot.co.uk for GraphtecGB Silhouette UK Blog.

Adding Reflective Panels
Use the panel pieces cut from mirror card to line the reverse of the box if you have it. I didn't, so I used some sticky-backed reflective paper that I had on hand. In this photo I've left the backing on at the ends of the long strips. When assembled these can be removed so the reflective paper hides the  box tabs on the inside also giving a bigger reflective surface.

Make your own 3D Cardstock Lightbox - Using Silhouette Carbon Fibre Vinyl - by Janet Packer https://craftingquine.blogspot.co.uk for GraphtecGB Silhouette UK Blog.


Add Extra Supports
The translucent part of the lightbox is effectively an adapted box lid. In order to add an extra line of text it is necessary to cut an extra centre support bar. I'd also recommend cutting extras of all of the bars in case they don't all fold straight. It is also necessary to add one extra aperture and reduce the height of the existing apertures in the lid. Check they are all of the same height, evenly aligned, and are equally spaced using the alignment and spacing tools in tools in the transform panel.

Make your own 3D Cardstock Lightbox - Using Silhouette Carbon Fibre Vinyl - by Janet Packer https://craftingquine.blogspot.co.uk for GraphtecGB Silhouette UK Blog.


Applying Vellum
Vellum is applied to the reverse of the lid. I recommend a strong adhesive tape so that no excess glue can get onto the vellum.

Make your own 3D Cardstock Lightbox - Using Silhouette Carbon Fibre Vinyl - by Janet Packer https://craftingquine.blogspot.co.uk for GraphtecGB Silhouette UK Blog.


Adding Lights
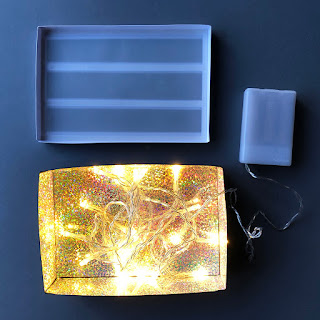
Here are the assembled top and base parts of the box with the fairy lights inside.

Make your own 3D Cardstock Lightbox - Using Silhouette Carbon Fibre Vinyl - by Janet Packer https://craftingquine.blogspot.co.uk for GraphtecGB Silhouette UK Blog.

Arrange the lights around the edges of the inside, adhering them to the box sides using adhesive tape. For an even neater effect, adhere the battery pack in the box (with double-sided tape) and cut a small slit and a rectangle out of the side so that the controller can be switched on and off with the lid in place (then no-one has to see the light 'spaghetti').

Make your own 3D Cardstock Lightbox - Using Silhouette Carbon Fibre Vinyl - by Janet Packer https://craftingquine.blogspot.co.uk for GraphtecGB Silhouette UK Blog.


Text Cheat
Instead of cutting individual letters and mounting them on small acetate rectangles, cut strips of acetate and mount the words in carbon fibre vinyl directly to the strip. This isn't quite so versatile, but you can just cut more strips and vinyl when you need new words. So much quicker and less fiddly to change them out. With this method you can choose just about any font you want. I picked LW Perfect Type as its quick to weed and easy to read, but any cuttable font will do, even script fonts work (don't forget to weld any overlapped letters together before cutting though).

HINT: For ease of application, cut your letters in weeding boxes of the same size as the acetate strips. Place your acetate strip on a card strip cut to the same size so that is easier to see. Align your transfer tape with the top of the weeding box, lift the word, then align the top of the transfer tape with the top of the strip and burnish it onto the strip. 

Make your own 3D Cardstock Lightbox - Using Silhouette Carbon Fibre Vinyl - by Janet Packer https://craftingquine.blogspot.co.uk for GraphtecGB Silhouette UK Blog.


Layered Emojis
These crying emojis were made using layered vinyl. Using transfer tape, pick up the blue 'tears' first, then the yellow faces next, and finally the black circles (with weeding box the same height as one of the acetate strips as for the words). Then they are easy to align onto an acetate strip in the same way as the letters.

Make your own 3D Cardstock Lightbox - Using Silhouette Carbon Fibre Vinyl - by Janet Packer https://craftingquine.blogspot.co.uk for GraphtecGB Silhouette UK Blog.


You may have realised, if you've been following the Silhouette UK Blog for a while, that I have a passion for adding lights to my projects. If you have a weakness for lights too, you might like to check out these earlier projects.

Wedding Marquee Letters
Marquee Lights
Light Up Big Ben - Cutting Thicker Cardstock
Big Ben Lantern 
Light Up Cards
Light up Cards
Vinyl and Foil Lanterns
Vellum & Foil Lanterns
Polar Bear Luminary
Acetate Lantern


*Saying Farewell
This is the last regular post I'll be doing with the Silhouette UK Blog Design Team. I've been on the team since it started in 2016 and I'm away to do a real world job which won't allow me as much crafting time. I may be back with a special post now and again. Meantime you can catch up with my crafty creations (Silhouette and otherwise) at the Crafting Quine Blog.


Bye for now,

Janet Packer https://craftingquine.blogspot.co.uk for GraphtecGB Silhouette UK Blog.
  Crafting Quine Blog@CraftingQuine


DESIGNS USED:
 Lightbox by Nilmara Quintela  LW perfect Type font by Lori Whitlock


PRODUCTS USED:
 Carbon Fibre Vinyl  Silhouette Vellum  Silhouette Cameo 3