Tuesday 31 January 2017

Do more of What Makes you Sparkle


Hey there, Niki here with you today with an easy home decor project. Anyone who knows me knows that my favourite colour is glitter ☺and I have recently been feeling that my craft room NEEDS more glitter on the walls.

I had a naked wood frame that I wanted to decorate, so I measured the inside of the frame and set about making my design. I chose the word 'Sparkle' from the Design Store, and also selected the 'Fabulous' font and wrote the rest of the phrase. I re-sized until I was happy my design would fit inside the frame, and then cut the design out of a double sided adhesive sheet.

I weeded out all the letters and stuck the adhesive piece inside my frame. At this stage I lifted off the front 'backing' to reveal the adhesive below. I sprinkled with glitter in two different colours...

Using two different glitters gave me an 'ombre' effect which I always love. I then finished off the frame by adding chunky gold glitter to the shaped part of the frame and patterned paper to the large flat back part of the frame. Finally I added ribbon to hang it up with and a bow. The perfect addition to my craft room.


Thanks so much for stopping by, happy scrapping xx 


DESIGNS USED:
Sparkle
Fabulous Font

PRODUCTS USED:


Monday 30 January 2017

Preparing stickers to print and cut


Hi, Bev here with a short tutorial on preparing stickers for printing and cutting. I have discovered some gorgeous coffee cups from Doodlebug Design and I love the way they have turned out.

What you will need:
  • Silhouette Design Studio®
  • Silhouette Portrait® or Silhouette Cameo®
Step One:

Opening up a new page in your Silhouette Studio®. Import the design you would like to use from your library.


Begin to build the design placing the shapes on top of eachother. It helps to group the smaller items together before moving them to ensure they stay in the correct position


Change the outline colour to black to achieve an almost sketched look


Then group the design together by selecting all of the elements, right click and group


 Repeat this for the other coffee cup also.  Import the coffee graphic and recolour as required.  I chose black as I wanted it to tie in with the outline of the coffee cups


Resize to your requirements.  I chose a width of 1inch for the lettering and a height of 1inch for the coffee cup.  Ensure that the lock aspect box is checked to keep it in proportion.


Step Two:

Next we will create an offset to enable the stickers to be cut around as a whole rather than individual componants.  Select the cup and the lettering and click on the offset tool.  Select offset and click off of the design.


So far, all of the elements on the page are set to cut.  Select the cup and the lettering and set them to 'no cut'.  This will mean that only the offset that you created will be cut.


Then group together


Step three:

Set the page up with registration marks and make sure to have your settings on letter (which all of the Silhouette products for printing are)  Using the replicate tool, duplicate the designs to fill the page.
You can do this by duplicating right and then selecting the whole row and duplicating down.


And that is the preparation for your stickers complete.  You can use any of the designs from the Silhouette Studio® to make stickers, using the technique above.

I have enjoyed sharing with you and look forward to seeing what you create!


PRODUCTS USED:


DESIGNS USED:

Coffee Title - Cream & Sugar by Doodlebug Design Design ID#175408

Coffee To Go - Cream & Sugar by Doodlebug Design Design ID#175414

Sunday 29 January 2017

Previewing Files in the Silhouette Software


Hello,
Janet here again. Today I'm sharing some information about how to preview larger images of the files you have downloaded into the Silhouette Studio® software. You may already know this, but a friend pointed it out to me recently, and I thought it was too good a hint not to share with you all.

At the time of writing, the latest version of the Silhouette Studio® software is 3.8150. It is a Cloud-based version (i.e. it holds the Silhouette store-bought portion of the library [and potentially more] in the Cloud). If you are wondering how to find out what version of the software you have on your device skip down to the section **How to Check what version of Silhouette Studio® I'm running.


PREVIEW FILE IMAGES IN CLOUD VERSIONS OF Silhouette Studio®
(These screen shots are of Version 3.8150)


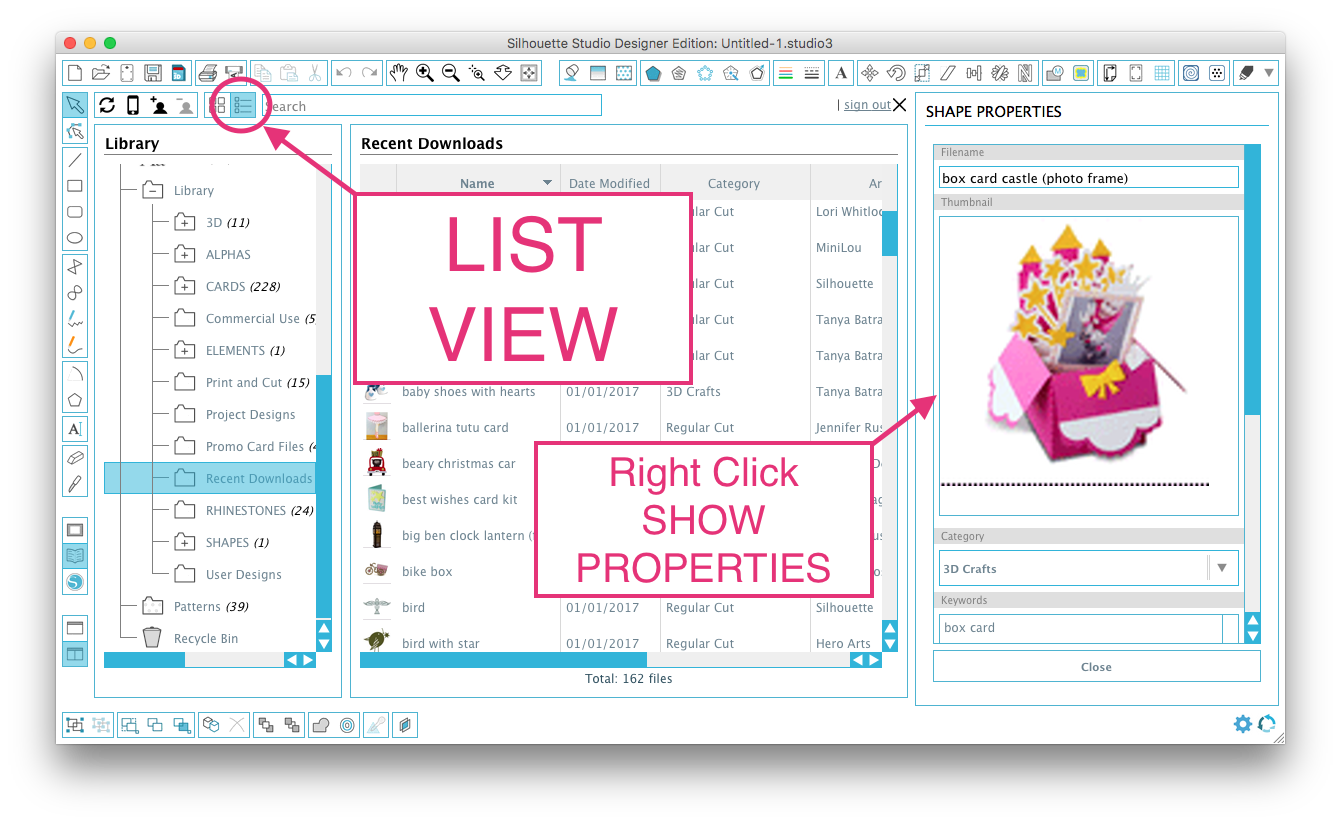
You can view your library in 'View as Icons' mode (default),

and also view them in 'List View' mode.

But did you know that when you right click with your mouse (Control + Click on a Mac), and select Display Properties, you can preview larger images of individual files with their details in this right-hand column?  

You can also do the same when you are in 'List View' mode.

Additionally, in 'List View' mode you can also sort your images by Name, Category, Artist, Date Downloaded, or Size by clicking on the column header titles. However, if you re-load the library, the Date Downloaded will be updated to the that of the re-load rather than the original download.

Just in case you wondered why some of the folders in these pictures are hidden, it is because I closed some folders to fit them in the display. You can expand and contract your folders by clicking on the folders containing a + and - respectively.


PREVIEW FILE IMAGES IN NON-CLOUD VERSIONS OF Silhouette Studio®


In older versions such as (3.6.57) pre-Cloud, you can also see a preview with file details, but the preview image is not as big as in the Cloud version.

Additionally, in 'List View' mode you can sort the Recent Downloads folder by Name (alphabetical) A - Z or Z to A, and files in other folders by Name, Category, Artist, Date Downloaded, or Size, by clicking on the column header titles, just like the cloud version.


**HOW TO CHECK WHAT VERSION OF Silhouette Studio® I'M RUNNING


Do I have a Cloud or Pre-Cloud Version?

You can tell that this is a pre-Cloud version by looking at the Library. The existence of the Local User Folder and the Cloud icon indicate that this is a Cloud version and here the user is signed into the Silhouette Cloud:

 The lack to those features indicate that this is a pre-Cloud version of the software:


How do I find my Version number?

a. On a Mac
On the top Menu Bar, select "Silhouette Studio" > "About Silhouette Studio".


b. On a PC
On the top menu bar, select Help > "About Silhouette Studio"


Both will display a box which looks something like this one - this is 3.6.57 Business Edition (pre-Cloud).

This one is 3.8.150 Designer Edition (Cloud):


MORE INFORMATION ABOUT Silhouette Studio® SOFTWARE

Currently available versions of the software from Silhouette America can be found here.

Answers to many questions about the Silhouette Studio® software are in their FAQs here .


I hope you find this information useful.

You can share your hints and tips on our Silhouette UK Facebook page.


Bye for now,


   Profile | My Blog | Pinterest | Twitter | Instagram


DESIGNS VIEWED:


PRODUCTS USED:
 Adhesive cardstock in Mint, Yellow and Stawberry  Double-sided Adhesive  Vellum