Showing posts with label Rhinestone Feature. Show all posts

Monday, 11 June 2018

Rhinestone feature take 3 - Sequins!


Hi everyone. It's Verity here from Pretty Little Button bringing you another project. So if you have seen my previous post you will have seen how I have tried using the Rhinestone feature in the Designer edition to create cards. The first used it in the traditional manner, but I also create a card with the waste from the template. You can find that post here. For the post last week, I used the rhinestone feature to help create cards with the use of my Nuvo drops, and you can find that post here. Today, the last in my little mini series in using the Rhinestone feature in Silhouette, I used it to create modern cards with sequins! Two cards I used to create a sentiment and one card I made a basic design pattern and converted this into a rhinestone pattern.

Rhinestone feature take 3 - Sequins feature detail:


For the Rainbow inspired card, I used the arc tool on the left hand tool bar. 


I drew a line horizontally until the length of the line was the radius I wanted for the arc.


 Then I drew an arc with 180 angle - the software lets you know the angle of the arc inside the small inner semi-circle, as seen below. 


To create additional, arcs, I copied and pasted the arc, gradually increasing the size of the arc each time. 


Now, if like me you aren't the best at lining your objects up, Silhouette has this sorted for you as you can use the transform window (three little bar icon on the right hand tool bar) to do just that. Make sure you are on the align tab in the transform window and select the align centre on the horizontal line. This will ensure they align up in the middle. To make sure they also align in height, you can select align bottom in the vertical section. 


To convert this into a rhinestone pattern, select the rhinestone icon (faceted jewel) on the right hand tool bar. For this pattern, I used 10ss approximate size as I only wanted the pencil to highlight where to place a sequin, but didn't have to be the same size as a sequin otherwise the pencil lines could show once assembled. As sequins are larger in diameter compared to rhinestones, you need to take this into consideration with the spacing. So for the spacing, I opted for 0.250 in and this worked out well for the design!


For the sentiments, there is a Rhinestone font in the Silhouette Store by Lori Whitlock. I typed out 'Thank you' and 'Cheers' and adjusted the size until I was happy with how they would sit on the card front. 

You will want to load your mat with the card of your choosing and place a pencil in your pen holder and then into your machine. When you send to your machine, make sure you change the cut settings to sketch and use the pen holder. As you can see below, once sent, the pencil will draw all the little dots. These indicate where you need to attached sequins


To attach the sequins, you will need some strong adhesive - I used Glossy accents. To speed up the process, the 'Pick me up' helps as you can easily pick up the sequins with the sticky end, and unscrew the plastic end for the poky tool to help position the sequin onto the card.

You may think that these cards took quite a long time, however time pasts quickly with a bit of music. As I put a lot of effort in with the sequins I kept the rest of the card simple to appreciate the work put into the cards. 

For this first card, I used a single colour of sequins and embossed an additional sentiment to finish it. 

For this second card, I used additional jewels that look similar to rhinestones but are different. I love the rainbow colour against the bold white background. I stamped an additional sentiment for simplicity.


And below you can see the 'Rainbow' card I created. I didn't use rainbow colours for this - I don't have the correct colours in my sequin stash but I love the pink tones of the design. This would be great to adapt for a little girls card!


If this has inspired you to try this out, please post below. I would love to see it!

Until next time,

Verity


Profile Pretty Little Button Blog | Instagram | Facebook

FONTS USED:
LW dots font by Lori Whitlock, Design ID #78284

PRODUCTS USED:


Tuesday, 5 June 2018

Puppy Love - Featuring Rhinestones


Hello, hello - Karen here.  You don't need to check your calendar it's not a Wednesday DOTW post but I thought I would make a page using rhinestones as the other DT members have been focussing on them this month.

To make my design I used this cut file from Samatha Walker.

First I chose the doily with the pattern in the centre and resized it to 10ins.


I then used the Rhinestone feature to change the line into apertures for 10ss rhinestones (see features highlighted in blue below).


I then cut the design and set aside. 

Next, onto a piece of white card I wrote my title using Golden Rule Sketch Font.    I converted the words Puppy Love into dots using the rhinestone feature (I got the idea from Verity's blog post here) - as above and used a sketch pen to draw the words and circles. 


I placed my doily to the top left of the page and added rhinestones to the doily and the words puppy love.


The only thing left to do was to add a photo and some embellishment clusters an my page was finished. 


DESIGNS USED:


PRODUCTS USED


Monday, 4 June 2018

An alternative use for the Rhinestone feature - Nuvo drops and papercrafting!


Hi everyone. It's Verity here from Pretty Little Button bringing you another project. Today's project features Rhinestones, and not in the traditional way. Instead, I used the Rhinestone feature and the pen holder to draw out the design onto card. From there, I used my Nuvo Drops to create a fun textured and coloured pattern as a background for my card.

An alternative use for the Rhinestone feature detail:

Now you can use any rhinestone design from the store, or create one with the rhinestone feature. For the first card, I used the Large Rhinestone Flower from the design store. Now when you load this into your design space, a warning will also appear informing you not to resize the design. This is very important you plan on using the design with rhinestones, as if you resize the design, the rhinestones will not fit into your template when cut as the circles will be a different size. However, I had planned to use this with Nuvo drops and therefore resizing would not be an issue. 


I resized the design to fit a 7.75" square card panel. When I was happy with the layout, I sent the design to my Cameo. I loaded the mat with a piece of white card, and instead of using a blade, I use the pen holder with a regular pencil to draw the design out. 


Once complete, I took a selection of Nuvo colours and placed a drop over each circle. The size of the circle drawn is a good indication of how big to make the drop. When you have finished filling in all the circles, there will be no pencil left showing. Allow this to dry, preferably overnight and then embellish the front with your sentiments. 


I also made a card using a design from the design store which was NOT a rhinestone design. When the design was loaded into my design space (stained glass heart), I opened up the Rhinestone tool window. I changed the size of the 'rhinestones' to 1 and reduced the spacing down until I was happy with the 'rhinestone' pattern. For more details on how to use the rhinestone feature, check out this post here.

This was drawn with the sketch pen holder and I used a single colour of Nuvo drops for a big bold statement.


If this has inspired you to try this out, please post below. I would love to see it!

Until next time,

Verity


Profile Pretty Little Button Blog | Instagram | Facebook

DESIGNS USED:

Large rhinestone flower by Sandi Idleman, Design ID #250702
Stained glass heart by Paige Evans, Design ID #216942

PRODUCTS USED:


Saturday, 2 June 2018

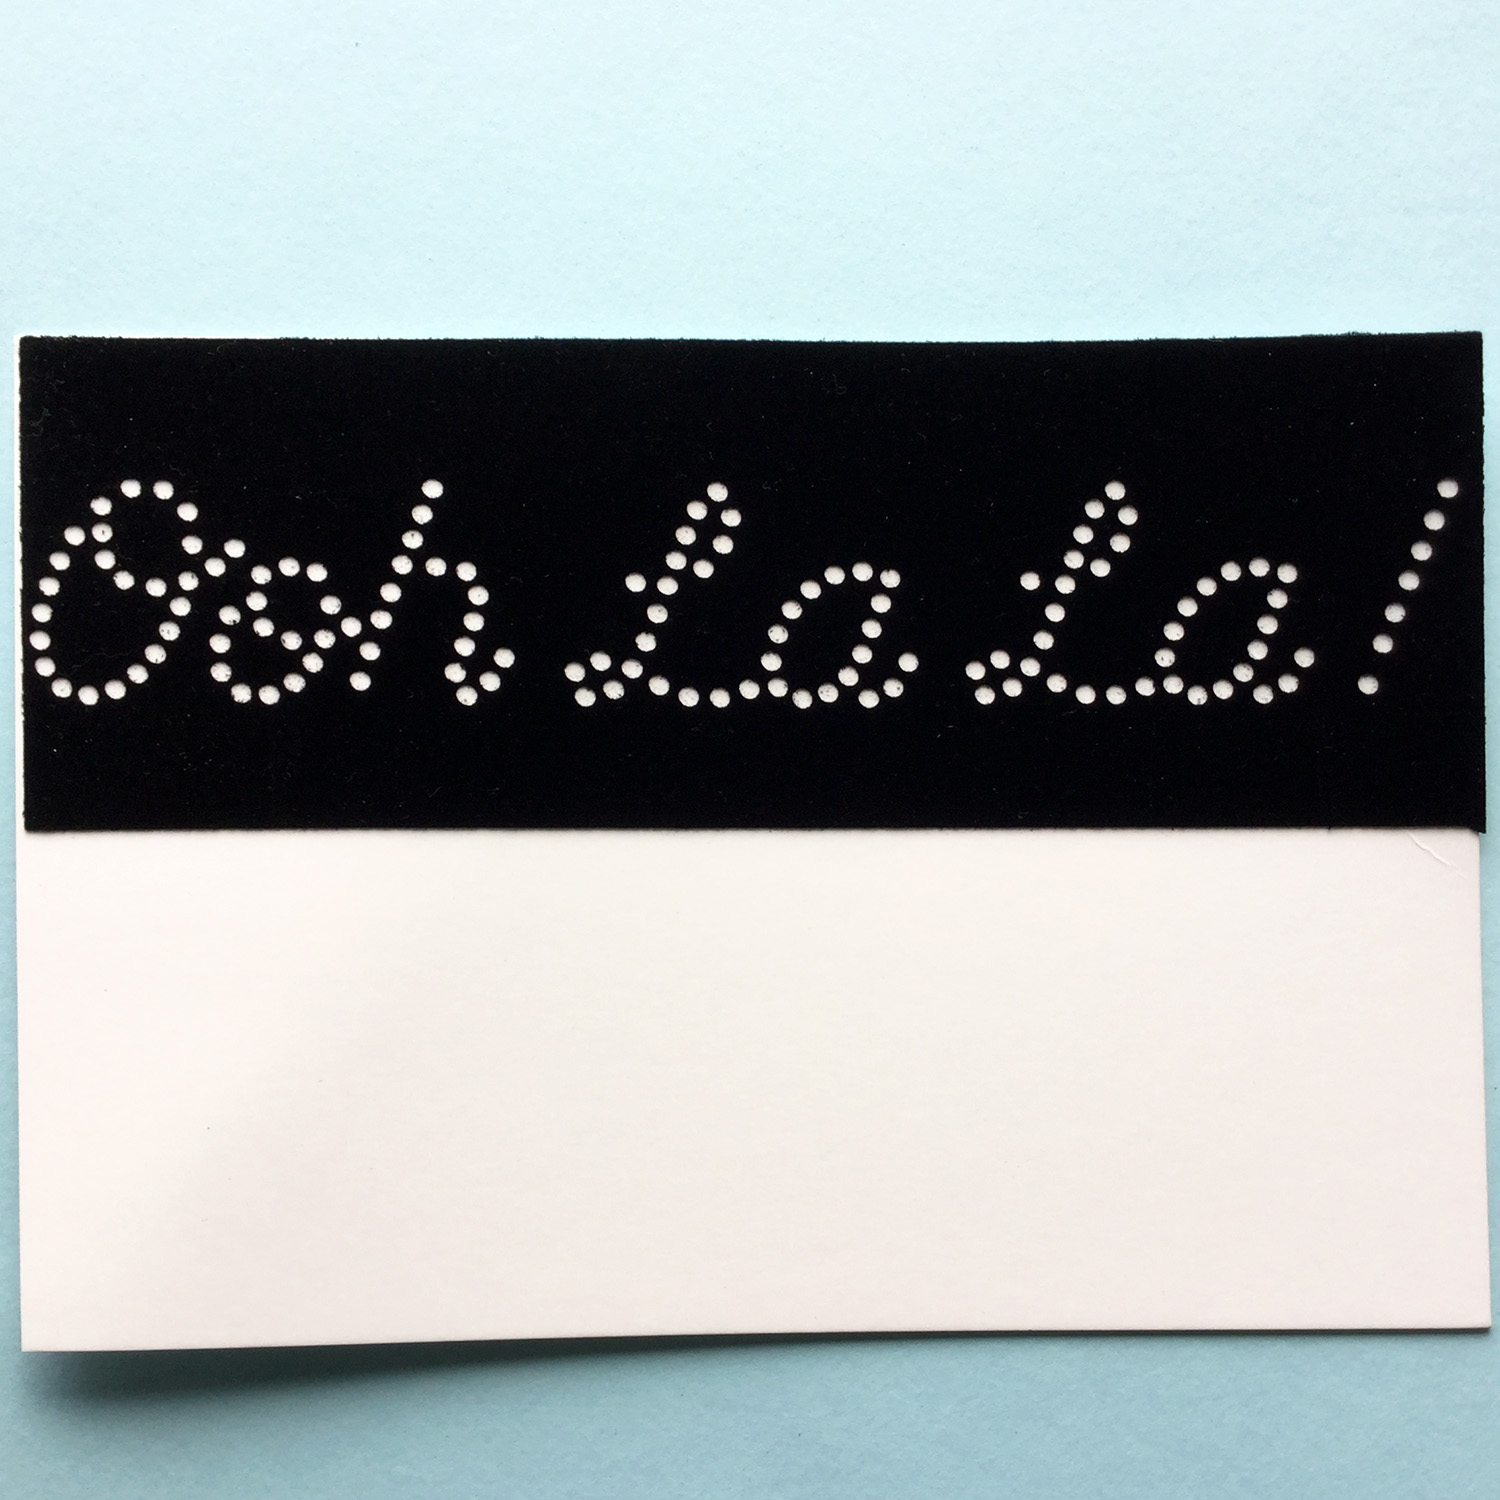
Ooh, La, La - Design Rhinestone Lettering


Hello, its been all about gorgeous Silhouette Rhinestones on the Silhouette UK Blog this week. Today I have a home decor project to share using a sparkly custom rhinestone phrase over a flock heat transfer design of the Eiffel Tower. The rhinestones are applied after the flock, but the flock design is specially trimmed so that the rhinestones adhere directly to the cover's fabric rather than the flock.

Here I'll show you how to design, make, and apply your own custom rhinestone phrase decal. You'll find a heap of extra hints and tips along the way too. I also show you how to customise the flock design to 'knockout' the rhinestone pattern from the design over on my Crafting Quine Blog. So pop over there if you'd like to find out how to do that.


Materials Used
Silhouette Cameo®
Silhouette Studio® Designer Edition
Silhouette Rhinestone Transfer Kit
Silhouette Rhinestones
Silhouette Flock Heat Transfer Material
Blank Rectangular Cushion Cover
Size-matched Cushion Insert
Iron or Heat Press


Make Your Own Rhinestone Lettering

There are many rhinestone letters, words, and phrases available in the Silhouette Design Store, but none were just right for this Eiffel Tower design (#41675 by Samantha Walker). If you have Designer Edition or above, you can convert just about ANY font (and many designs) into rhinestone designs using the software's built-in rhinestone conversion function.

There is a quick overview of the software's rhinestone conversion function from Silhouette here. Access the options by clicking to open the Rhinestone panel (the gem icon).


Re-size your design before you start playing with the rhinestones. With the words selected, choose the size of rhinestones that you plan to use. You can toggle through the rhinestone effects to see which looks best, and change the space between the rhinestones (a smaller space gives better readability, but uses more stones). For script fonts, I prefer to use the Edge effect and reduce the spacing between the characters. TIP: keep a spacing of 0.025-inches or more, or the template may become difficult to work with.  For this design I used 10ss sized stones and 0.025-inch spacing. The number of stones required is helpfully displayed at the bottom of the window.


Font Selection for Rhinestone Lettering

Don't panic if the lettering doesn't look great in the default font, it may well look better in another. Open the Text Style panel to choose another font. Better still, keep both Rhinestone and Text panels open at the same time (move the panels closer to each other to lock them together). Then, experiment with different settings as you try out different fonts (increase the character spacing if the letters appear to overlap too much).

TIP: Select the phrase, and with the font list open, jump down the font list using the keyboard's up or down arrows to see each font previewed.


Make a Custom Font List (MAJOR TIP)

I found that generally the Silhouette Design Store single line sketch fonts work well in rhinestones. To save having to search for each one, it is easy to make a custom font list, and then just try out fonts from the shorter list (useful when selecting fonts to use with sketch pens too).


They will then appear in the Text Style list with the heading that you give to a new folder in the font file structure. To make the new folder:
  • open the Library
  • click on 'Fonts' in the file structure to preview them in the right-hand panel
  • right mouse click on 'Fonts'
  • select 'New Folder'
  • type in a name for the new folder
  • drag font previews into the new folder.
The font names will then appear under the heading of the new folder in the Text Style list right away (no need to restart the programme). Be aware that currently there seems to be an upper limit on the number of font names that are displayed in a custom list (possibly ten at the time of writing).


I chose the Madilyn Sketch Font (#77519) by Rivka Wilkins.


Fine Tuning the Design

Click on Release Rhinestones in the Rhinestone panel to manually adjust the placement of individual stones. You can make extra stones by choosing the Freehand option, and click where an extra stone is required. Once this is done, I like to group each word in the phrase and change the distance between the words until they look well balanced.


Cutting the Template Material

When you are happy with your design, you'll be ready to cut it from the template material. This is a velvet-y self-adhesive media with a paper backing sheet. If you need to re-size your design at this point you may need to start over, as the hole size shouldn't be changed, or your template won't fit the rhinestones. Under certain conditions the hole size will remain constant, but the effect will look very different anyway, if re-sized significantly.

Select the setting for 'Rhinestone Template Material' from the material cutting list in the sent window.


I found that I needed to reduce the force setting, and could have reduced it a little more to achieve the perfect 'kiss cut' (cutting through the top layer and not through the backing sheet).  Here you'll see that I a few holes on the 'o' and 'h' cut too deep and were left behind on my cutting mat.


Making the Rhinestone Template

Peel off the top layer (the template) and you'll find most of the waste dots are left adhered to the backing sheet. Remove any dots that remain in the top layer, and check the reverse of the design in case there are any stray ones lurking there. Smooth the template onto the chipboard piece included in the kit.


Making the Rhinestone Decal

Tip the rhinestones onto the design and gently spread them across the design with a light touch. The rhinestone starter kit contains a special padded tool which is very useful for this. The majority of the stones will drop into the holes gem side up. Place the wayward ones into place with a pickup tool (I couldn't find mine, but this tool proved perfect to move and turn over stones to complete the placement.


When your design is completely filled, brush away the excess stones.


Remove the textured backing paper from the sticky, clear transfer sheet (also included in the kit). Holding one end of the sheet in the each hand, away from the design, bring your hands closer to make a dip in the centre then carefully place that just above the centre of the design then quickly move it towards the design and let the sides drop over the design. Don't hover the sheet too close or static will lift the stones and mess up the pattern. Press it firmly onto the stones then peel it away from the template and temporarily store the decal on the textured backing sheet.


Applying the Rhinestone Decal

Align the rhinestone decal with your pressed vinyl design and then apply the design with an iron or heat press. Instructions for using an iron are included with both the template kit and the rhinestone packs. I used a heat press just slightly hotter than I had used for the flocked vinyl. Pressing time with a heat press will be less than that suggested for an iron. Remember to protect your design with a cloth or non-stick sheet while pressing.


When the rhinestones do not lift when a corner of the clear sheet is peeled up, allow to cool a little and then remove the sheet. Press with the protective cloth in place for a few more seconds. Then turn the cover inside out and press again for a few seconds more on the reverse of the design.


Turn the cover back to right side and the cover is ready to be put on a cushion insert and the project is done!


The template of course can be used over and over, and you'll find that you may get more than one use from your sticky transfer sheet. Just store it on the textured backing paper until you are ready to use it again.

If you haven't tried rhinestones before, I urge you to try them - the effect is dazzling.

Here are some other projects I've made with them for the Design Team. Just click on a pic to visit the page for that project.

Rhinestones on a Makeup Bag by Janet Packer Metallic heat Transfer and Rhinestone T-shirt by Janet Packer Rhinestone decorated dog collar on greeting card by Janet Packer


Let us know how you get on.


Bye for now,

  Crafting Quine BlogInstagram @CraftingQuine


DESIGNS USED:


PRODUCTS USED: