Showing posts with label Janet Packer. Show all posts

Saturday, 23 March 2019

Make a 3D Lightbox using Carbon Fibre Vinyl

Make your own 3D Cardstock Lightbox - Using Silhouette Carbon Fibre Vinyl - by Janet Packer https://craftingquine.blogspot.co.uk for GraphtecGB Silhouette UK Blog.


Hello, Janet from the Crafting Quine Blog here using the Silhouette Carbon Fibre Vinyl and saying farewell* with a 3D Lightbox design. This speciality vinyl is available in black with a pattern that gives the look and texture of carbon fibre in an easy to apply material. For this project I have applied the vinyl to cardstock which I then used to make the box. I also used it in a more conventional way to make the letters.

The lightbox design (#251632) is from the Silhouette Design Store. I adapted it to take three rows of letters, which allows for longer words and then cheated on the letters, putting the  words onto long strips. Far quicker and less fiddly to change out than individual letters. Finally I added a string of led fairy lights inside.

Design ID #251832 in Studio and SVG format


DESIGNS USED:
Lightbox by Nilmara Quintella (#251632)
LW Perfect Type font by Lori Whitlock (#55159)


MATERIALS USED:
Black & White Cardstock
Shiny/Mirror Card, Paper or Vinyl
Strong Tack Transfer Tape
Liquid Craft Adhesive
Strong-Tack Tape Adhesive
Vinyl Scraps for Emojis
Silhouette Premium Carbon Fibre Vinyl
Silhouette Vellum
Set of Battery-Powered LED Lights

You'll find instructions for assembling the box on the designer's website and there is a link from the file's description in the Silhouette store. I'll just highlight the things I did differently.

HINT: The designer's instructions are in Brazilian, for English instructions just copy the link into a Google search and you get the option to translate the page. 

Preparing & Cutting Carbon Fibre Cardstock
Cut a piece of vinyl slightly larger than the box base and smooth it onto a piece of black cardstock. Cut the piece, increasing the blade depth and force as necessary, to cut all the way through. Use a bone folder to make crisp fold lines.

Make your own 3D Cardstock Lightbox - Using Silhouette Carbon Fibre Vinyl - by Janet Packer https://craftingquine.blogspot.co.uk for GraphtecGB Silhouette UK Blog.

Adding Reflective Panels
Use the panel pieces cut from mirror card to line the reverse of the box if you have it. I didn't, so I used some sticky-backed reflective paper that I had on hand. In this photo I've left the backing on at the ends of the long strips. When assembled these can be removed so the reflective paper hides the  box tabs on the inside also giving a bigger reflective surface.

Make your own 3D Cardstock Lightbox - Using Silhouette Carbon Fibre Vinyl - by Janet Packer https://craftingquine.blogspot.co.uk for GraphtecGB Silhouette UK Blog.


Add Extra Supports
The translucent part of the lightbox is effectively an adapted box lid. In order to add an extra line of text it is necessary to cut an extra centre support bar. I'd also recommend cutting extras of all of the bars in case they don't all fold straight. It is also necessary to add one extra aperture and reduce the height of the existing apertures in the lid. Check they are all of the same height, evenly aligned, and are equally spaced using the alignment and spacing tools in tools in the transform panel.

Make your own 3D Cardstock Lightbox - Using Silhouette Carbon Fibre Vinyl - by Janet Packer https://craftingquine.blogspot.co.uk for GraphtecGB Silhouette UK Blog.


Applying Vellum
Vellum is applied to the reverse of the lid. I recommend a strong adhesive tape so that no excess glue can get onto the vellum.

Make your own 3D Cardstock Lightbox - Using Silhouette Carbon Fibre Vinyl - by Janet Packer https://craftingquine.blogspot.co.uk for GraphtecGB Silhouette UK Blog.


Adding Lights
Here are the assembled top and base parts of the box with the fairy lights inside.

Make your own 3D Cardstock Lightbox - Using Silhouette Carbon Fibre Vinyl - by Janet Packer https://craftingquine.blogspot.co.uk for GraphtecGB Silhouette UK Blog.

Arrange the lights around the edges of the inside, adhering them to the box sides using adhesive tape. For an even neater effect, adhere the battery pack in the box (with double-sided tape) and cut a small slit and a rectangle out of the side so that the controller can be switched on and off with the lid in place (then no-one has to see the light 'spaghetti').

Make your own 3D Cardstock Lightbox - Using Silhouette Carbon Fibre Vinyl - by Janet Packer https://craftingquine.blogspot.co.uk for GraphtecGB Silhouette UK Blog.


Text Cheat
Instead of cutting individual letters and mounting them on small acetate rectangles, cut strips of acetate and mount the words in carbon fibre vinyl directly to the strip. This isn't quite so versatile, but you can just cut more strips and vinyl when you need new words. So much quicker and less fiddly to change them out. With this method you can choose just about any font you want. I picked LW Perfect Type as its quick to weed and easy to read, but any cuttable font will do, even script fonts work (don't forget to weld any overlapped letters together before cutting though).

HINT: For ease of application, cut your letters in weeding boxes of the same size as the acetate strips. Place your acetate strip on a card strip cut to the same size so that is easier to see. Align your transfer tape with the top of the weeding box, lift the word, then align the top of the transfer tape with the top of the strip and burnish it onto the strip. 

Make your own 3D Cardstock Lightbox - Using Silhouette Carbon Fibre Vinyl - by Janet Packer https://craftingquine.blogspot.co.uk for GraphtecGB Silhouette UK Blog.


Layered Emojis
These crying emojis were made using layered vinyl. Using transfer tape, pick up the blue 'tears' first, then the yellow faces next, and finally the black circles (with weeding box the same height as one of the acetate strips as for the words). Then they are easy to align onto an acetate strip in the same way as the letters.

Make your own 3D Cardstock Lightbox - Using Silhouette Carbon Fibre Vinyl - by Janet Packer https://craftingquine.blogspot.co.uk for GraphtecGB Silhouette UK Blog.


You may have realised, if you've been following the Silhouette UK Blog for a while, that I have a passion for adding lights to my projects. If you have a weakness for lights too, you might like to check out these earlier projects.

Wedding Marquee Letters
Marquee Lights
Light Up Big Ben - Cutting Thicker Cardstock
Big Ben Lantern 
Light Up Cards
Light up Cards
Vinyl and Foil Lanterns
Vellum & Foil Lanterns
Polar Bear Luminary
Acetate Lantern


*Saying Farewell
This is the last regular post I'll be doing with the Silhouette UK Blog Design Team. I've been on the team since it started in 2016 and I'm away to do a real world job which won't allow me as much crafting time. I may be back with a special post now and again. Meantime you can catch up with my crafty creations (Silhouette and otherwise) at the Crafting Quine Blog.


Bye for now,

Janet Packer https://craftingquine.blogspot.co.uk for GraphtecGB Silhouette UK Blog.
  Crafting Quine Blog | @CraftingQuine


DESIGNS USED:
 Lightbox by Nilmara Quintela  LW perfect Type font by Lori Whitlock


PRODUCTS USED:
 Carbon Fibre Vinyl  Silhouette Vellum  Silhouette Cameo 3


Saturday, 2 March 2019

Hybrid Whiteboard Labels

Making Hybrid Whiteboard Labels for more decorative whiteboard labels and stickers - by Janet Packer https://craftingquine.blogspot.co.uk for the GraphtecGB Silhouette UK Blog


Hello, Janet here from the Crafting Quine blog. Today's post shows how to make hybrid wipeable whiteboard labels. I've combined the Silhouette Whiteboard Vinyl with other vinyls to give extra detail and decoration which could not be achieved by using the whiteboard vinyl alone. You get the best of both worlds - fancy labels with a wipeable panel which can be written on, erased, and re-written with a regular dry erase marker.

Making Hybrid Whiteboard Labels for more decorative whiteboard labels and stickers - by Janet Packer https://craftingquine.blogspot.co.uk for the GraphtecGB Silhouette UK Blog


I've chosen to add my labels to some clear paint pails which I'll admit have been sitting in my stash for way too long (they are still available to purchase at various online stores). The whiteboard vinyl has a semi-permanent adhesive backing and the product description says it can be used on many surfaces, both indoors and out, including walls, so the surface options are not limited to storage containers. I've combined it with both regular adhesive vinyl for this project, and with premium translucent vinyl too, in order to show you just how versatile this product is.


Selecting the Design
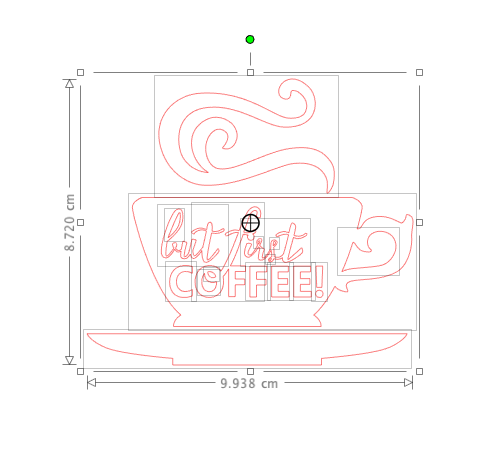
I'd recommend choosing a design whose outline is not too intricate. The whiteboard vinyl is thicker than regular sign vinyl, and cuts well, but I don't think lacy or delicate outlines would be easy to work with. I chose a coffee cup design (#175243) for my coffee bean storage pails, there are many other alternatives in the Silhouette Design Store.

Making Hybrid Whiteboard Labels for more decorative whiteboard labels and stickers - by Janet Packer https://craftingquine.blogspot.co.uk for the GraphtecGB Silhouette UK Blog


Coffee Bean Pails
I store my coffee beans in a sealable container, but often get the different beans confused. These labels should end that confusion and hopefully I'll no longer end up with an unexpected cup of decaf. Almost any coffee cup design could be used. The one I used originally had writing on the cup.


Simplify the Design
To remove the writing open the design in the Silhouette Studio software, ungroup the elements, remove the letters, and regroup the remainder. With some designs it might be necessary to release the compound path, delete and remake (or a combination of ungrouping and removing path). You'll see when you've isolated the elements you need when they have a light grey box around them when the design is selected.
Making Hybrid Whiteboard Labels for more decorative whiteboard labels and stickers - by Janet Packer https://craftingquine.blogspot.co.uk for the GraphtecGB Silhouette UK Blog

Add an Outline
Make an outline of the whole cup using an External Offset.

Making Hybrid Whiteboard Labels for more decorative whiteboard labels and stickers - by Janet Packer https://craftingquine.blogspot.co.uk for the GraphtecGB Silhouette UK Blog


Simplify the Outline by deleting any tiny pieces.

Making Hybrid Whiteboard Labels for more decorative whiteboard labels and stickers - by Janet Packer https://craftingquine.blogspot.co.uk for the GraphtecGB Silhouette UK Blog


Make a Panel for Writing
Use internal offset to make a writing panel on the cup. This panel could be placed on top of the cup, but I chose to delete the shape from the cup. An internal offset gives an unwanted part to the shape near the handle. Remove this using Point editing.

Making Hybrid Whiteboard Labels for more decorative whiteboard labels and stickers - by Janet Packer https://craftingquine.blogspot.co.uk for the GraphtecGB Silhouette UK Blog

Here are the shapes ready to cut; the one the left from whiteboard vinyl, and the one on the right from brown glossy vinyl.
Making Hybrid Whiteboard Labels for more decorative whiteboard labels and stickers - by Janet Packer https://craftingquine.blogspot.co.uk for the GraphtecGB Silhouette UK Blog

Cut both vinyl pieces and weed (remove any unwanted parts). There is a cut setting for the whiteboard vinyl in later versions of the software, use a test cut and adjust/reduce to where the whiteboard still cuts through.


Apply the Vinyl
First pick up the brown vinyl onto transfer tape, then align it over the whiteboard vinyl.

Making Hybrid Whiteboard Labels for more decorative whiteboard labels and stickers - by Janet Packer https://craftingquine.blogspot.co.uk for the GraphtecGB Silhouette UK Blog

Lift up both layers on the transfer tape and apply them to the pail or other surface. Burnish it well and carefully peel off the transfer tape leaving the vinyl layers behind.

Making Hybrid Whiteboard Labels for more decorative whiteboard labels and stickers - by Janet Packer https://craftingquine.blogspot.co.uk for the GraphtecGB Silhouette UK Blog


The same technique could be applied to other designs. Here is a bunny label made in a similar way with Silhouette Translucent Vinyl instead of the glossy vinyl.

Making Hybrid Whiteboard Labels for more decorative whiteboard labels and stickers - by Janet Packer https://craftingquine.blogspot.co.uk for the GraphtecGB Silhouette UK Blog


Here the waste translucent vinyl has been used too.

Making Hybrid Whiteboard Labels for more decorative whiteboard labels and stickers - by Janet Packer https://craftingquine.blogspot.co.uk for the GraphtecGB Silhouette UK Blog


I hope this post has inspired you to make your own hybrid labels using the whiteboard vinyl and that you'll try it.


Bye for now,

  Crafting Quine Blog | @CraftingQuine


DESIGNS USED:
But First Coffee by Sarah Bailey Easter Bunny w/heart by Loni Stevens


PRODUCTS USED:
 Silhouette Whiteboard Vinyl  Silhouette Glossy Permanent  Vinyl


Saturday, 23 February 2019

Faux Letterboard Card


Hello, Janet here from the Crafting Quine blog. Today I have a faux letterboard card for you. I've been inspired by all the letterboard dies around at present, and it struck me that the Silhouette Adhesive Corrugated Paper would be perfect to give a similar effect with minimum effort. The letters have been cut on the Silhouette too, with single and double height letters and some extra script and icon embellishments. There is so much versatility for all kinds of cards with this design, so I do hope you'll try it out.

Selecting the Design
The base of the card is one of the 3D Frame Cards by Lori Whitlock. I used design ID #101975 which has a Christmas theme, but any of the similar designs will work. To find them all search for '3D Frame Card' in the Silhouette Design Store and filter by Artist, selecting 'Lori Whitlock'. Most of them appear at the top of the page. Select one that has a panel on the front of the frame if you want to add a wood patterned panel as I have done.


Preparing the Frame Card Base
Ungroup all the file parts, and discard all but the base card, the frame, the frame panel, and the interior panel. I increased the size of these remaining pieces so that the 3D frame piece would just fit onto a piece of 12" x 12" textured cardstock. This gave a finished card of 17cm x 13.25cm, which made it easier to cut and place the letters. However, it did make the accompanying box piece bigger than 12" x 12" so be aware that if you make it this big you'll need A3 cardstock and the larger sized cutting mat to make a box to fit. The interior panel was cut from the Silhouette Corrugated Paper, which gives the letter board effect. It is self-adhesive and easiest to apply to the card frame while it is flat, before folding it up.


Preparing the Lettering
Choosing the correct font is critical for the letterboard effect. I cut the basic black letters in a sans serif font that was pre-installed on my computer from black cardstock (this one is similar to Ariel). Just avoid a font with a circular 'O', as a font with an oval shaped 'O' (and other rounded letters) generally fits in the limited space better. I cut two of each letter and layered them together. The larger letters are LW Trendy font with the background shape cut from white cardstock and the cutout layer cut from Silhouette Textured Translucent Vinyl, giving a glitter plastic-y finish to those letters. The word 'Birthday' was made from LD Charming Bold font. I recommend choosing a favourite script font that maintains a similar width through the letters (that doesn't get too narrow). However, if your chosen font is too narrow, use a small offset to thicken it up.


For the little precent icon, I chose the letter 'a' from the LW Birthday Dingbats font. I removed some of the detail, by releasing the compound path and deleting all but the outside line and the bow loops, grouping it all together again (if you want it to display correctly on the screen make it into a compound path again, it will cut correctly either way). Cut the present from the same materials as the 'GREAT DAY' words, layering the vinyl on top of two copies cut from white cardstock.


Finishing the Lettering
If you have a problem getting your letters to align (as I always do), use this little alignment trick I have for you. Arrange the letters on your mat on a rectangle of the same size as the frame interior, add the cut line shown in blue (below), and cut the whole thing from a piece of scrap card.


Use the scrap piece to align the first row of larger letters.


Then use strips cut horizontally across the centres of the other words to align each row in turn.


Once all the letters are adhered I add liquid glaze to the black letters to give them a more plastic-y appearance. The translucent vinyl would be great for this too.


Making the Box
The cut file for the box is included with the design. If you increase the size of the card as much as I did you'll find that the box is too big to fit onto 12" square cardstock. In which case use A3 card and the larger sized cutting mat. This box was cut from a background pattern (design id #171187) printed onto A3 cardstock. By aligning the pattern and the design to the centre of the card I was able to print THEN cut, so a Print & Cut was not necessary.


The box is the perfect finishing touch. I can't wait to give this card to its recipient!


Bye for now,

  Crafting Quine Blog | @CraftingQuine


DESIGNS USED:
 3D Frame Card by Lori Whitlock  Blue Wood Grain Pattern by Lori Whitlock Handpainted Watercolor Stripes Background By Angie Makes  LW Trendy Font by Lori Whitlock  LD Charming Bold font by Scrap N Fonts  LW Birthday Dingbats font by Lori Whitlock


PRODUCTS USED:
 Silhouette Adhesive Corrugated Paper  Silhouette Textured Translucent Vinyl  Silhouette Cameo 3  Silhouette Cameo Large Cutting Mat  Silhouette Studio designer edition