Showing posts with label Cork Sheets. Show all posts

Thursday, 8 March 2018

Cute Cork Bunny Baskets


Cork Bunny Baskets - Using Silhouette adhesive cork sheets to decorate egg baskets. Designed by Janet Packer for the Silhouette UK Blog.


Hello,  Janet here with a 3D project using Silhouette Cork Sheets to decorate these cute Bunny Baskets (#76181) from the Silhouette Design Store. They are great for egg collecting, and pretty enough to use for Easter or spring table decorations too. I cut the bunny panels from the cork sheets and added fluffy pom-pom tails together with some floral decorations (#121568, #251053).


Cork Bunny Baskets - Using Silhouette adhesive cork sheets to decorate egg baskets. Designed by Janet Packer for the Silhouette UK Blog.


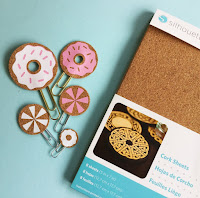
The cork sheets are self adhesive so application is clean, and the finished result is very effective.  I've used cork sheets for several projects now, and love how easy they are to cut.  I've included links to some previous cork projects and information posts below. Just click on the photo to visit each one.


Materials Used
Medium-weight Coloured Textured Cardstock
Silhouette Cork Sheets
Small White Pompoms
Strong Liquid Adhesive
Dimensional Foam Pads
Blend-able Inks
Silhouette Cameo, Portrait or Curio


STEP 1: Preparing The Cork Bunnies

1. Change the page size to reflect the size of the cork sheets which are 7" x 5" (Page Setup panel, Page size tab, enter dimensions in the height and width boxes, press Enter).

Cork Bunny Baskets - Using Silhouette adhesive cork sheets to decorate egg baskets. Designed by Janet Packer for the Silhouette UK Blog.

2. For this project, the dimensions may be easier to enter in inches. If necessary, you can change the unit of measurement by clicking on the gear symbol in the bottom right of the screen.


Cork Bunny Baskets - Using Silhouette adhesive cork sheets to decorate egg baskets. Designed by Janet Packer for the Silhouette UK Blog.


3. Open the Bunny Basket (#76181) file.  Leaving all the elements grouped together, click the mouse and drag the corner handle towards the centre of the file until one bunny takes up roughly half of the cork sheet (width of around 4.467").

Cork Bunny Baskets - Using Silhouette adhesive cork sheets to decorate egg baskets. Designed by Janet Packer for the Silhouette UK Blog.


4. Ungroup the pieces and arrange the two bunnies so that they fit on the sheet.

Cork Bunny Baskets - Using Silhouette adhesive cork sheets to decorate egg baskets. Designed by Janet Packer for the Silhouette UK Blog.


5. Cut the bunnies from the cork sheet, using the minimum force that will cut through the cork (use a test cut to ascertain what this is). I was able to reduce the force to 18. Your machine may require a different setting.

Cork Bunny Baskets - Using Silhouette adhesive cork sheets to decorate egg baskets. Designed by Janet Packer for the Silhouette UK Blog.


STEP 2: Cut and Prepare the Basket Pieces

The file designer, Jamie Cripps, has a tutorial on how to assemble the baskets (available through the file description in the Silhouette Design Store). I have included information here on the adaptations that I made.

1. Cut out all the basket pieces including an additional offset of one bunny panel per basket. I used an external offset of 0.1".

Cork Bunny Baskets - Using Silhouette adhesive cork sheets to decorate egg baskets. Designed by Janet Packer for the Silhouette UK Blog.


2. Adhere the cork panel to the new offset piece.

Cork Bunny Baskets - Using Silhouette adhesive cork sheets to decorate egg baskets. Designed by Janet Packer for the Silhouette UK Blog.


3. Blend ink around the edges of the remaining bunny panels.

Cork Bunny Baskets - Using Silhouette adhesive cork sheets to decorate egg baskets. Designed by Janet Packer for the Silhouette UK Blog.


4. I found that the easiest way to assemble the pieces was to join the base pieces first, adhering the square bases above and below the joined pieces, and then joining the bunnies nose to tail. Remember to locate the bunny pieces with the handle slits on opposite sides of the base.


Cork Bunny Baskets - Using Silhouette adhesive cork sheets to decorate egg baskets. Designed by Janet Packer for the Silhouette UK Blog.


5. Adhere the bunny panels to the assembled base after the handle has been installed.

Cork Bunny Baskets - Using Silhouette adhesive cork sheets to decorate egg baskets. Designed by Janet Packer for the Silhouette UK Blog.


6. Adhere the cork covered panel to one face with dimensional foam pads.

Cork Bunny Baskets - Using Silhouette adhesive cork sheets to decorate egg baskets. Designed by Janet Packer for the Silhouette UK Blog.


7. Add pompom tails and a few floral accents (flowers from #251053, leaves from #121568).


Cork Bunny Baskets - Using Silhouette adhesive cork sheets to decorate egg baskets. Designed by Janet Packer for the Silhouette UK Blog.


8. (optional) Make a 'grass' liner to the assembled basket. I made this by welding an appropriately sized slant-edged rectangle to the Easter Scene Grass file (#186841) and joining the pieces together.

Cork Bunny Baskets - Using Silhouette adhesive cork sheets to decorate egg baskets. Designed by Janet Packer for the Silhouette UK Blog.


Cork Bunny Baskets - Using Silhouette adhesive cork sheets to decorate egg baskets. Designed by Janet Packer for the Silhouette UK Blog.


This family of bunnies will look great as an Easter display too.


Cork Bunny Baskets - Using Silhouette adhesive cork sheets to decorate egg baskets. Designed by Janet Packer for the Silhouette UK Blog.


Bye for now,


   Profile | Crafting Quine Blog | Instagram @CraftingQuine


DESIGNS USED:


PRODUCTS USED:

Friday, 1 December 2017

Gingerbread Cork Ornaments


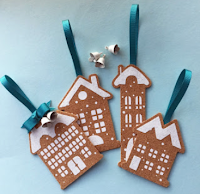
Hello, Janet here again.  This week I've made a start on making faux gingerbread tree ornaments.  I love using the Silhouette Cork Sheets, and previously I've used them to make Cork Stickers and to cover MDF Shapes. I knew back then that they'd be great to use for faux gingerbread items - the perfect colour and texture - but I had to bide my time until the festive season arrived, and here it is.

I've used the Snowy House files (1) and (2) by Hero Arts from the Silhouette Design Store, there is also a church in the same series. I've used self-adhesive cork sheets and Silhouette Heat Transfer Material in white, both smooth and glitter finishes.  These materials and techniques would work for any snow-sprinkled design, so browse your files and see what would fit your decorating scheme and taste.


I aim to hang mine on my Christmas tree, but as they are flat, they could also be attached to a card for  a lovely card/present combination. Of course, family names, house names, or personal greetings can be added to the reverse, for a personalised gift for friends and family.


What You'll Need

Silhouette Smooth Heat Transfer Material - White,
Silhouette Glitter Heat Transfer Material - White,
Silhouette Cork Sheets,
Ribbon,
Mini Bells,
Liquid Glue,
Iron or Heat Press


STEP 1: Prepare the Cork Pieces

Open all the files in one tab. Ungroup them so they are four separate files (Right click and Ungroup). Select them all and Resize them by holding the Shift key and dragging one of the white corner squares toward the centre of the mat. I made the tallest one roughly 4-inches tall.

Ungroup and Release the Compound path on the houses until all the individual parts are separated.

Click away to deselect and select all the parts of one house. Deselect the house outline by clicking on it while holding down the shift key and Group (right click, Group). Move the interior parts off the mat.


Set the paper size to reflect the dimensions of a cork sheet (5-ins. x 7-ins.) and arrange the house outlines to fit. Do NOT resize unless you select the interior parts as well.


Change the dimensions to double the height (10-ins. x 7-ins.). Duplicate the houses and flip horizontally (now you have a second set to use back-to-back with the first set.


STEP 2: Cut the Cork Pieces

Mount two pieces of cork onto the mat and send the cork to cut. The cork will cut successfully with the Cameo, Portrait or Curio.  I used cut settings close to the recommended settings, but I found that it was necessary to lower the Force (thickness/pressure) to achieve a 'Kiss cut' (that is, to cut through the cork, but not the backing).

These are the cut settings used:

Silhouette® Curio
Ratchet Blade: Blade 7, Platforms 6, Speed 2 and Thickness (Pressure) 25

Silhouette ® Cameo 3
AutoBlade: Blade 7, Speed 1, Thickness (Pressure) 18

Your settings will no doubt differ, and it really is worth using the test cut and getting it right, because getting an adequate cut in one pass gives a much neater result than two or more passes.

Remove the cut sheets from the mat keeping them intact. Peel the excess cork from around the houses, leaving the houses on the backing sheet.


STEP 3: Prepare the Heat Transfer Pieces

Remove the houses from the virtual mat and bring back all the interior pieces. Ungroup all of the pieces. Taking one house at a time select just the roof and the door and group them. Select the whole of a house, deselect the roof/door and group the remainder. Repeat for each house.


Move the non door/roof bits off the mat and arrange the roof/doors, placing a weeding box around each. Duplicate and make similar boxes for just the roofs (for the reverse, leaving room for a sentiment). Mirror just the roof/door set and cut from Glitter Heat Transfer (right click each and click FLIP Horizontally). I used the recommended cut settings for Heat Transfer - Glittered.


Remove these pieces from the mat and arrange the smaller pieces, remembering to FLIP these too. Cut these from the smooth heat transfer using a suitable setting (again, the recommended setting worked for me).


STEP 4: Weed the Pieces

Cut the rectangles apart and trim to the edge of the rectangles for both types of heat transfer pieces. Peel off the unwanted parts.


STEP 5: Apply Heat Transfer to Cork

Align the smooth heat transfer rectangles onto the cork pieces keeping the cork on its original backing paper. Press with iron or heat press for a few seconds and remove the backing layer.


Then apply the glitter heat transfer pieces.  Remove the backing layer and press again. Full details as to heat setting and duration are shown in the cork stickers post.


STEP 6: Finishing the Ornaments

Trap a loop of thin ribbon between each house and it's reverse image.

HINT: Although the sheets are self adhesive, add a little liquid glue to allow the two pieces to aligned more easily. It gives a little wiggle time whereas the cork is instant grab.


Optional: Add a matching bow made from a thicker ribbon.

To finish add small bells (threaded onto matching embroidery floss and tied onto the bow).


I loved how these turned out and am looking forward to adding them to my tree. They'll have to wait a little longer though - we don't put our tree up until the second week in December.

Bye for now,


   Profile | Crafting Quine Blog | Instagram @CraftingQuine


DESIGNS USED:


PRODUCTS USED: