Showing posts with label V4. Show all posts

Monday, 25 September 2017

Finding your way in Silhouette Studio (right click, keyboard shortcuts, user manual, search and quick access)


Hello Janet here to help you navigate around Silhouette® Studio. Have you updated your  software recently? Can't find favourite tools and actions in the new version?  Here are some ideas to help you if you lose your way.

  1. Right click menu
  2. Keyboard shortcuts
  3. User manual
  4. Interactive search
  5. Quick Access tool bar


1. Using Right Click

Using the right click with your mouse when a shape is selected brings up a menu of useful shortcuts which can be a huge time-saver, bypassing the menus and panels.


2. Using Keyboard Shortcuts

For alternative speedy access you can use keyboard shortcuts. There is comprehensive list in the manual on page 116.  You'll find much more than just Copy and Paste.  I've printed it in A4 to keep next to my laptop, and in A3 to wall mount next to my desktop computer.


3. Locating the User Manual

The user manual will show you where things are and is accessible from within the Silhouette® Studio software.

To find the manual, click on Help in the top Menu bar and select User Manual. 


It will open in the default PDF Reader on your computer, most probably Adobe Reader.


You might find it easier to navigate if you display Page Thumbnails.


Then it will look like this, and its a whole lot easier to find what you're looking for.


Page 2 has a useful Table of Contents.


The Find feature is useful to locate specifics.


You can print some or all of the pages (although there are currently 118 pages). New features are added to the Manual but it may be useful to know what version of the manual you are looking at.   This information is on page 115.


4. Using Interactive Search

Another way of navigating around the tools and actions is to use the interactive search feature.  This will actually guide you to the actions available from the Main Menu. Click on Help and then type the function in the search box. Here I've typed in 'zoom' and selected 'zoom - fit to window' it shows how to navigate to the action, and clicking on it carries out that action.


5. Quick Access Tool Bar

The Top white menu bar is now dynamic, displaying frequently used tools. Another time-saver when repeating actions.


I hope you find these tips useful. If you have any others to suggest please mention them in the comments to this post.


Bye for now,


   Profile | My Blog | Instagram


PRODUCTS USED:


Thursday, 15 June 2017

Insta-Cube Card and Applying Heat Transfer to Card


I'm always excited when there is a new style of card in the Silhouette Design Store. The new Insta-cube cards by Lori Whitlock are small folded cards powered by a rubber band. When you pull a card from its decorated sleeve it pops up to form a cube. I know a couple who are expecting their first baby later in the year, so I selected the baby version and think it will make a lovely keepsake.


To make the card extra special I gave some of the elements (giraffe, heart and the 'B' in baby) a fluffy texture to make the card and sleeve extra tactile. I used flocked heat transfer vinyl, but felt or speciality flocked paper could be used instead.


I've also used the newest version of Silhouette Studio, version 4, and included some extra screenshots to help you out in case you're not sure where things are located in the new version.

What You'll Need
Medium-weight card for the base
Printable Cardstock
Coloured or patterned card/paper
Rubber band (about 2.75"/ 70 mm)
Strong double-sided adhesive tape
Baby Insta-Cube Card file by Lori Whitlock #198865
Iron or Heat Press
Printer 


Step 1: Regular Cut

Open the file from the library onto the virtual mat.


Ungroup the design and move the small pieces aside. Change your page and mat settings if necessary. I wanted to cut the base pieces (grey here) from A3 cardstock so I changed the settings in the Page Setup window to A3 media and the 12" x 24" cutting mat. The Page Setup panel appears automatically when you open the software. If it is no longer there you can bring it back by clicking on the first button.


Rearrange the pieces to fit, and rotate if necessary. The rotation tools are still accessible though the main menu > Object > Rotate, but also through the Transform button/panel, Rotate tab. Of course, now you can have more than one panel open at a time, you can keep both panels displayed and even move them outside the Silhouette window.


(Optional) Ungroup the parts and recolour the dashed lines so that different cut settings can be applied.


To access the Cut Settings, select the Send option and select your media in the Material tab. The settings for the media are displayed and can be adjusted at the bottom left.


Move on to the Action Tab to make cut setting selections in 'Simple' mode, or in 'Cut By Line' (I cut the dashed lines with the ratchet blade at a lower setting).


Click Next, or move to the Send tab and select Start to commence cutting.

Separate out the other coloured cut pieces and cut them in your chosen colours and/or patterns.


Step 2: Print and Cut

I decided to put the Print & Cut function though it's paces, so placed and edited the other pieces together so they could be printed rather than cutting out all those small pieces. Fill the designs with colours and patterns.


Set your Page size appropriate to your media (as above for regular cut), and then add registration marks. These now have their own tab in the Page Set Panel.


Make an alternative sentiment label if required. I did one to demonstrate but didn't use it in my finished card. I used LW Cheerful and LW Title fonts. They weren't exactly the same, but close enough at this size I think.
Type as usual; using the Text Tool (on the left) and edit the font and size by opening the Text Style panel.


In the main menu, check that File > Print Page Setup is set to the correct size for the media, and then send to print (main menu > File > Print).  Before you click print, check that your settings are not set to borderless (or your printer's equivalent) or the Print & Cut won't align.

Once printed, cut on the mat using your normal settings for the card used.


Step 3: Using Heat Transfer Material

Sort out the pieces that you are going to cut from heat transfer. Remember that heat transfer elements need to be flipped (Object > Mirror > Flip Horizontal) or use the new Replicate panel (shown below).  


Turn off the registration marks and under the Send tab, select the 'Heat Transfer - Flocked' option from the media list.  I usually reduce the Thickness (pressure) setting, but you should carry out a test cut if you haven't cut this media before.


Place your heat transfer material shiny side to the mat and cut your pieces and then weed (remove the bits you don't need).  Separate the pieces and iron, or heat press them on to the places that you want them. Use a lower setting than normal and allow to cool before carefully peeling off the backing. You'll find details on my earlier post where heat transfer is applied to leatherette. You may need to encourage the flock to separate from the backing with a flat tool, and hold down the part that has separated against the card, and fold the backing back on itself to pull it away (don't pull it straight up from the card). A heat press isn't necessary, but it does a better job of applying heat evenly so that your base card doesn't scorch.


Step 4: Decoration and Assembly

Lori has provided a video tutorial on how to assemble the card. Follow the link from the card's listing in the Silhouette Design Store and search Insta-cube to locate it.
 
This is such a fun card and the added fuzzy elements make it extra special. Let me know how you get on if you try one of these cards or use the heat transfer on card technique in the comments below.  


Bye for now,


   Profile | My Blog | Pinterest | Twitter | Instagram


DESIGNS USED:


PRODUCTS USED:


Tuesday, 30 May 2017

Aligning the Pieces, easy as Pie.

I Thought I would share with you a tip for lining up your pieces after you have them all cut out. 
As we get braver with our cutting machines we like to push the boundaries with our designs. maybe using a few different colors within the same intricate design. How do we realign the design without placing and replacing each layer over and over again? Every time we reposition our vinyl it loses some of its sticking power.
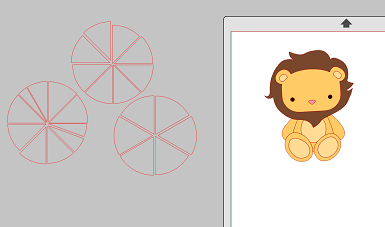
 If a design is busy we can get distracted by too many pieces, making it difficult to line up correctly. Pie is my favorite answer to most problems. For this demonstration, I have used this cute little lion I picked up in the design store. It is a simple design to show you the process.

 I layered the lion pieces up and filled in the sections with the different color I wanted to use. As this is an ordinary cut file all the pieces would cut out separately, so if I were to leave the image like this I would end up with a lot of cuts in places I don't want them. To turn it into the pieces I need I use the modify tool. by selecting overlapping sections and clicking subtract all (Hold down Shift to select more than one piece at a time).This tool removes all the bits of the design that are hidden from view and are not needed.

After the process is complete the pieces can be separated as shown in the image on the right you can separate them to check you have the correct pieces and simple use the undo button to put them all back together again.


Next, I create my alinement wheel my "pie". From the store I have purchased a file called "Pie Charts" this file has a number of different pie charts with different numbers of slices. Which pie you use will depend on how many colors you have in your design. I recommend that you use two slices of pie for the main color of your design, it will make lining up the subsequent slices easier.


 After Purchasing the pie design open it from your Libary to the mat and delete the "pies" you won't be using. For my design, I used the 6 section pie and colored the pie pieces to match the colors in my image. If you can't remember which color you used, select a piece of pie then select the dropper tool and click on one of the colors on you image this will change the color to match for you.


Your image is now ready to cut. Click the Send button in the top right of the software. For media, I selected glossy vinyl and clicked next this brought me to the action window.  within the action, section select the "Fill" tab. All of the boxes will have a tick in them, as we are cutting each color separately we will click on each tick to turn off the cut function. One by one click on a box to activate the cut function on each color and load the matching color into your machine. you will see that when you select the color of different pieces of your design the matching piece of pie will also cut out. Send each color cut job to the machine until you have cut all your pieces.

When you have cut your pieces remove the unwanted areas of vinyl from the backing sheet leaving only the pieces of your design and the piece of pie 

Apply a piece of transfer tape over the main section of your design and rub over to ensure good contact. peel back the corner of the backing paper beneath the "pie". Align the section of Pie on the next section of the design. when you are happy with the position, peel back the backing from the first sheet and allow the two pieces to come together  Be careful not to allow the "Pie-corner" to move
repeat this process until you have all the sections of your design placed back together. All is left to do now is apply your decal in the desired location or if you sending it to a friend leave the last layer of backing on and the transfer tape so they can easily apply it themselves.

This one is going in the post!


Designs Used

animal set

by Rivka Wilkins

Design ID #5353
Published: 11/27/2009

pie charts

Design ID #26383
Published: 4/24/2012

PRODUCTS USED: