Showing posts with label Design Team. Show all posts

Wednesday, 14 November 2018

Design of the Week - Autumn Word Art - 13th November 2018


Hello, Karen here with my Wednesday DOTW post and this week it's a word art design.

This design could be used for so many different things - home decor, clothing, a card or as I have for the title of a scrapbook page.

I decided that I didn't want any reference to Fall on my page so ungrouped the words and removed 'FALL' and I (heart) Fall.  I then decided to dispence with 'late nights' because to me autumn signifies dark evenings and early nights!


To make the remaining words fit around my design I rearranged them, adding some to the bottom left of my photo and then cut the design from adhesive backed cardstock.  This makes the job of backfilling so much easier when the card is already sticky.


Next I used this file, added an offset and then used three different coloured sketch pens to draw it.


My final, Silhouette, addition to this scrapbook page was to cut two banners of leaves from this design, which I reduced in size.

I then found some stickers and leaves that I had used on a previous page here which went perfectly with all the other elements on this page. 
PRODUCTS USED:

/>

Friday, 12 January 2018

Introducing the 2018-2019 Silhouette UK Design Team - Verity


Hi everybody, it is so good to be here! My name is Verity and I have been lucky enough to join this fabulous design team for Silhouette UK. I am so excited and I cannot wait to start making and sharing some fantastic projects for you. Today though, is just a little introductory post before all the magic begins. So here is a little about me.

I currently live in Liverpool and work full time as a Clinical Physiologist - basically I am involved in testing your nervous system. I have always loved doing anything arty from as young as I can remember, from loving art at school and going on to do an A-level in photography, to baking in the kitchen or turning my hand to a new project. The satisfaction you get when you have made something yourself is amazing and it's something I look forward to after a busy day at work.

I love to create. I am always constantly thinking of what my next project is and what great products can I use. I feel like I never switch off from crafting even at work! I have been crafting for a while, from papercrafts/cards to home decor and so much more, but I only started my blog back in October 2016 after deciding I needed a platform to show-case my makes and to help inspire others to create too. My blog is called Pretty Little Button and can be found here: www.prettylittlebutton.com. After all, for me is the best part, sharing my makes and being able to show-case a skill or technique to others, helping inspire them to create something too.

I would say my current style is a modern twist packed with plenty of technique however, I am always looking for and trying out new things. I have also designed and cut my own stencils with my silhouette cameo to use in card projects and love to print and cut some foiled sentiments - who doesn't love foil! More and more, I like to use my Cameo to create fun and modern home decor - creating personalise keepsake signs and wedding decor as well. I have had my Cameo for around 4 years, but I always find something new to create with it. Last year, I also added the Mint to my collection as I love to create custom stamps for my papercrafts.

So for my design team journey, I hope to bring you plenty of home decor, incorporating soft and hard furnishings, bring you some interesting and fun papercrafts, as well as new tips, hints and tricks along the way. Believe me, I always learn something new with my machines. Thanks for getting to know me and I will be back soon with a project for you all. But, for now I shall leave you with a few projects I have made with my Silhouette Cameo, so you can get a taste for whats to come!


Saturday, 16 September 2017

Kids Craft personalised bookmark

With the start of a new school year, a whole new group of friends could be on the horizon. What better way to forge friendships than an after-school craft party. This little project will not only keep them busy expressing themselves but also gives you the chance to learn everyone's names, (I can never remember anyone's name but I can remember what they made) here's a fun little bookmark project suitable for all ages.

Open silhouette studio and type the intended participants names by clicking on the text tool and then on your virtual page, use your keyboard to add names.
 By opening the text panel you can choose any a font that is installed on your computer, simply select one from the drop-down menu. If you are unsure what your text will look like in a particular font simply type the word and select the word by clicking at one end and dragging the mouse to the other end, the word will become highlighted click on any font type in your menu and the word will change to that font ( you can scroll through all your fonts one by one using the arrow key on your keyboard .   Big blocky fonts work best for this project. I have chosen Accord Heavy SF, bear in mind the age group you are working with when making your choice.

Select a flag type file from your library (lots of different styles are available from the silhouette store if you do not have one). You will need a flag for each name. Resize each of the names to make it fit nicely inside one of the flags.

Arrange the flags and names to make the best use of your media. I am using silhouette chipboard as its sturdy but not too bulky to place inside a book.(ensure your page settings match the size of your media).

 Select some designs from your library or the store to use as embellishments. Resize the designs so they will fit onto the flags. This is done by clicking on one of the boxes in the corner of the design and dragging it inward.
Arrange the embellishments to make the best use of the media.use the rotate button located in the transform panel to rotate you pieces where necessary.
Send the project to your silhouette from the material menu select chipboard and carry out a test cut, adjust the settings if necessary. Click send to cut your project.

Give each child a flag and place all the letters and embellishments in the center of the table with some markers and/or paint, perhaps put out some glitter and gems.
Let the children's creativity flow.
For younger children, this project also works well if the letters and embellishments are cut from silhouette self-adhesive card  weed the unwanted card away leaving only the "stickers"


Designs used:

File: flags
Artist: Silhouette
File: brontosaurus dinosaur set.studio
Artist: Studio Ilustrado
File: car.gst
Artist: Silhouette
File: Heart.gst
Artist: Silhouette
File:flower
Artist: Silhouette

PRODUCTS USED:


Light hold cutting mat for Cameo

Tuesday, 5 September 2017

Duel aspect bunting

Those of you who have attended the NEC to pick up your Silhouette supplies may have wandered into the artists' avenue and seen the beautiful bunting.


The lovely ladies of Crafts of hearts, the driving force behind the artists' avenue, will this year be hanging their bunting with a twist, With the help of silhouette and Picscan, we are personalising the bunting.


Carefully the stitches are removed from one of the flags to act as a donor to create our template.

As our bunting is cream we will not get a great contrast for tracing, so a piece of black card was used as a background.
The black card and the flag are placed on the Picscan mat and photographed. For help with Picscan please see the blog by Nicky pixscan-from-start-to-finish
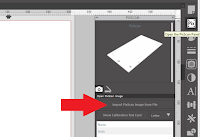
Open silhouette studio and open the Picscan panel, click on import Picscan image from file.
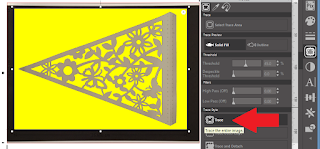


When your Picscan image has loaded open the trace panel.

select your trace area using the outline trace, and adjust the threshold until the trace picks up all the areas of your design. Click trace in the trace style section to trace the entire image.
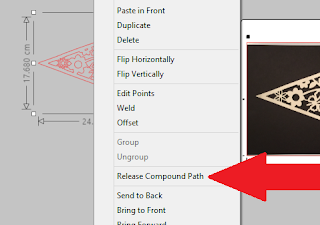
Drag the newly created cutlines off the mat and release compound path by right clicking on the design and clicking on release compound path.

 This will separate all the pieces of your design picked up in the scan, any areas such as the outside border that are not required should be selected and deleted using cut, located in the top toolbar.
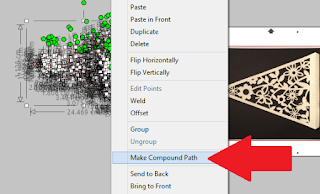
After editing, drag a box around your cutlines to select them all, and right click. From the pop-up menu select "make compound path".
You may want to save this new cut file to your library.
With the cut line of the flag selected, click on "copy" from the top toolbar and then open a new silhouette page.
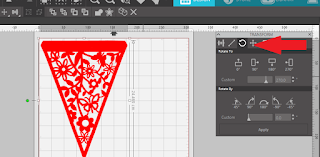
With this new page open, select paste from the top toolbar and a copy of your flag will appear on your virtual workspace.
To make things easier, I have rotated my flag to the way it will hang, I have also used fill to colour the flag in for ease of viewing.
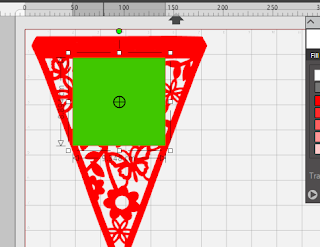
Draw a box on the flag to determine the usable space in which the letters can be placed, type the first letter you will use and using the box, determine the size your letters.
Individually type all the other letters that will be needed for the project to one side of the mat for later use. delete the box it is no longer needed.
As I have 12 letters, I will require 12 flags to place them on. Of course, the bunting will be viewed from both sides so it needs to read correctly from both sides, so if we were to simply merge the letters into the bunting, they would not read correctly. To create an illusion we will add a piece of reflective card between two pieces of bunting and add separate letters to both sides allowing the text to be read correctly.
Ensure your silhouette machine is plugged in, switched on and connected to your computer. Depending on the size of media you are using, you may be able to arrange a number of flags on your mat at one time. I am using A4 stock, so I must cut my flags one at a time. Place your chosen material on the cutting mat and load into your machine.
Click on send, choose your material type and adjust your blade accordingly and carry out a test cut to check your settings, adjust again if necessary. Proceed to cut out the file by clicking send at the bottom of the control panel. Repeat this until you have twice as many flags as letters in your word or sentence, for example with Craft o hearts I will need 24.
Only 12 of my flags require a tab, so it will be necessary to adapt the original file. Select Paste from the top tool bar as before and another copy of the trace will be added to the workspace. Open the fill panel and fill your new flag with any colour, I have used yellow (as the cut line will show up better) select the knife tool and cut the tab as shown.
Proceed to load media and cut out the original number of flags, for example, I will be cutting out 12.
Move your flag off to one side off the mat to clear your workspace.
 Arrange your letters to make the best use of your chosen media,(silhouette adhesive card works well for this project) load your media for the letters onto your cutting mat and load into your silhouette. Choose the correct setting for the media and carry out a test cut to ensure a clean cut, repeat this process until you have two of each of the required letters.
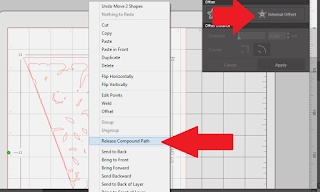
To create the reflective central piece of card open the modify panel and select open the offset panel with internal offset selected, create an offset on the flag without the tab.
 Ensure you leave enough area for the application of glue. Click Apply and move the original to one side. With the newly created cutline selected, right click and select "release compound path" select the outer line only and move to one side delete the rest of the offset, this gives you a solid triangle slightly smaller than your flag. You will need one of these for each of your letters, I will require 12. Place your reflective card stock on your cutting mat and send to your machine, (remember to carry out a test cut)

Sandwich a reflective triangle between one of each of the other two types of flags using the pointed tip as a guide, 


Use wet glue to allow yourself some wiggle room


Place a letter on each of the flags with tags and glue into place. Then assemble the letters in order to spell out your phrase.
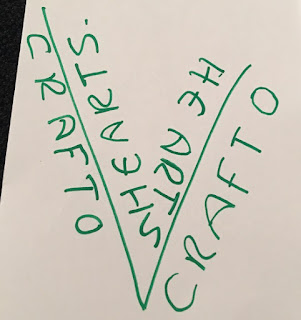

Decide how your bunting is to be hug. Artist avenue has it zig-zagged over the main walk way so I drew a zig-zag on a scrap of paper a wrote down the words as they should read when hung, rotate the piece of paper and write the text again, this is your template to follow when applying your letters.
Keeping your flags in this order lay down some cord or ribbon, close the tabs on each of the flags to enclose the cord making sure not to catch the cord in the glue. This allows for repositioning of the flags after hanging. For a professional finish run a single line of stitching along each folded tab.


Remember when you next visit the NEC to pick up your silhouette supplies, pay a visit to artists avenue to see the finished project.


PRODUCTS USED:


Light hold cutting mat for Cameo
