Showing posts with label Scratch-off Sticker Sheets. Show all posts

Monday, 17 December 2018

Christmas tree table topper scratch of cards


Hi everyone. It's Verity here from Pretty Little Button bringing you another project. Today I have a quick project to whip up to add to your table for the kids to play and win a prize whilst waiting for dinner to arrive. The prize is completely up to you and this standing tree card leaves you plenty of space inside to let them know. The scratch-off sticker sheets are great for making a run game and allow the kids to scratch off to see if they have 3 matching red stars to win (well you can choose what number and colours are needed to win). These are so quick to make you can even make one for the adults too!

Christmas tree table topper scratch of card details: 

Add your designs from the design store into your design space. I find it easier to change the colour of the designs to the colour of cardstock I plan to cut out off. 

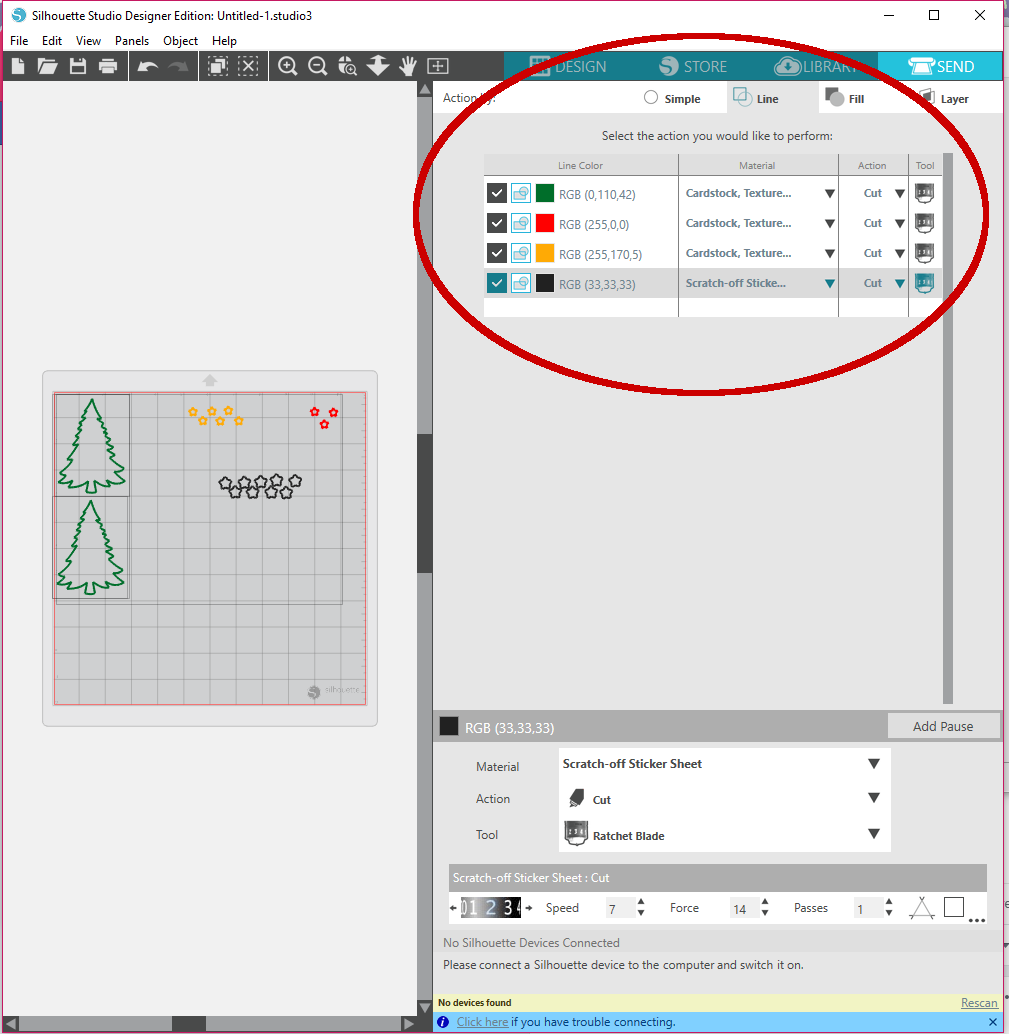
The black stars represent the starts I want to cut out of the scratch off sticker sheets. However, I needed to make these slightly larger than the stars to cover them up. Offset tool to the rescue!


For these stars, I added a 0.06-inch offset and deleted the original black stars from the design to make sure they wouldn't cut later on.


To make it easier to see where to put the different colours of cardstock on my mat so I only had to load it up once, I changed the 'reveal' of my cut mat from 0% to 100%.


The line colour also makes it easier to see the different shapes to cut out of different materials. If you have the cameo 3 you can also set this to cut from either blade holder 1 or 2, however, I have the cameo 2. So I initially cut the cardstock and before it cut the scratch off sticker sheets I changed the blade number for the cut settings. 

Christmas tree table topper scratch of card assembly: 

To assemble, add a little shading to the trees with green ink and a blending tool. Next, score a line at the top of the tree that will make the back of the card. Add adhesive above this scoreline and adhere the two trees together. This creates a hinge at the top of your trees to open and form the card. 


Next, peel the scratch-off stars from the backing and adhere on top of the cardstock stars. The adhered the star layer to the card, using a bit of liquid adhesive to the back of the card stars to ensure they stay in place. 


If this has inspired you to try this out, please post below. I would love to see it!

Until next time,

Verity


Profile Pretty Little Button Blog | Instagram | Facebook

DESIGNS USED:

Christmas tree by Sophie Gallo, Design ID#32030

PRODUCTS USED:


Wednesday, 5 September 2018

Design of the week - Scratch-Off Greetings Cards - 5th September 2018


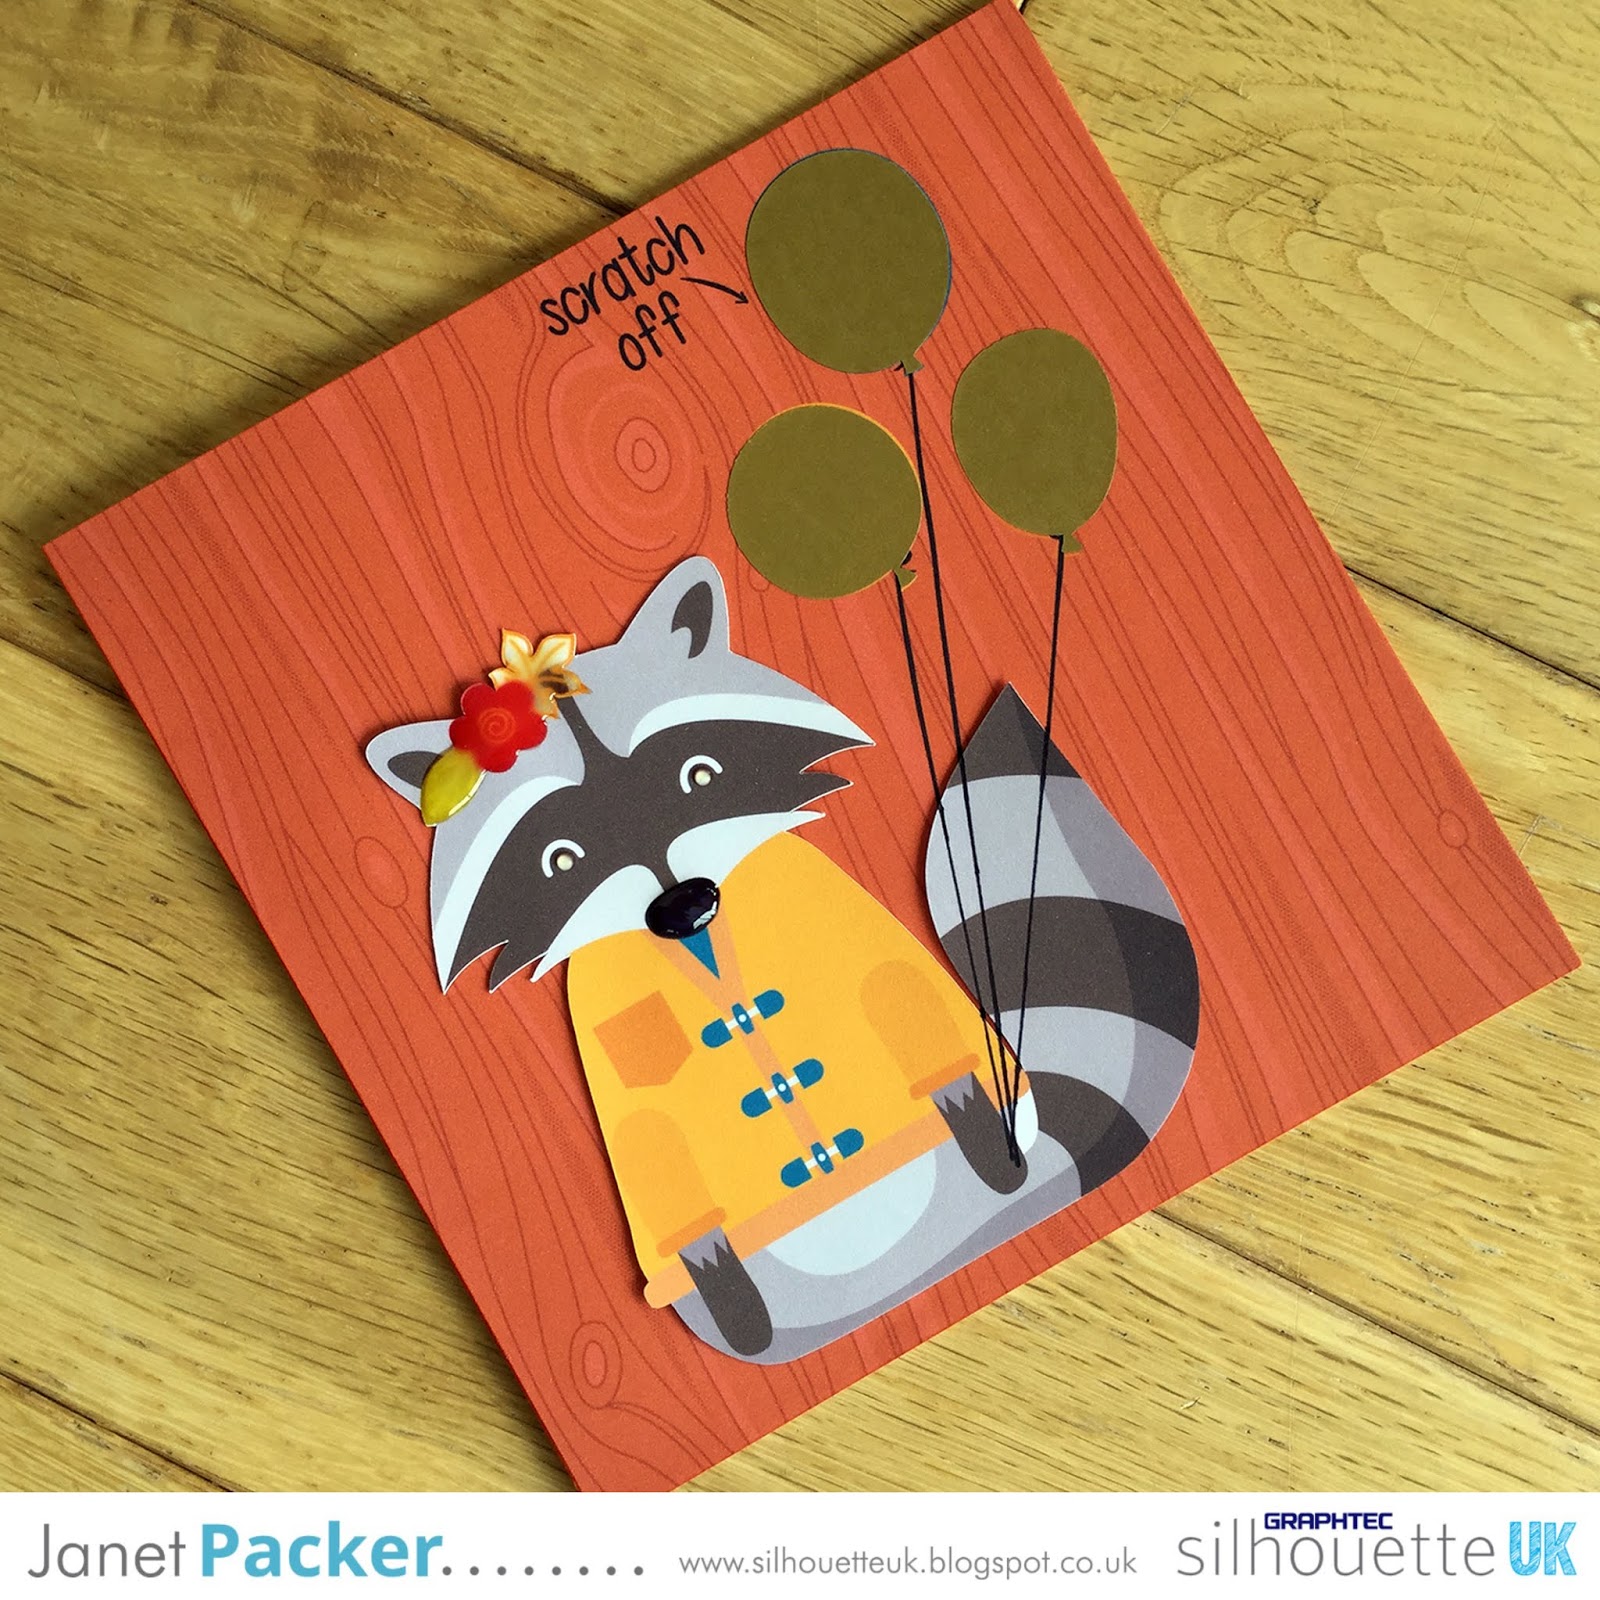
Hello, Janet here bringing you a cute card idea using Silhouette Scratch-Off Sticker Sheets and this week's free design, the Autumn Raccoon file (#271649). The scratch-off sheets can be cut into just about any shape on your Silhouette Cameo or Portrait. Once peeled from the backing paper they can be adhered over printed or hand-written text and later scratched off to reveal a hidden message. This is great for interactive greetings cards of all kinds; it can be used to reveal a surprise gift, some special news, or just a fun personalised greeting.

Today's post is intended to show how I used this fun product with this week's free file, and isn't a tutorial. Where necessary I've linked to other posts which contain hints and instructions on how to use the techniques mentioned.


To make this card I put together a Print & Cut Sheet. The racoon was used as is, but the card front took a little preparation. I first drew a rectangle the size of my card front and filled it with a background pattern. I then copied the balloon file onto the card front and extended the strings by editing the points at the bottom end of the strings. The balloons were coloured using colour picking from the racoon image. I added text to say "scratch off" and a small arrow from a dingbat font using the glyphs panel. Before sending to print I ensured that all the non-cut lines were set to clear, so that only the lines around the outside of the racoon and the square would be visible and cuttable (using cut by line colour).


I then used the cut outlines of the balloons to cut a number of them from the scratch-off sheets (I made extra for future projects). Then I peeled them from the backing sheet and aligned them over the printed balloons.


Next I adhered the raccoon onto the card front and using a black pen and ruler, drew the strings on that had been hidden by the raccoon's tail. The the entire front was mounted onto a square card base, and finished by adding a little glaze medium to the raccoon's nose and the head decorations.


I think incorporating scratch-off panels has added some fun interaction to this card. I'd love to see what you make with the scratch-off sheets - do share over on the Silhouette UK Facebook page.


Bye for now,


  Crafting Quine BlogInstagram @CraftingQuine


DESIGN USED:


PRODUCTS USED:

Monday, 3 September 2018

Thank you cards for your customers - Gold Scratch of sheets


Hi everyone. It's Verity here from Pretty Little Button bringing you another project. Today's project features the gold scratch-off sticker sheets. Gold scratch-off sticker sheets are just like the material you find on scratch cards from the post office. The material sits on top of the clear plastic adhesive sheet. Therefore, just cut your shape like you would a sticker, peel off of the adhesive back and stick down onto your project. Then your recipient will be able to scratch the gold material off the clear plastic to reveal your suprise. Now, I know a lot of people use their Silhouette machines to make objects to sell. But why not use your Silhouette machine to help with your business stationery as well? I don't sell items I make, but I wanted to do this post to help inspire you. These cards are a great way to interact with your customers, and reward repeat custom. They are so easy to make and easy to change the 'reward' to suit you. 

Thank you cards for your customers' details: 

To start, turn out your print and cut registration marks on and decide on how big you want the card to be. The cards I made are 2"x 3". I used the Just' a Little Thank You' design from the store (ID below), and positioned this towards the top of the box. To make sure this was centred. I used the transform panel and whilst selecting the box and text I aligned this horizontally in the centre.

Before adding any more text, it is best to work out and place your 'scratch-off' on your design. I kept it simple with a circle, and use the Width and Height options in the top toolbar to alter the size. Again, to make sure this was aligned centrally, I repeated the previous step.


Once I was happy with the design, I grouped the whole card together. Using the replicate window, I duplicated the card using the duplicate right option. I was able to fit three cards on the a4 sheet horizontally. 


To space these cards equally, move one card to the outer edge of the print and cut area. Selecting all three cards, selecting the horizontal spacing option in the transform window. 

You can then use the replicate the trio of cards with the replicate window selection duplicate down option. Once the panel is full, send to your print and load on to your cutting mat. 

Before cutting these out. make sure you either move the 'circle' lines for your scratch off shapes off the card panels or change the line colour off red. You can then cut by line colour of red as long as no other item in your card has a red line and only the outline. 


On a separate sheet, copy and paste the circle 'scratch-off' shape enough times for the number of cards you have cut. Apply the gold scratch-off sticker sheet on to your mat and load into your machine. Send the circles to cut, making sure you select the correct material from the menu and test-cut first!

Once cut, peel the material off the adhesive backing and stick onto your cards.

Thank you cards for your customers'  Photos:


If this has inspired you to try this out, please post below. I would love to see it!

Until next time,

Verity


Profile Pretty Little Button Blog | Instagram | Facebook

DESIGNS USED:

Just a little thank you phrase by Kolette Hall, Design ID #274553


PRODUCTS USED:


Saturday, 3 February 2018

Valentines Scratch Giftcard


Hi everyone. It's Verity here with my first project for you all. I had some technical difficulties with my computer - seperate from using my Cameo, so I haven't been able to bring you a project until now. Today, I am showing you how fun and easy it is to create a scratch-off gift card for your Valentines.

Scratch-off gift card details:

First of all, you will need to design the gift card. Based on the size of the envelope I was going to use, I created a gift card measuring at 4" 3/4 X 42 3/4. I used the Heart Frame for each of my scratch-off areas. This needed to be made into a compound path in order to add a gradient fill (2). To do this, I just highlighted the outer and inner frame, and right clicked to select make a compound path. If I hadn't done this, it would have filled both the outer and inner frames with no inner aperture (1).


I used Fearless font for the main text on the gift card and Miss Molly font for the body of the text. To add a little more interest, I used one of the hearts from the Frame set and positioned this multiple times over the card. This was printed out on to plain paper, as I wanted to mount this onto silver cardstock.

Now I had the main basis of my gift card, I was able to create the scratch-off shapes to cover my 'gift' areas. I selected the circle shape and drew whilst holding shifting over one of the areas.


To speed up the process and to prevent different size circles, I cleared the gift card design to one side and replicated the circle 6 times with the Replicate panel.


These were then cut from the Silver Scratch-off Sticker Sheets using the cut settings stored in the studio. However, I suggest doing a test cut before your proceed to a full cut as machines can vary slightly. These were peeled off the adhesive backing and stuck down over the gift areas on the gift card.


To finnish this gift card off, I wanted to encase it in a coordinating envelope. I used the Hearts tiny Flap 5"x5 envelope and embellished this with a 'Love is all you need' Die cut, and some sequins and Nuvo drops to match.


I hope you enjoyed this post and inspires you to reveal you Valentines gift in a fun way this year.

Until next time,

Verity


Profile | Pretty Little Button Blog | Instagram | Facebook

DESIGNS USED:

Love is all you need - Jennifer Wambrach Design ID #54212
Hearts Tiny Flap 5x5 envelope - Snapdragon Snippets Design ID#178366
Set of 4 Frames, heart, butterfly, star and flower - Alaa'l Design ID#8224

FONTS USED:


Fearless Font - Rohnna Farrer Design ID #212848
Miss Molly Font - Miss Kate Cuttables Design IS#215911


PRODUCTS USED: