Friday 30 November 2018

Loving layouts featuring the Silhouette

Hi everyone

Due to some technical issues I am unable to show you what I hoped today, so instead I am sharing some scrapbook layouts.I regularly make pages using cutfiles created with the Silhouette.  It is such a useful tool and since being on the Design Team I have used it for so many different materials and projects but I originally bought it for my memory keeping.

I love choosing cutfiles to go with a  theme and this year I went to Wales on an outdoor holiday so this was perfect...


Big titles make a great statement on a page and I backed this one using foam pads and added fringed cut paper behind the hearts...


A background cutfile can be the perfect accent, adding extra interest behind the photograph as this ice cream example shows...


It is fun to experiment with painting or adding mixed media to cutfiles and colouring the floral element to this page worked perfectly...


Combining cutfiles is another simple way to add interest to a layout. Here I have used the hexagon page frame and the fringed hearts...


A plain white cutfile (like this adventure frame) pops from a colourful background sheet of patterned paper and minimal embellishments are needed


On my final layout I have painted the paper that backs the cutfile and forms the rainbow...


Thanks for stopping by and reading my post today and I will be back soon to share more on my Silhouette journey

Ruth
xxx

Thursday 29 November 2018

Faux leather earrings


I'm super excited this week to share my project as I been wanting to make some really cute earrings for ages! This project was very quick and easy to do and perfect for those last minute Christmas pressies! 

Materials

For this project you will need

Step one

First open the file in Design Store and resize the earrings to the size you would like. The earrings I made are approximately 3cm by 4cm. Once you are happy with the size of the earrings click on 'Send' and choose your cut settings. I used the preloaded 'Faux leather paper' setting but I adjusted my blade setting to '7'. 


Step two

Once you had cut out your design remove from the cutting mat and attach the hooks. I didn't need any special equipment for this I was just able to pull the hook open and slip the earring on the hook using the loop provided. 


And the project is complete! With the material being made from paper you would also be able to add further embellishments to the earrings. I really can't want to make some more of these. Thank you for reading this post. If you enjoyed it please feel free to leave me a comment. 

Thanks
Helen x 


Wednesday 28 November 2018

Let's Start By Taking A Smallish Nap or Two


Hello, hello - Karen here with a 'sort of' design of the week.  I apologise in advance for the photography as it has been a horrible foggy day today and impossible to get a decent photo.

From the 22nd to 30th November the Silhouette Design Store is giving away a different free design every day!


This was one from Sunday and as soon as I saw it I knew the exact photo I wanted to use with it. 

I decided that I would make an 11 x 8.5 scrapbook page - a size I used to scrap with all the time but haven't used for several years.


I started by arranging lots of z's around the page, adding a rectangle to hold my photo and writing my journaling, all of which will be written using Apple Pie Sketch font and a blue Silhouette pen.


I added the design to my page, resized and ungrouped it then rearranged it as I wanted to use the moon and clouds to hide things on my photograph.


I added a few more stars and cut it out.  I backed the stars with gold glitter card and the text with silver.

All that was left to do was to add my photo, moon and clouds.


I think that the whole page took less than 50 minutes to make from start to finish!


PRODUCTS USED:


Monday 26 November 2018

A Shell in your Pocket | Cutting and Sketching at the same time | Niki Rowland


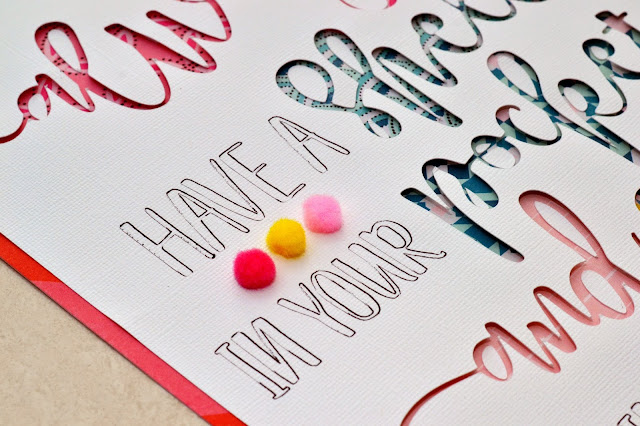
Hey there, Niki back with you today with a favourite technique of mine - cutting and sketching at the same time. It's one of the benefits of having a Silhouette Cameo 3 becuase it has the duel blade holder. This means I can have a blade in one and a sketch pen in the other and run the design through my machine once instead of twice. 

I started off my choosing a design. I went for this lovely one called 'Always have a Shell' by Jillibean Soup which I opened up on my screen.


I ungrouped and removed the words I didn't need.

 And then in the 'Send' screen, I dragged a box over the parts of the design I wanted to sketch instead of cut, went down to Tool 2 and selected 'sketch'. Once the parts I wanted to cut with Tool 1 were red and the parts I wanted to sketch with Tool 2 were blue, I loaded my Tool 2 holder with a black sketch pen and sent the design to my Silhouette.

I love the effect. I then backfilled the cut words and left the sketched words as they were. Sometimes I colour them in with paints or inks but on this occasion I left them blank.


I then created the rest of my layout over on the right side of my page.


I kept the rest of the layout quite simple as I wanted the focus to be on the oversized title.


Thank you so much for joining me today - will you try cutting and sketching at the same time?
Happy scrapping xx


 DESIGNS USED:
 Always have a Shell by Jillibean Soup Design ID: 271717


Sunday 25 November 2018

Sunday's with Steph - 12 x 12 Scrapbooking layout - Sometimes the smallest things take up the most room in your heart


Hello Crafters and welcome to this weeks blog post!

On a recent retreat we were given some per-retreat challenges.  On one of the challenges we were given the saying "Sometimes the smallest things take up the most room in your heart" So I decided to look on the silhouette store to see if there was anything suitable.  As per usual I was impressed by the vast amount of choice available in the store.  After looking for a while I eventually settled for this one https://www.silhouettedesignstore.com/designs/129638  I chose my favourite white bazzill textured paper to cut it on and made sure I changed the passes from one to two.


Once I removed the sheet from my Silhouette Cameo I decided to use the sheet as a whole rather than the titles.  I flicked the paper with brightly coloured paint before I backed the whole sheet with a sheet of paper from Shimmelle's box of crayons collection. I used foam raisers all across it so it gave the layout a certain depth.


As the saying is such a big part of this layout the rest of it came together quickly.  I used four photos of my darling girls which I backed onto papers from the same collection and then arraigned all of the embellishments and sequins around the layout and then that was it....All done :o)


Until next time crafters!

Steph xx

Saturday 24 November 2018

'Tis the Season - Mass Producing Cards with Printable Sticker Foil

Fa La La - Tis the season - Mass producing cards with printable sticker foil - by Janet Packer https://craftingquine.blogspot.co.uk for Silhouette UK Graphtec GB

Hello, Janet here again from the Crafting Quine Blog. Every year I make one or two card designs in multiples, and this year I've picked a lovely contemporary card design by Kristen Magee; the
Fa La La Christmas Card (#234355). As I wanted to mass produce this card I knew that I'd have to simplify it and to add some quick additional shine I also incorporated some of the Silhouette Sticker Foil.

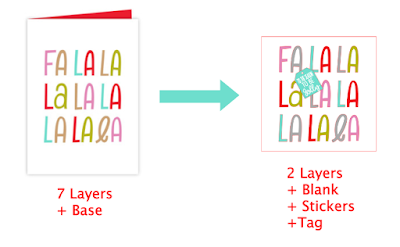
I thought I'd take you through the process of how this card evolved to the point at which I felt I'd made it as easy enough to make in quantity. To do this I reduced the number of layers, and brought in the Print & Cut technique as well as adding some fast and easy extra shine with the foil sticker paper.


Fa La La - Tis the season - Mass producing cards with printable sticker foil - by Janet Packer https://craftingquine.blogspot.co.uk for Silhouette UK Graphtec GB


What You'll Need
Silhouette Silver Printable Sticker Foil
Medium-weight White Textured Cardstock
Square Card Blanks
Liquid Craft Adhesive
Silver Cord
Silhouette CAMEO® 3
Silhouette 12" x 12" Cutting Mat
A3+ Printer (if printing on 12"x12", otherwise an A4 Printer)

The original design has seven layers plus a card base, one layer of card for each colour. It is a lovely card (you can watch the designer put it together, the video link is in the product description), but there are lots of layers to assemble and to post.


STEP 1: Squaring Up for Blanks

I deleted all but the top layer and made it fit a square of the same size as my card blanks (they are 122 mm square). I could cut four of these from a piece of 12" square cardstock.

Fa La La - Tis the season - Mass producing cards with printable sticker foil - by Janet Packer https://craftingquine.blogspot.co.uk for Silhouette UK Graphtec GB


STEP 2: Losing the Layers

With a copy of the above cut file I made an offset of the letters and filled each letter using the colour picking technique.

Fa La La - Tis the season - Mass producing cards with printable sticker foil - by Janet Packer https://craftingquine.blogspot.co.uk for Silhouette UK Graphtec GB


STEP 3: Making the Print & Cut

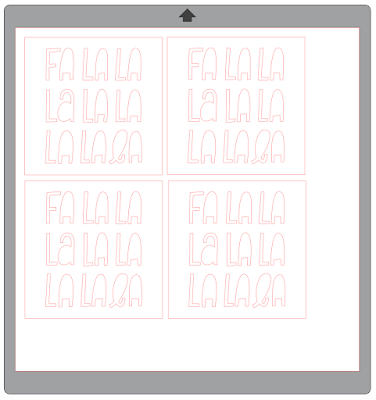
I then arranged four copies as a Print & Cut on 12" square textured cardstock (I like to print on the non-textured side). You'll need a large format printer to print these on the 12" cardstock. They can be printed with two to a sheet on A4 cardstock with a regular printer however.

Fa La La - Tis the season - Mass producing cards with printable sticker foil - by Janet Packer https://craftingquine.blogspot.co.uk for Silhouette UK Graphtec GB


STEP 4: Adding the Silver Sticker Paper

With a copy of the Print & Cut file, I ungrouped the set of letters. selected just the letters I wanted to cut from the Silhouette Silver Foil Sticker Paper and arranged them on a US Letter-Sized page (to match the sticker paper).

Fa La La - Tis the season - Mass producing cards with printable sticker foil - by Janet Packer https://craftingquine.blogspot.co.uk for Silhouette UK Graphtec GB

Then I cut the letters from the Foil. The default settings for the 'Foil. Printable' are Blade 5, speed 5, Force 33. I was able to reduce the force to  31.


Fa La La - Tis the season - Mass producing cards with printable sticker foil - by Janet Packer https://craftingquine.blogspot.co.uk for Silhouette UK Graphtec GB
I was then able to peel-off the silver stickers and align them over the selected letters..

Fa La La - Tis the season - Mass producing cards with printable sticker foil - by Janet Packer https://craftingquine.blogspot.co.uk for Silhouette UK Graphtec GB


STEP 6: Print & Cut the Tags

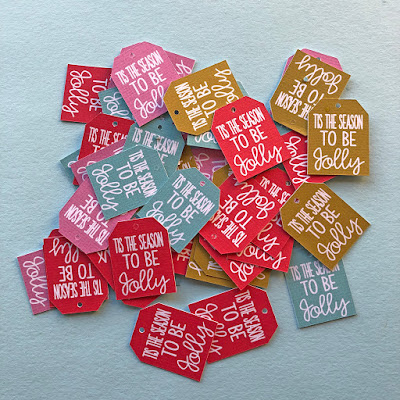
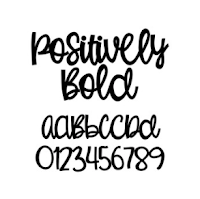
I thought the design needed an extra pop of colour, so I designed these little hang tags using the Sofia Reign Sans Bold and Lettering Delight's Positively Bold fonts. The colours were colour-picked from the Fa La Print & Cut so they matched perfectly.

Fa La La - Tis the season - Mass producing cards with printable sticker foil - by Janet Packer https://craftingquine.blogspot.co.uk for Silhouette UK Graphtec GB


STEP 7: Finishing

To finish, I just layered up the cutout layers with the Print & cut layers and adhered them together and  then to the card blanks with liquid adhesive. Then I affixed the tags with a little silver cord threaded through the hole, and the cards were complete.


Fa La La - Tis the season - Mass producing cards with printable sticker foil - by Janet Packer https://craftingquine.blogspot.co.uk for Silhouette UK Graphtec GB

Do you mass-produce cards to send out at Christmas?  I'd love to see your designs, so do share them over on the Silhouette UK Facebook page.

Bye for now,


  Crafting Quine Blog@CraftingQuine


DESIGNS USED:

PRODUCTS USED: