Wednesday 31 October 2018

Haunting Night | Halloween using Adhesive Corrugated Paper by Niki Rowland


Happy Halloween!  Niki here today with this fun Halloween layout!

I've used two cut files from the Store: Haunting Night by Paige Evans and Pumpkin Trio, also by Paige Evans


I cut the background word file from black cardstock. I then back filled it by hand - this was a mistake becuase it took AGES!  I should have cut the patterned papers on my Silhouette too but I hadn't saved the sized background so therefore couldn't match it up without re-cutting so I had to do it manually.


I also cut the Pumpkin Trio cut file from the adhesive Corrugated paper - these cute little pumpkins were the perfect embellishments and the corrugated texture was great!

This layout was great fun to make, even though it did take me a long time!

What Halloween projects will you make?

Happy scrapping xx 


DESIGNS USED:
Haunting Night by Paige Evans
Pumpkin Trio by Paige Evans

PRODUCTS USED:
Silhouette Adhesive Corrugated Paper

Tuesday 30 October 2018

Corrugated Card Autumn Leaves Card.

Hi everyone, its Helen here from Helens Craft Studio and I'm super excited to be brining you my very first make for the Silhouette UK blog. Todays project is an autumnal birthday card made with a cut file from the Silhouette Store and using the brown corrugated adhesive card available from Silhouette UK. 

What you will need:

Step one:

Download the file from the Silhouette Design Store and open in Silhouette Studio®. Select the shapes and 'ungroup' them so that you can separate the leaves from their squares. Then place the leaves at the top of the design space and resize so you have some large leaves and some small leaves of each type. I then cut the leaves design out of the accent papers. 

Step two:

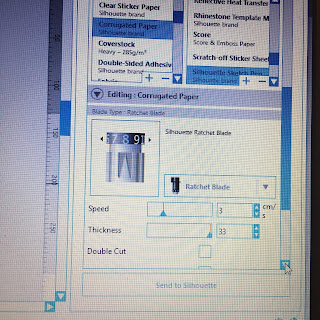
To add texture to the card I opted to use the Silhouette Corrugated Self Adhesive Card. This was a great material to use and created a great overall autumn look to the card. It was very simple to use, simply load the card onto the cutting mat at normal, then select 'corrugated paper' from the menu. This will automatically set your blade to 8, speed to 3 and thickness to 33. I found that the cut settings were very accurate and the design cut first time.  

Corrugated paper settings

Leaves cut from the corrugated card

Step three:

As part of the card I wanted to add a sentiment within one of the leaves. To do this I used the Silhouette Sketch Pen feature. Firstly I took one of the leaf shapes and enlarged it so that I could fit my message inside. Selecting the font tool I typed my message inside the leaf. I then placed the black Silhouette Pen into the holder and with the Silhouette Pen tool selected sent the design to Silhouette to be drawn. After the sentiment had been drawn I cut the leaf shape out as normal. 

Card elements cut out and ready for assembly

Step four: 

Now that all of the elements of the card are cut out all you need to do is assemble it. I started out by folding my A4 card to make an A5 sized card then used a 20cm by 13.8cm accent paper for the first layer or matting and layering on the card. Arrange the leaves and sentiment on the front of the card until you are happy with the overall look of the card. Once you are happy with the position of all the leaves use a glue stick to attach them or the adhesive backing for the corrugated card. 

Finished card

Thank you so much for reading my blog post. If this project inspired you please leave me a comment below or share this post :)


Sunday 28 October 2018

Sunday's with Steph - Always be happy 12x12 scrapbooking page


Hello Crafters and welcome to this weeks blog post!

So this week I chose a delightful cutfile by the very talented Paige Taylor Evans!  https://www.silhouettedesignstore.com/designs/228032?sortby=relevance&search=paige+taylor+evans+%26amp%3B&&page=7&limit=30

I cut the file out on my regular favourite paper Bazzill basics textured card and cut it on the heavy card stock setting passing through twice.

I decided I wanted the flowers to look quite like daisies so I started by using the cut file as a template and turning it back to front I drew round the centres of the flowers.  When I cut them out of yellow paper I made sure cut them out a bit bigger than the line so they sat on the back of the cutfile when turned the right way round.  I then cut the background pink pieces of paper and then the leaves which I backed in green.  I chose a white textured polka dot paper for the backing of the daisies and I cut this as a whole and stuck it on the back of the cutfile.


I tried this on quite a few backgrounds before I settled on a similar colour paper to the centre of the daisies and put the backed cutfile onto the paper.  Once I stuck down the ampersand rest of the page came together quickly.  I backed the photo of me onto some floral pink paper and then on black to give it that extra pop!  I used a couple of tags, some ephemera butterflies, some foam glitter hearts and some glossy floral stickers.  I also used three different types of lettering to make up my title a glossy sticker, some small alphas and a foam word.  


Here it is my finished design.  I must say the backing of the cutfile was a labour of love that I started and put down again a couple of times but I did really like the end look!


Until next time.....

Take care,

Stephanie


Saturday 27 October 2018

Step-by-Step Guide to Creating Your Own Shadow Diecuts

Make your own Shadow Diecuts with the Silhouette Cameo. Tutorial by Janet Packer for Graphtec Silhouette UK https://craftinhquine.blogspot.co.uk


Hello, Janet here with a new step-by-step tutorial on designing your own shadow word die cuts in the Silhouette Studio® software. Large metal word dies with a matching shadow, or halo, seem to be everywhere at the moment, and I'm so pleased that we can make infinite variations of these using our Silhouette machines. I've made a small selection of diecuts in different colours using the Silhouette Adhesive Cardstock and the software's Print & Cut feature. The same technique can also be used to cut the pieces from regular coloured cardstock too, but the adhesive backing makes them clean as well as fast to use.


Silhouette Adhesive Cardstock

There are 8 sheets in a pack, each sheet being 8.5in. x 11in., or 215 mm x 280 mm. The sheets are essentially smooth, coated, medium-weight cardstock with an adhesive backing, protected by a yellow peel off layer.  They can be printed on using a home printer. I used my regular inkjet printer and the colour reproduction was bright and clear.


Silhouette® Studio software recommends a setting for the adhesive cardstock sheets under "Cardstock Printable, Adhesive-Backed" (Blade 4, Speed 3, Force 29 and a single pass). I found that this setting cut a little too deep, so I reduced the force to 24 to achieve a 'kiss cut'. Of course, your ideal setting may differ, so I'd advise that you carry out a test cut first.


Designing the Shadow Diecuts

Step 1: Choosing a Font. You can choose almost any font to make a shadow diecut. I've seen the metal dies in all capitals, all lower case and title case, serif fonts (with the extra horizontal bits), non-serif, monoline (letters are a regular width) and script, or brush fonts. I've chosen the Watermelon Font from the Silhouette Design Store, which is a premium script font. It is a fancy font (with extra glyphs), which you might think would be too intricut to cut successfully with thick card, but I have a couple of work-arounds for you, so read on!


Step 2: Generate your Words. Click on the Text Button and then type the words that you want to use.

Make your own Shadow Diecuts with the Silhouette Cameo. Tutorial by Janet Packer for Graphtec Silhouette UK https://craftinhquine.blogspot.co.uk

Place each word on a new line, but keep them in the same text box (for now). Then, EITHER (1), Select the text, navigate to the Font section of the library, find your chosen font and double click on it, or (2) Select the text, navigate to the Text Style panel, chose the font and click once. As I have a lot of fonts, I find the former method is quicker (shown in the pics below).

Make your own Shadow Diecuts with the Silhouette Cameo. Tutorial by Janet Packer for Graphtec Silhouette UK https://craftinhquine.blogspot.co.uk


Step 3: Finesse Your Words. Adjust the Character Spacing if the majority of your letters are either too close or too far away (if there are only a few that need moving, adjust them separately after ungrouping). Select all the words and ungroup (select, right mouse click, Ungroup). Note: you can no longer edit your text once you have done this, so if you are uncertain, or may want to edit the text later, make a duplicate copy before ungrouping, and keep it off the the side. Once your letters are all ungrouped they look like this.

Make your own Shadow Diecuts with the Silhouette Cameo. Tutorial by Janet Packer for Graphtec Silhouette UK https://craftinhquine.blogspot.co.uk

Fine tune the placement of individual letters if necessary. The only change I made was to move the dots on the 'i's a little closer down.


Step 4: Thicken the Font. Thicken your letters by using an offset of the words if, like me, you've used a script type font with fine details. It is usually unnecessary to thicken other styles of font. To thicken the font, select one, several, or all of your words, then open the Offset panel, zoom in, click offset and enter a small value. It is better to do this rather than reduce the value with the slider because the necessary offset is so small that is is easy to inadvertently take the slider to zero. If that happens you'll need to start the offset again. For this font I typed in a Distance of .01", Square corners, and then clicked Apply. Prior to clicking Apply the offset looks way too large, but it does reduce in size when you click apply.

Make your own Shadow Diecuts with the Silhouette Cameo. Tutorial by Janet Packer for Graphtec Silhouette UK https://craftinhquine.blogspot.co.uk

If you are happy with the result, move or delete the original letters (a quick method is to move the new one aside (one word piece), delete the original (many letter pieces) and move the new one back into place). WARNING: Don't delete your dots by mistake (been there), and also keep some of the original letter insides (counters); I sometimes substitute the new ones with the originals if the new ones are too small to cut. Fill the new words with colour, they will automatically have welded, but you might want to group each word, so that you can easily rearrange them on the mat if you need to without leaving bits behind (select a whole word, right mouse click, click Group).


Step 5: Make the Shadow (or halo). Select all the words again, open the Offset panel and this time make a bigger offset. In this case the default of 0.125", Rounded Corners worked for me, but you may want a bigger offset. Note: Your offset distances will be different if your font size is different. I have kept mine to the default size throughout.  Examine your new shadow offsets. If you have little gaps like these, you'll need to delete them. To do that, select the offset, right mouse click, select Release Compound Path, then delete the small pieces. I think its best to do this word by word.

Make your own Shadow Diecuts with the Silhouette Cameo. Tutorial by Janet Packer for Graphtec Silhouette UK https://craftinhquine.blogspot.co.uk


Step 6: (Optional) Add an Overlay. I chose to overlay a duplicate of the word in a different colour a small distance away from the original, giving a more 3D look. To do this just select, right mouse click, and Duplicate. Move it around and send it behind or in front of the original until you like the effect (select, right mouse click, Sent Forward, or Send Backward). Group the two copies of the word together, turn line colour to clear, and move them apart from the shadow piece.


Make your own Shadow Diecuts with the Silhouette Cameo. Tutorial by Janet Packer for Graphtec Silhouette UK https://craftinhquine.blogspot.co.uk
Step 7: Print & Cut. Turn on the Registration Marks in the Page Setup panel, Registration Mark tab, and tick the Show Print Border and Show Cut Border in Page Setup tab. Ensure that Print Page Setup is set to US Letter Size, and that Borderless, or Print to Edge is NOT selected. Arrange the words, shadows, and any extra bits within the the print and cut area, avoiding the hashed areas. Add a printing gutter around each shape if you wish, but you'll need to use a different line colour and then Cut by Line so you don't cut the gutters. Print the sheet and then send it to cut on a mat through your Silhouette. You'll need to use the Simple tab, and Cut Edge if you have made overlays, but ensure that each word and its overlay are grouped to each other. If you have used both gutters and overlays you'll need to use both Simple and Cut by Line cuts in succession with different line colours. Cut settings are suggested above.


Make your own Shadow Diecuts with the Silhouette Cameo. Tutorial by Janet Packer for Graphtec Silhouette UK https://craftinhquine.blogspot.co.uk


Step 8: Finishing. Once cut, layer the words onto the shadows, and they are ready to use on your projects. One of my favourite ways to use them is to cut the shadows from vellum - try different materials and see which looks you like best. 

Make your own Shadow Diecuts with the Silhouette Cameo. Tutorial by Janet Packer for Graphtec Silhouette UK https://craftinhquine.blogspot.co.uk


Example Project

I used one of my shadow diecuts with the pieces from the A2 Happy Watercolor Card by Carina Gardner to make a quick Print & Cut window card.

Make your own Shadow Diecuts with the Silhouette Cameo. Tutorial by Janet Packer for Graphtec Silhouette UK https://craftinhquine.blogspot.co.uk


This is the resulting card - quick and easy thanks to my pre-made diecuts.


Make your own Shadow Diecuts with the Silhouette Cameo. Tutorial by Janet Packer for Graphtec Silhouette UK https://craftinhquine.blogspot.co.uk


Do comment below if you've found this tutorial useful.


Bye for now,


  Crafting Quine BlogInstagram @CraftingQuine


DESIGNS USED:


PRODUCTS USED:

Friday 26 October 2018

Buying a bundle for Autumnal crafting

Hiya....I know I was going to post about adhesive card stock this week but I am so excited about buying these bundles from the Silhouette Design Store that I am sharing this instead.

As you may be aware I have a bit of a thing about pumpkins and wanted to make some pumpkin decorations for Autumn (they are not just for Halloween remember!)

I looked at all the cutfiles that were available in the bundle section and they are really good value for money. Initially I bought the Feels Like Fall bundle  which has over 40 cutfiles for less than £4!! From this bundle I used the 3D pumpkin


and pumpkin patchwork banner

There is also a pumpkins bundle which again offers exceptional value and I have used the jack 0 lantern candy pail.

The pumpkin banner and candy pail I put together without any additional instructions but I went to the designer website for the 3d pumpkin and followed the easy step by step picture guide.

The pumpkin banner looks perfect across the fire place...


with the colour coordinated 3d pumpkins on the mantlepiece...


I added some tendrils by cutting thin ribbons of cardstock and wrapping them around a pencil...
 

the candy pail has brads to hold the handle in place and the face is simply glued on...


the banner was the simplest to put together and could easily be completed by children...


I had some orange card stock left over so cut the pumpkins background (from the pumpkins bundle) ready to document the photos and stories from Autumn 2018...


I hope you have enjoyed my quick overview of a couple of the seasonal bundles available, you can check them all out here

Enjoy creating for Autumn and do share any of your projects

Have fun

Ruth xxx 

Wednesday 24 October 2018

Design of the Week - Trick or Treat - 23rd October 2018


Hello, hello - Karen here with my DOTW post for this week.

The free design is a Trick or Treat Title.

I don't really scrap Halloween and so decided to 'stage' a photo with my beautiful fur baby holding my project from last week and wearing a Halloween headdress (from £land).

Also,  as a consequence of not 'doing' Halloween, I don't have any Halloween themed embellishments.  

On top of that, I didn't have any orange card for the centre of the letters.  To accommodate my limited Halloween supplies I thought I would make the title into a Print and Cut file and also print some bits and bobs to add to my page. 

I used these files, which are all Print and Cut.


For the title I removed the cut lines and the bats then added an offset - see my blog post here for how to do this.


I then resized all the elements and printed them onto two A4 pieces of card.


All that was left to do was to assemble my layout.


So there we have it a layout made from two pieces of A4 and one piece of 12 x 12!