Showing posts with label Metallic Heat Transfer. Show all posts

Friday, 23 March 2018

Design a Faux Leather Pen Holder for Planner, Notebook or Journal

Make your own pen holder for planner notebook or journal from faux leather paper. Designed by Janet Packer (CraftingQuine.blogspot.co.uk) for the Silhouette UK Blog


Hello, Janet here showing how to create a custom pen holder for your planner, notebook or journal using the Silhouette® Faux Leather Paper.  The faux leather is stronger and more durable than cardstock, perfect for this job. 

Make your own pen holder for planner notebook or journal from faux leather paper. Designed by Janet Packer (CraftingQuine.blogspot.co.uk) for the Silhouette UK Blog


I've used the faux leather in many projects previously, and although it takes a little more care to cut then card, it is well worth the effort. I've included some tips to make the job easier if you decide to try it for yourself.  I've also included links to some previous faux leather projects below. Just click on the photo to visit each one.


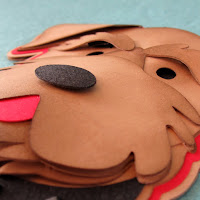
Faux Leather Bracelets by Janet Packer Faux Leather & HTV Ginger Jar Rocking Horse Baby Gift with Faux Leather Saddle MDF Bunny Decorated with Cork and Faux Leather Dimensional Dog Card with Faux Leather Nose and Collar


I chose to decorate the ends of my holder with a shell image from the CG Under the Sea Dingbats Font using metallic heat transfer material.  I think shells compliment the pretty mermaid scale fold-over elastic, but any relatively simple shape could be used in its place.


Materials Used
Silhouette Faux Leather Paper
Silhouette Metallic Heat Transfer
1 metre of Fold Over Elastic (5/8" thick)
Fabric Adhesive
Iron or Heat Press
Silhouette Cameo, Portrait or Curio


Make your own pen holder for planner notebook or journal from faux leather paper. Designed by Janet Packer (CraftingQuine.blogspot.co.uk) for the Silhouette UK Blog


STEP 1: Design the Pen Holder

To design the holder, draw a pair of rectangles of similar size to your pens and then draw a larger rectangle to encase them and form a base for them. I selected a shell from the CG Under The Sea Dingbat font (click here for more info on how to do this) resized it to fit, added an offset, and welded that offset to the larger rectangle.  Then add some slits for the elastic; horizontal ones for the long strap to go around the planner, and vertical ones for loops to hold the pens in place.  I added 3 mm diameter circles to the ends of the splits. They allow the elastic to lay flat when threaded through the slits.
 
Make your own pen holder for planner notebook or journal from faux leather paper. Designed by Janet Packer (CraftingQuine.blogspot.co.uk) for the Silhouette UK Blog

Then duplicate the complete design and delete the horizontal slits from one copy, and the vertical slits from the other. Move the shells aside to be cut from metallic heat transfer material.


STEP 2: Cut the Faux Leather

I changed the line colour of the slits so that I could be sure of cutting them completely in the Faux leather before proceeding to cut the outsides.  Cutting by Line makes this process easier.  This step is necessary as the faux leather will curl from the mat once the outside lines are cut completely.  I found that the default cut settings for the faux leather weren't sufficient to cut on the first attempt, so increased the blade depth gradually until it cut through.


I used the deep cut blade, but on a regular blade setting. The deep cut blade isn't necessary, but I knew it would be good and sharp (a sharp blade and a sticky mat are a MUST for cutting faux leather successfully).


The faux leather has a tendency to curl and pull away from the mat. To minimise this, I recommend cutting a piece off the roll rather than trying to use the roll intact. Some masking tape to secure the piece is also a good idea.


STEP 3: Cut and apply the Metallic Heat Transfer

Cut the shell shapes from metallic heat transfer material (remembering to place the shiny side down, I use a mat, but it is not essential).


Apply the shells to the backing piece with the vertical slits (the front) with a heat press or iron (I press with a heat resistant sheet in 10 second increments until the backing paper can be peeled away, peel it, then press similarly until the surface texture of the faux leather is visible on the heat transfer material).


STEP 4: Measure, Cut & Add the Fold-Over Elastic

For the front section, thread the end of the elastic through one set of vertical slits and the pens, cutting it off to leave sufficient to overlap on the back. Repeat for the other set.

Thread the remaining elastic through the horizontal slits and ensure there is enough to wrap around your notebook, planner, or journal, with sufficient to overlap on the back. Trim off the excess at the red line (right hand picture below).


Make your own pen holder for planner notebook or journal from faux leather paper. Designed by Janet Packer (CraftingQuine.blogspot.co.uk) for the Silhouette UK Blog


Apply adhesive where indicated by the red shapes to attach the elastic.  Similarly, adhere the front to the back piece behind the shells.

Make your own pen holder for planner notebook or journal from faux leather paper. Designed by Janet Packer (CraftingQuine.blogspot.co.uk) for the Silhouette UK Blog


That's it - job done! Once the adhesive is dry just install your pen holder to the outside, or within the planner/notebook or journal to act as a place marker.

Make your own pen holder for planner notebook or journal from faux leather paper. Designed by Janet Packer (CraftingQuine.blogspot.co.uk) for the Silhouette UK Blog


This design can be adapted for different themes, just choose a relatively simple shape to weld to the basic rectangle. I hope you'll try it.


Bye for now,


   Profile | Crafting Quine BlogInstagram @CraftingQuine


DESIGNS USED:


PRODUCTS USED:

Tuesday, 15 August 2017

Mason Jar Tissue Holders


Hello again,
Janet here using heat transfer to decorate fabric sleeves for mason jar tissue holders. I've seen ideas for decorating mason jars to hold tissues in their thousands on Pinterest, but most of them use distressing techniques to make shabby chic holders, and that's not really my style. I first spray painted the jars and decided I'd cover up the wording with a hessian sleeve and decorate it with heat transfer.


What You'll Need
Mason Jars with metal 2-part lids
Box of tissues
Spray paints
Hessian or open weave fabric
Double-sided fabric tape or glue gun
Silhouette Heat Transfer material (smooth, flock or metallic)
Iron or heat press


Step 1: Prepare the Jars

I first primed and then spray painted the jars in a cardboard box out of doors and used a pearlescent spay finish to tone down the colours. The inside of the lids proved useful to prevent paint from drifting inside the jars. The picture was taken part way through - just before the pearl layer.


You'll notice that the embossed wording shows up quite distinctly - more so than before they were painted.


Step 2: Prepare the Designs

I worked on two patterns initially, but realised that one didn't work for this project, and I've repurposed it as a bookmark!

The jars measure about 11"/280mm, make the designs a little under 12"/305mm. Open the design and resize it to just under 6"/152mm. Then:

  1. Open the Replicate panel
  2. Select the Replicate tab
  3. Click the Mirror Right symbol
  4. Draw a small circle with the Ellipse tool
  5. Hold down shift to make it round
  6. Move it onto the point where the two patterns meet
  7. Right click with mouse and Weld


(Optional) Make offset if you want to layer the vinyl.

  1. Open the Offset panel
  2. Select Offset tab
  3. Reduce distance to .050"/1.27mm
  4. Select Rounded Corner
  5. Click Apply


Move the offset off the original and look for small, unwanted cuts.

To get rid of them, right click your mouse and Release Compound Path. Select and delete the little cuts, but not the larger ones. Then select the whole offset including the larger holes, right click, and Make Compound Path. Now they are ready to cut.


Step 3: Choosing Heat Transfer Media

Now, I'm not the world's expert on layering Heat Transfer, but here's the consensus from the various manufacturers and blogs I checked out.

Base layer: Smooth or Flock
Secondary Layers: Smooth on Smooth, Flock on Flock, or Flock on Smooth
Top Layer: Metallic, Glitter, Holographic

Different brands may give different results.

For this project I've used Silhouette Metallic on Silhouette Smooth, and Silhouette Smooth alone. I've layered metallic on flock on other projects with good results too.


Step 4: Cutting Heat Transfer Media

Choose your media and cut out the layers, placing the shiny side down (you'll find further details on cutting metallic vinyl here and smooth vinyl here). Ordinarily you'd reverse the image before cutting, but these are symmetrical with no words, so it isn't necessary for this project.


Step 5: Pressing Heat Transfer Media


Press the heat transfer vinyl for the minimum time for it to allow the backing to be peeled away.


Add a second layer, if used and press again.  Press one more time from the reverse. Trim the sleeves and fray the edges up to the decoration.


Step 6: Completing the Tissue Holders

Affix the decorative sleeves to the jars. I used strips of double-sided quilting tape.

Break open a box of tissues and remove the tissues in one pile keeping it intact. Separate the pile into two and roll the tissues with one tissue standing proud in the centre. Remove the screw top on a jar and place the tissues inside. Replace the screw top.


I hope you'll try this project - so much prettier than a box of tissues!


Bye for now,


   Profile | My Blog | Instagram


DESIGNS USED:


PRODUCTS USED:


Saturday, 4 March 2017

Introducing the 2017-2018 Silhouette UK Design Team - Beverley Edwards


Hi! Bev here and I am so so happy to be staying on the design team for another year!  I learned so much last year and created over 40 projects and tutorials for this blog.  I have popped some pics of my favourites below.


I have also had the opportunity to take on magazine projects and that was amazing!! Seeing my projects in print in real life was surreal and definitely a highlight last year.


So, a little bit about me.  I am a mother of a gorgeous 6 year old girl Poppy and a scrummy little 4 year old called Chester.  They inspire me and entertain me on a daily basis!  I married my best friend Wayne 7 years ago and we live in the North West, where we make it our mission to laugh each and every day at least once.

I began my business as a way to stay at home with the babies and not miss a moment with them.  The business has evolved and I have found my calling in leatherwork creating Travelers Notebooks and I adore it!  I launched my Etsy shop last month and I am loving it.  You can take a peek here www.etsy.com/uk/shop/LovefromPoppyDesigns 

I am very much looking forward to more creating this year and sharing projects with you all.  And I can't wait to see what you create too.