Showing posts with label stencil. Show all posts

Monday, 1 April 2019

Dotty stencilled painted cup - Adhesive vinyl and warp tool


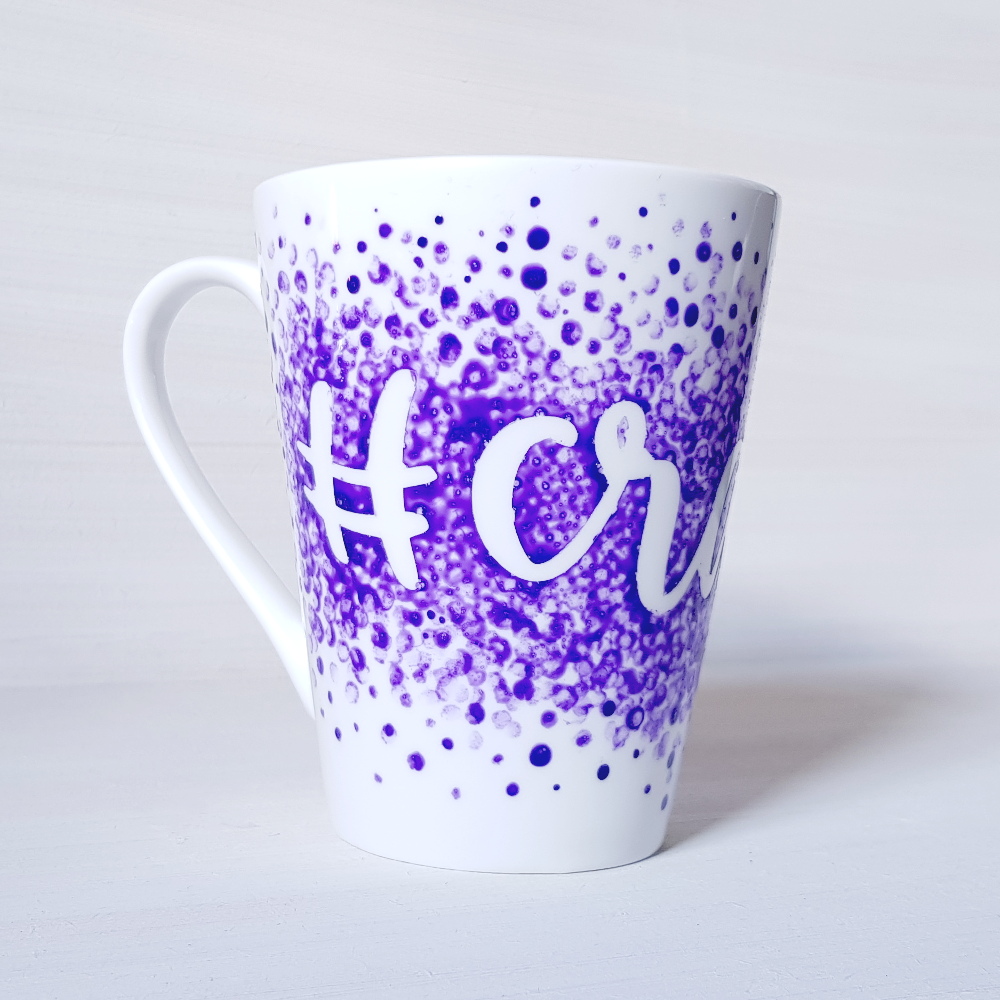
Hello, it's Verity here from Pretty Little Button. A few weeks ago, I went to the Creative Craft Show at the NEC. Whilst I was there I won a mug making kit which included two mugs along with porcelain paint. As they were blank mugs, I thought they were perfect for adding a 'Silhouette' touch to them. Adhesive vinyl can act as great stencil material on surfaces like this, and as long as you don't use permanent adhesive vinyl you can easily create a positive paint effect like this.

Dotty stencilled painted cup process: 

For this cup, I went with a simple design using '#crafter'. Change the font style to a font of your choosing; I used 'Sweet Mia' from the Silhouette store. 


Next, you need to make sure all your letters in the design is welded together. With the text selected, right click and select weld. 


If you have more than one word, then these will not weld together, for example like the # in my design, you need to group all of the parts together to adjust the size of your design. Right-click again with all the elements selected and click group.


To adjust the size of the design, use the object size options in the top toolbar.  Make sure the little padlock appears closed as this will adjust your design proportionally and if you change the width, it automatically changes the height proportionally. 


To use the arp feature, you need a designer edition of the studio software or higher. The icon that appears warped in the right-hand toolbar opens up the warp window. 


There are two tabs to the warp feature, the second tab has template warp shapes - allowing you to take out the guesswork for you. Select the shape most appropriate one for your object. 


When it applies the warp, you will notice additional adjustments lines around the design (in green, blue and grey).


For a bit warp fit, you can adjust these to suit your object. My cup gets thinner as it gets near the bottom. Therefore adjusting the bottom right square allows me to move the bottom of the design in and thinner in width. 


Remember to do this the same on the other side for symmetrical warp. 


When you are happy with the warp, you are ready to send your design to cut. 


For the cup, I wanted the word to be left bare for the cup but the dotted paint to appear around the words to negative dotted design. Therefore, I weeded all the negative vinyl to leave a positive design on the back sheet. Use transfer paper to adhere the vinyl to your object. 


To apply the porcelain paint, I used a cotton bud and varied the pressure and size of the dots. However, you could use any shape to apply the paint. 


This was left to dry for 24 hours before removing the vinyl from the cup. To heat set the paint, the cup was baked at 150C for 35 mins to set the paint.
Dotty stencilled painted cup photos:


 If this has inspired you to try this out, please post below. I would love to see it!

Until next time,

Verity


Profile Pretty Little Button Blog | Instagram | Facebook

FONTS USED:

Sweet MIA SCRIPT FONT by Skyla Design, Design id#229372

PRODUCTS USED:
    

Monday, 16 July 2018

Using Metallic vinyl to add foil decal to cards


Hi everyone. It's Verity here from Pretty Little Button bringing you another project. Today I've created a card using metallic vinyl to add a foil decal. If you love foil but don't have the means to add it to your papercrafts i.e no laser printer, no heat reactive foils, no Curio etc, but wish you could add it, then this is the post for you! There is some great metallic vinyl out there which are easy to cut and have a great shine to them. You probably have several in your stash as we speak. Well, why not add them to your papercraft projects! I went and create a 'Love you' card today, as I had red or green metallic vinyl to choose from. It screamed Christmas at me, but I just can't bring myself round to making anything Christmas related yet, I know many of you already are! So instead I went an made a 'loved' theme card. Yes, Valentine's day is a long way away, but this could be sent at any time of the year to your loved one!

Using Metallic vinyl to add foil decal to cards detail:


To create the stencil, draw a 6.25" square. Next, you need to create an internal offset, this will allow the struts of the stencil to attach to this when we later modify the stencil. 

Following this, you need to draw a thin oblong. You can use the width and heigh measurements boxes to easily alter the size so the oblong measures at 6.125" wide and 0.25 inch tall. 


Using the replicate window, replicate the oblong 11 times. Position, one oblong towards the top of the square, and one towards the bottom of the square. To make sure your oblongs (struts of the stencil) are equally spaced out, highlight all the oblongs so they are selected. Make sure you unselect the squares if they are accidentally highlighted. Next, open the transform window and select vertical spacing. 


To connect the struts to the square to make this a stencil, open the modify window. With all the oblongs and inner square selected (do not select the out square), press the subtract button. 


You struts will have connected and subtracted from the inner square forming the struts of the stencil. Now when this is cut, the inner oblongs will form the open spaces of the stencil. 


This was cut out of the stencil material from Silhouette, I used the settings for stencil material in the programme, however, make sure you do a test cut. These setting worked for my blade and machine this time but your machine could be different, especially your blade so you may need to tweak the settings!


For the vinyl decal, I used a 'Heart' design from the store. I also used another cut file from the store 'Love you' for the sentiment on the card and cut this out 3 times for more depth and dimension. 

To make it easier to work with the vinyl on my card, I first adhered a piece of vinyl large enough for the design, to a piece of white scrap card. I then proceed to cut the hearts out of this vinyl/card piece.  If you decide to do this, don't forget to do a test cut! You have two materials to cut through, so will require for force and a deep blade depth. I happened to have chosen a thick piece of card, and require a very deep blade. But you can easily do this with thinner card, and I would recommend that!


Once I had everything cut out, it was time to assemble the card. I applied grey ink through the stencil onto a white card panel. This was done in a patchy manner as I only wanted this to give texture behind the elements, but no to be the focal point of the card. The hearts were adhered down with glue and before adhering the sentiment down, I covered this in several layers of Platinum embossing powder. This tied in well with the grey of the background but did not detract from the shine of the hearts. 

Finished photos:


If this has inspired you to try this out, please post below. I would love to see it!

Until next time,

Verity


Profile Pretty Little Button Blog | Instagram | Facebook

DESIGNS USED:

Hearts by Sophie Gallo - Design ID #177304Love you by Dawn Nicole Designs - Design ID #209771

PRODUCTS USED:


Monday, 21 May 2018

Creating a layered Stencil


Hi everyone. It's Verity here from Pretty Little Button bringing you another project. For today's project, I'm using the non-adhesive Stencil Material. I have created my own stencils before using a variety of media similar to the stencil material, however, this was the first time I have used Silhouette's stencil material. I was really impressed with it - it is thin so cuts well but the material isn't flimsy like a piece of acetate, so it holds its shape well. In today's project, I wanted to show you how you can create layered stencils to use with inks, mouses, embossing powders and more, to get a multicoloured stencilled image. 

Creating a layered Stencil detail:

Choose a design from the Design store, I choose this beautiful tree by Echo Park. When selecting a design to stencil in layers, go for a simple design where you can easily identify 2-3 layers. If it is too intricate it will be more difficult to cut and align though this can be done. For now, when starting off, go for a simple layout first. 

When opening the design up with this tree from Echo Park, the leaves and trunk are separate. However, in order to use it as a stencil, you need to make a few adjustments. First of all, let's take the leaves. 


As you can see above, many leaves are very close together or overlapping. It is best to ungroup the leaves and move these with your arrow keys to ensure they aren't overlapping and have a little space between them. If they are very close, this will affect the stability of your stencil. 

In addition, you will also want to check for any areas that aren't attached to the stencilled outline. As you can see below, there are several areas where the branches overlap, creating shapes within the trunk. If you cut it as is, the shapes are not attached to the stencil and your loose this definition. 


There is an easy remedy to this - the knife tool! Using the knife tool (the left-hand toolbar ), crag a line down between the two points where you want the opening to appear at. Once the cut has been made, you need to seal the ends.


Right-click on the design and select 'make compound path' and then right click selecting edit points. Using the points, join up the ends as seen above so you can have one continuous cut line.


When you are ready to cut, make sure you do a test cut first! For me, the cut settings on stencil material were just right for my machine, but unless you have used it before you never know!

To create the cards, I used a variety of pigment inks, embossing powder and Tonic Nuvo Mousse.

For this card, I inked clear embossing ink over the stencil direct to paper. This was covered with copper embossing powder and heat set. For the leaves, I layered the stencil over the top and applied Tonic Nuvo paste with a palette knife. This was mounted on a card base, and I added a layered die-cut sentiment along with a smaller stamped sentiment.


For the second card, I applied pigment ink for the trunk and heat embossing the leaves in a beautiful red embossing powder. To finish, I added a simple sentiment.


For the last card, I used a white pigment ink for the trunk and a beautiful pale turquoise nuvo mousse for the leaves. A few matching sequins were added along with an embossed sentiment.


If this has inspired you to try this out, please post below. I would love to see it!

Until next time,

Verity


Profile Pretty Little Button Blog | Instagram | Facebook

DESIGNS USED:

Tree by Echo Park - Design ID #64906


PRODUCTS USED: