Showing posts with label Mini Book. Show all posts

Wednesday, 4 July 2018

Design of the Week - Here Comes The Sun - 3rd July 2018


Hello, hello Karen here with a little mini album inspired by this week's free design.  A perfect cut file for the lovely sunny days we have been having lately - Here Comes The Sun
I decided to use it for the title on the front of a little mini album for photos of my upcoming trip to Newcastle.

I chose this design by Lori Whitlock  for my album and reduced the size to 98% so that I could get all three pages onto one 12 x 12. 

I used Silhouette chipboard to make the box and the base for my pages. 

Once it was made (Lori Whitlock has a YouTube showing how to make the album and box) I covered the box and pages with patterned paper and cut the 'Here Comes The Sun' from rose gold printable foil


I am really pleased with the final results and it is now packed ready for my little summer adventure. 


Wednesday, 4 April 2018

Free Design Of The Week - Spring Feaver - 3rd April 2018


Hello, hello lovely Silhouetters.  Karen here with my take on this week's DOTW which this design.

This was very fortunate as I was going to start a project called 100 Days of Scrap Therapy, run by a scrapbooker called Suse Fish and it was ideal for the front of my little A5 binder. 

I decided that I wanted to sketch the design rather than cut it out and so changed the outline of each letter to the corresponding colour and removed the fill.


I added a design called Leaf Border


and used a font called LW Block Sketch for the text.

As I wanted my writing to be similar colours to the original design I bought a cheap pack of felt tip pens, which had a good selection of colours (£1.00 from The Range) to use with my pen holder. 


Unfortunately, they were to thin, even for the small attachment so I solved this by winding a strip of sticky tape around the barrel. 


I then drew each colour separately with my Cameo3. 


Very quickly, I had a beautiful cover for my project!


Friday, 28 October 2016

Mini square "explosion" photo album

Explosion mini photo album by Hilary Milne for Silhouette UK


Today I am showing you a quick and simple tutorial for a super cute photo album that will easily fit in your bag to show to anyone at a get together, and it is more unusual than a phone photo album! I have given a couple to friends and they have been delighted. The finished size is 3.25" or 8 cm square and then it accordions out.

EQUIPMENT:
Silhouette Cameo
3D Lori Whitlock square album #42691
Silhouette Chipboard or strong Kraft card stock for the covers
3 pieces A4 Cardstock for the inner folded card
2 pieces Ribbon, each 30cm long.
4 Photographs 7 x 7 cm
Silhouette Essential glitter in turquoise for embellishment
Glue

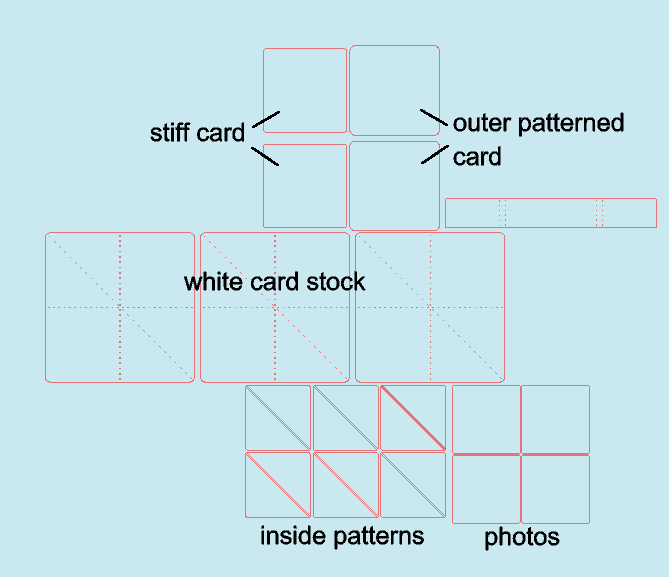
Open the library file on your design area and identify the pieces as shown. Ungroup everything, then re-group dotted lines with the three "white card stock" squares. I haven't named that long rectangle as it is not used in Lori's video tutorial, and I can't think what it is for!
  1. Cut what will be the two outer covers from thick Kraft card or Silhouette chip board.
  2. Cut the two patterned outer covers, and if wanted, two more patterned inner covers to hide the Kraft card or chip board.
  3. Cut three pieces of white card stock for the folding inner pages.
  4. Cut 12 pieces of coordinating patterned triangles
  5. Cut 4 photos for the front and another 2 photos if you are going to use the back. I cut mine by hand into squares 7 x 7 cm.
Lori Whitlock has an excellent video to show you how to put this together here.
Explosion mini photo album by Hilary Milne for Silhouette UK

The ribbon must be long enough to wrap around the album, so cut two pieces 30 cm long. Stick a piece of ribbon either side sandwiched between the layers of the outer, stiff cover and the patterned paper. N.B. Make sure they are stuck so that they are pointing to the back of the booklet, to wrap around it and be tied at the front. Have a look at the photo below. Also as shown below using two pink daisies, there is room for 2 more photos.

Using a thick font, I cut out the letters for "Leo 2016". I then cut out some  double sided Silhouette adhesive sheet, applied it to the letters following the instructions on the packet, and sprinkled on the turquoise Silhouette glitter from the Essentials glitter stack. As you can see above, it is a lovely deep colour. Once I stuck these onto the front of the album, the present was ready. I hope you like this enough to make one for yourself. It takes less than an hour and is very versatile. Here is one I made earlier!
Explosion mini photo album by Hilary Milne for Silhouette UK


PRODUCTS USED:


Tuesday, 31 May 2016

Design of the Week - Movie Flipboard

Silhouette Flipbook Using Free Shape of the Week, Admit One Movie Ticket Design by Nadine Muir from Craft Chatterbox Blog for Silhouette UK Blog

Hello, Nadine here with a tutorial for this week's Free Design, which is a vintage style set of 'Admit One' tickets.  I thought they would make a nice invitation to a movie night.  Vintage movies reminded me of the flipbooks we used to make as kids to animate a little stick men running.  The thought filled me with such nostalgia, I thought it would be cute to make a flipbook using Silhouette to spell out the message 'Lights, Camera, Action It's Movie Time'.

I spelt out one letter at a time and also had the camera reels spinning.  Here's a video of the final result:

What you’ll need:


STEP ONE: Prepare Film Camera


We want the film reels to spin, so ungroup design ID 12560.  Select the 6 triangular segments of the first film reel and group.  Similarly group the 6 segments of the second reel. Select all other shapes.  A wee tip here, is that I find it easier to simply select all, then deselect the reels, by clicking on them with the shift key held down.  Convert the remaining shapes into a compound path.  I was very
intimidated by compound paths when I first started using Silhouette Studio, but it's nothing to fear.  I just makes internal shapes appear as holes so that fill colour works as you'd like.

Scale the camera to 33% smaller.

STEP TWO: Make Flip Book Template.


Make a round edge rectangle 13.5cm wide and 5.5cm tall.  Place the camera in the centre of the rectangle and add a rounded 5cm square to the right.  Add text in 35pt using the LW Stars Font.  Depending on how you will fasten the flipbook, you may need some hole punches at the left-hand side.
Right-click and 'Ungroup' the text.  This will convert the text to a regular shape and lock the letters in place.

STEP THREE: Page and Cut Settings


Only the outside edge, the hole punches and the reels are to be cut.  Control this using the cut settings menu by setting the other shapes to 'No Cut'.  Set your page to be A4 landscape, with registrations marks.

STEP FOUR: Layout Flip Book


Replicate the template so there are 6 on a page.  Delete the text so that it spells out one letter at a time.

STEP FIVE: Rotate Reel


Rotate each of the reels by 5 degrees more for each page

STEP Six: Make Cover


Take the two tickets from this week's free file and fill the background black.  For the 'admit one' image, we want this to be white, so set brightness to 100% using the Effects window.  Group this shape with the outside ticket shape and resize to 2cm tall (maintain ratio).  Add the text 'You're Invited To' above the tickets and 'Movie Night' below.  Remember to set all these shapes to 'No Cut' so that they are printed but only the outside rectangle and punch holes are cut.

THE FINAL PRODUCT 

Silhouette Flipbook Using Free Shape of the Week, Admit One Movie Ticket Design by Nadine Muir from Craft Chatterbox Blog for Silhouette UK Blog

Silhouette Flipbook Using Free Shape of the Week, Admit One Movie Ticket Design by Nadine Muir from Craft Chatterbox Blog for Silhouette UK Blog

Silhouette Flipbook Using Free Shape of the Week, Admit One Movie Ticket Design by Nadine Muir from Craft Chatterbox Blog for Silhouette UK Blog

Silhouette Flipbook Using Free Shape of the Week, Admit One Movie Ticket Design by Nadine Muir from Craft Chatterbox Blog for Silhouette UK Blog


Profile | My Blog | Pinterest | Instagram

DESIGNS USED:
Free Design of the Week - 31st May

PRODUCTS USED:
Silhoueet Cameo 2 Light hold cutting mat for Cameo

Sunday, 13 March 2016

Faux Leather Mini Album

Faux Leather Mini Album

OK, confession time. I ADORE MINI ALBUMS - there I said it! They can be packed full of little moments that can be enjoyed for years to come. Decorated and adorned with images and pretty papers, what's not to like? I'll warn you, this post will be very photo heavy so you get to see all the pages.

Now here is my second confession, I have never used the faux leather before - YIKES, I was worried about giving it a try but I promise you, it was just so simple and easy and, so much so that I have already used it again.

Here's what you will need to complete the above project
  • silhouette cameo
  • faux leather
  • photographs
  • sewing machine (optional)
  • patterned papers and embellishments
  • embroidery floss (optional)
  • pokey tool (could use a needle instead)
  • a button
  • needle
  • double sided tape/ wet glue
  • heat gun (optional)
  • crop o dile (optional)
  • sewing machine (optional)
  • bakers twine (can use wool or string etc)  
The 'how to' bit

the design I chose to work with was this one

 You will see when you open it it looks like this:


For my book I didn't want the bottom right section:


In order to remove it I clicked on the whole image, went to object and clicked ungroup:


I highlighted the section on the bottom left and deleted it, be sure to get all the dash lines deleted too!

I was left with this:

Perfect! I knew that I wanted to add in some extra pages so for those I simply deleted the left hand section and then re grouped the remaining section on the right, copied and pasted it onto a second page twice for extra pages YAY!


Now for the cutting, I was so nervous but it worked great. I added a 12 x 12 sized piece of the faux leather, it feels like thick card. Loaded it up just the same as I would do for a piece of paper.


I used these settings:
Now once your designs are cut you need to soak the paper in warm water with some washing up liquid in it, then after about 2 minutes I stared to scrunch them up in my hand (these pictures show some tags I did for another project but the same method) I really scrunched mine and then rinsed them and sort of made them flatish again. The faux leather is super strong and can cope with this process very well, LOVE the stuff! you will feel that the it becomes softer and pliable when wet and the scrunching gives it more of a leather texture.


You can just leave them to dry naturally but I am impatient so I used my heat gun to speed up the process.

Now you are ready to go YAY!

I decided that I wanted to use a button as a closure so I poked holes in using my pokey tool so I could sew it in:


You will see that all my pieces have holes around the edge, I made these by running them through my sewing machine minus thread. I wanted to add interest and texture and you will see in the finished album that I have added little sections of thread which I sewed by hand using embroidery floss. This is a great way to add texture and interest but you can skip that part if it's not too your liking.

I decided that I wanted to sew in my middle pages to the book, my book measures about 4 x 4" and included 3 pages. I needed to measure an inch in from the top and the bottom of the inside of the book cover and make holes with my pokey tool, I did this three times, one for each page down the inside of the spine. To make the holes on the inside pages, just lay the cover over the page and use a pencil to mark through to the inside page, this will ensure they line up perfectly, reapeat on all inside pages.


I also wanted to add a charm to the book so I  used my crop o dile to create a hole ready to thread it through, this again is optional,


I then got together all the inside pages and chose which photo's I wanted to use. The theme of this album were the twins Lily and Freya (aka The Frillies) at the beach through the years.


To attach the inside pages to the book I threaded up a needle and sewed the pages in with embroidery floss, I sewed each page a few times between the holes to make it more sturdy, plus it looks pretty. Choose whatever colours you want to match your papers. You can see mine on the picture below.


I added a long length of bakers twine trying it near one end to the button and then leaving enough length for me to run it around the book three times and to secure it I run it around the button again.

Now for the really fun part, decorating the cover. You can see that I stitched some sections of thread as I think it looks fun and colourful. I used my double sided tape to add on the paper elements and for very small pieces of paper I used wet glue. To add the flowers and the hearts I used a hot glue gun as I it's important that the books can be looked at without falling apart.

It's so hard to describe how amazing the faux leather is, it feels so tough yet can be shaped, sewn through, and it really looks the part.

Some photo's of the cover of the book:


Here is the inside of the book:


On the page below I wound more thread around the page before I added the photograph. More interest and texture. 


Chunky, scrumptious and so much interest, a feast for the eyes. It feels amazing too.


A few more pictures of the cover:


I really urge you to have a go at making one of these books, I have lots of ideas and you will see them in future posts.

Thanks for taking the time to wade through the pictures, I hope you like it and feel inspired!

C x

Design Used:


PRODUCTS USED:

Light hold cutting mat for Cameo