Showing posts with label Faux Leather. Show all posts

Monday, 8 April 2019

Leaf motif earrings


Leaf Motif Earrings | Leather Sheets


Hello, it's Verity here from Pretty Little Button. Today's project features leatherette sheets from Silhouette and a lovely leaf motif design by Kristen Magee to create a lovely pair of earrings. I'm showing you how to use the edit points to adapt the design to add in enough space to cut a hole to attach the earring holders. This was so simple to do and you could create a pair of earrings out of a variety of designs from the design store.

Leaf motif earrings process: 

Locate the leaf design in the design store and download. Open up the design into your design space. The designs come as pair so decided on which design out of the pair you want to use. 

Next, right click on the design and select edit points. Alternatively, with the design selected you can also press the edit point icon in the left-hand toolbar (third from the top). This will add a lot of little squares to your cut lines - these are the 'points' to edit. 


When you have one selected, you can move the edit point about - from side to side, up and down etc. In addition, each point has a little handle. Moving this handly around can change the direction of the path line from the previous point to the point you are on.


When you are happy with all the changes you have made to the points, select off of the design and the points will disappear showing your design in its changed format. 


Draw a circle with the circle tool from the left-hand toolbar. If you hold shift down whilst you draw the circle, it will draw a symmetrical circle, and will continue to keep the circle symmetrical whilst you enlarge it as long as you continue to hold shift down. 


Insert the circle into the design, and make sure you group the two items together - with both items selected, right click and select group. 


You need to copy the design to create a pair of earrings - but depending on your design, you are more than likely going to need to mirror the design. With the second design selected, right click and select flip horizontally. 


You should have two mirrored designs to cut from leatherette sheets. Make sure you do a test cut for your machine and blade to ensure you get the best cut possible. 

Leaf motif earrings photos:

To add a little more to the earrings, I decided to add some foiling to the pair. 


I added some Heidi Swapp Minc reactive paint to the earring with a paintbrush (make sure you wash this well after use). 


Once the paint was dry, I covered them with Gunmetal Heidi Swapp foil and ran this through my Minc machine on heat setting 3.

I added a couple of fish hook earring holders through the holes to complete the look. 

If this has inspired you to try this out, please post below. I would love to see it!

Until next time,

Verity


Profile | Pretty Little Button Blog | Instagram | Facebook

DESIGNS USED:

LEAF by Kristen Magee, Design ID275205 


PRODUCTS USED:


Saturday, 1 December 2018

Tiny Tealight Gingerbread Houses with Faux Leather Paper

Tiny Tealight Gingerbread Hanging Tree Ornaments made with Silhouette Faux Leather Paper by Janet Packer https://craftingquine.blogspot.co.uk for Silhouette UK - GraphtecGB


Hello, Janet here again from the Crafting Quine Blog. This week I've been making some new Christmas Tree decorations using Silhouette's Faux Leather Paper. The natural shade is perfect to use for gingerbread-look projects and I really enjoyed using it to make these miniature Tealight Houses. The design used is the Tiny Gingerbread House by Amanda McGee from the Silhouette Design Store. This year I'll be giving these as to friends - as 'from our house to your's' gifts.

Tiny Tealight Gingerbread Hanging Tree Ornaments made with Silhouette Faux Leather Paper by Janet Packer https://craftingquine.blogspot.co.uk for Silhouette UK - GraphtecGB


What You'll Need
Silhouette Faux Leather Paper in White and Natural
Oracal 651 Premium vinyl in White and Red
Transfer Tape
Liquid Fabric Adhesive
Thin Ribbon or Cord
Silhouette CAMEO® 3
Silhouette Black Ratchet Blade
Silhouette 12" x 12" Cutting Mat


Cutting the Faux Leather Paper
All the pieces, excluding the icing decorations, are cut from the faux leather paper. The leather paper is quite thick, and I found it best to cut it in two stages using a sticky mat (with extra tape, as the paper has a tendency to curl up from the mat given half a chance), and a sharp blade (I used the ratchet blade).

It is a good idea to cut a piece from the roll slightly larger than the amount needed. Then it pays to leave it to flatten out for a while beneath something heavy.

For the first cut my favoured settings are the blade set at 4 or 5 with a reduced force for the first cut (adding an overcut if straight lines are involved).


For the second cut I deepen the blade to 6 and increase the force to something closer to the default setting for Faux Leather Paper and cut with one or two passes. This decreases the likelihood of the paper shifting on the mat. Your settings may differ, so do test it out using the test cut facility.


Tiny Details
There is something very appealing about teeny, tiny items, and this house is no exception. It is amazing just how small the fine details are that can be cut from faux leather paper with a Silhouette. Here are the tiny gingerbread couple made from two layers of faux leather; the natural layer on top with all the cutout details, and a plain white layer below.  The hardest part is applying a tiny amount of glue, enough to adhere the layers, but not so much that it oozes through the cutouts. I like to use a strong fabric adhesive as it has a fast grip, but a bit of 'slide-y' time; enough to align the pieces before it sets.

Tiny Tealight Gingerbread Hanging Tree Ornaments made with Silhouette Faux Leather Paper by Janet Packer https://craftingquine.blogspot.co.uk for Silhouette UK - GraphtecGB


Vinyl House Decorations
With that in mind, I wanted to make the job of applying the decoration to the outside of the house as easy as possible. To cut all the fine details, and to apply them without any adhesive mess, I elected to use the Oracal 651 Premium Vinyl rather than paper or card. It requires the use of transfer tape to move and align the decorative pieces, but can be a real time saver. If you are careful with your alignment, and don't move the relative position of any of the white parts on the mat you can apply all the wall elements in one operation. Of course you need to do the roof and red pieces separately, but you can reuse the same piece of tape, so don't discard it.

Tiny Tealight Gingerbread Hanging Tree Ornaments made with Silhouette Faux Leather Paper by Janet Packer https://craftingquine.blogspot.co.uk for Silhouette UK - GraphtecGB


House Base
The base, the back of the people, and the candy cane are cut from white faux paper. As I intend to hang up this decoration I decided to cut the base a little smaller than the design; with a diameter of 2.7-inches, rather than the original 3-inches. I also doubled up the base to give the house a really firm foundation.


Incorporating a Hanging Loop
I made a hanging loop from narrow silver ribbon. The easiest time to install it is prior to adhering the roof to the walls. Of course, I forgot first time around, but with a bit of finagling I fitted it through a slit in the roof and adhered it to the inside after the house was assembled without too much difficulty.

Tiny Tealight Gingerbread Hanging Tree Ornaments made with Silhouette Faux Leather Paper by Janet Packer https://craftingquine.blogspot.co.uk for Silhouette UK - GraphtecGB


Installing A Tealight
I cut all the pieces at the design's default size. The finished house is big enough to easily fit a battery operated tealight inside, but the ones I bought only just fitted through the flap. However, if your tea lights are a little bigger than mine the height of the flap can be easily be extended.

Tiny Tealight Gingerbread Hanging Tree Ornaments made with Silhouette Faux Leather Paper by Janet Packer https://craftingquine.blogspot.co.uk for Silhouette UK - GraphtecGB


Christmas Message
As I'm gifting these to friends, I plan to add a personalised paper message to the base. They'll make lovely family or hostess gifts over the festive season don't you think?


Other Faux Leather Projects

If you haven't tried faux leather paper before, or you have some in your stash that you haven't used yet, I urge you to try it - it's the perfect media for making seasonal keepsakes.

Here are links to some of my favourite leather paper projects. Just click on a pic to visit the page for that project.

Faux Leather Glitter Tags with a Hanging Loop MDF Bunny Decorated with Cork and Faux Leather Faux Leather Planner Penholder by Janet Packer Faux Leather & HTV Ginger Jar


Let us know how you get on.


Bye for now,


  Crafting Quine Blog | @CraftingQuine


DESIGNS USED:

PRODUCTS USED:

Friday, 18 May 2018

Making (more) Durable Flowers using Printable Duct Tape Sheets

Make durable flowers with printable duct tape sheets on the Silhouette Cameo. Blog post by Janet Packer (Crafting Quine) for Silhouette UK. Wreath design by Snapdragon Snippets.

Hello Janet here trying out a new (to me) product from Silhouette: Printable Duct Tape Sheets. I thought that they'd be great to use for the flowers on a wreath for my porch, as they were sure to be more durable than those made from cardstock.

I chose to make the Flower Wreath, Spring from Snapdragon Snippets, as it didn't have too many flower layers, and I only had a few sheets of the printable duct tape to play with. Here is a list of all the materials that I used to make the wreath. I chose items with a plasticised surface wherever possible to give the wreath a chance of surviving in a outdoor, but sheltered position.


Silhouette Printable Duct Tape Sheets
Silhouette Faux Leather Paper
Graphtec Glossy Vinyl
Silhouette Cameo® 3
Inkjet Printer
Jute Ribbon
22 mm Self-Cover Plastic Buttons (7)
Strong Fabric Adhesive


Cutting Duct Tape Sheets

The flower petals were cut from unprinted sheets. Rather than kiss-cut these sheets, I chose cut settings that would cut through both the tape, and it's backing sheet. Leaving the backing sheet attached to the pieces gives the petals more 'body' and allows them to be layered without the adhesive side sticking to lower petals, or the wreath. The same effect could be obtained by cutting duplicate pieces, and by sticking them back-to-back. The holes in the centre of the flowers were enlarged to accommodate the stem of the plastic buttons.

Make durable flowers with printable duct tape sheets on the Silhouette Cameo. Blog post by Janet Packer (Crafting Quine) for Silhouette UK. Wreath design by Snapdragon Snippets.


To ascertain the correct cut settings I used the test cut feature. Settings vary depending on the sharpness of the blade, and the stickiness of your mat. I saved my setting as a custom setting, naming it Duct Tap, Cut Through.


Other Strong Materials Cut for the Wreath

I cut the wreath ring twice from faux leather paper, sticking the layers together with strong fabric adhesive. The top one was covered with a ring cut from glossy vinyl. The size of the holes on these pieces were also increased.


Make durable flowers with printable duct tape sheets on the Silhouette Cameo. Blog post by Janet Packer (Crafting Quine) for Silhouette UK. Wreath design by Snapdragon Snippets.


Print & Cut Duct Tape Sheets

The flower centres and leaves were duplicated and arranged with a colour-filled offset and arranged on a Letter sized page then printed with registration marks.  Holes had been added to the flower centres as they will sit behind the plastic buttons. Veins were added to the leaves by drawing them on prior to printing with the Smooth Freehand Drawing Tool (the line was then coloured, thickened, and set to non Cut).


Make durable flowers with printable duct tape sheets on the Silhouette Cameo. Blog post by Janet Packer (Crafting Quine) for Silhouette UK. Wreath design by Snapdragon Snippets.


Wreath Assembly

The leaves were peeled from the backing and smoothed onto the wreath ring.


Make durable flowers with printable duct tape sheets on the Silhouette Cameo. Blog post by Janet Packer (Crafting Quine) for Silhouette UK. Wreath design by Snapdragon Snippets.


The assembled flowers were attached to the wreath backing using the button backs. A length of ribbon was trapped between the button backs and the rear of the wreath.


Make durable flowers with printable duct tape sheets on the Silhouette Cameo. Blog post by Janet Packer (Crafting Quine) for Silhouette UK. Wreath design by Snapdragon Snippets.


Here is the completed wreath. I'm not sure how well it will stand up to the outdoors, but I plan to mount it on my front door which is sheltered by an open porch. The wreath won't be open to the full force of the elements, but still in a position where cardstock would soon warp and discolour. I'll let you know how it survives.

Make durable flowers with printable duct tape sheets on the Silhouette Cameo. Blog post by Janet Packer (Crafting Quine) for Silhouette UK. Wreath design by Snapdragon Snippets.


Bye for now,

  Crafting Quine Blog | Instagram @CraftingQuine


DESIGNS USED:


PRODUCTS USED:

Friday, 23 March 2018

Design a Faux Leather Pen Holder for Planner, Notebook or Journal

Make your own pen holder for planner notebook or journal from faux leather paper. Designed by Janet Packer (CraftingQuine.blogspot.co.uk) for the Silhouette UK Blog


Hello, Janet here showing how to create a custom pen holder for your planner, notebook or journal using the Silhouette® Faux Leather Paper.  The faux leather is stronger and more durable than cardstock, perfect for this job. 

Make your own pen holder for planner notebook or journal from faux leather paper. Designed by Janet Packer (CraftingQuine.blogspot.co.uk) for the Silhouette UK Blog


I've used the faux leather in many projects previously, and although it takes a little more care to cut then card, it is well worth the effort. I've included some tips to make the job easier if you decide to try it for yourself.  I've also included links to some previous faux leather projects below. Just click on the photo to visit each one.


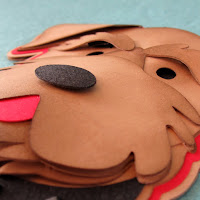
Faux Leather Bracelets by Janet Packer Faux Leather & HTV Ginger Jar Rocking Horse Baby Gift with Faux Leather Saddle MDF Bunny Decorated with Cork and Faux Leather Dimensional Dog Card with Faux Leather Nose and Collar


I chose to decorate the ends of my holder with a shell image from the CG Under the Sea Dingbats Font using metallic heat transfer material.  I think shells compliment the pretty mermaid scale fold-over elastic, but any relatively simple shape could be used in its place.


Materials Used
Silhouette Faux Leather Paper
Silhouette Metallic Heat Transfer
1 metre of Fold Over Elastic (5/8" thick)
Fabric Adhesive
Iron or Heat Press
Silhouette Cameo, Portrait or Curio


Make your own pen holder for planner notebook or journal from faux leather paper. Designed by Janet Packer (CraftingQuine.blogspot.co.uk) for the Silhouette UK Blog


STEP 1: Design the Pen Holder

To design the holder, draw a pair of rectangles of similar size to your pens and then draw a larger rectangle to encase them and form a base for them. I selected a shell from the CG Under The Sea Dingbat font (click here for more info on how to do this) resized it to fit, added an offset, and welded that offset to the larger rectangle.  Then add some slits for the elastic; horizontal ones for the long strap to go around the planner, and vertical ones for loops to hold the pens in place.  I added 3 mm diameter circles to the ends of the splits. They allow the elastic to lay flat when threaded through the slits.
 
Make your own pen holder for planner notebook or journal from faux leather paper. Designed by Janet Packer (CraftingQuine.blogspot.co.uk) for the Silhouette UK Blog

Then duplicate the complete design and delete the horizontal slits from one copy, and the vertical slits from the other. Move the shells aside to be cut from metallic heat transfer material.


STEP 2: Cut the Faux Leather

I changed the line colour of the slits so that I could be sure of cutting them completely in the Faux leather before proceeding to cut the outsides.  Cutting by Line makes this process easier.  This step is necessary as the faux leather will curl from the mat once the outside lines are cut completely.  I found that the default cut settings for the faux leather weren't sufficient to cut on the first attempt, so increased the blade depth gradually until it cut through.


I used the deep cut blade, but on a regular blade setting. The deep cut blade isn't necessary, but I knew it would be good and sharp (a sharp blade and a sticky mat are a MUST for cutting faux leather successfully).


The faux leather has a tendency to curl and pull away from the mat. To minimise this, I recommend cutting a piece off the roll rather than trying to use the roll intact. Some masking tape to secure the piece is also a good idea.


STEP 3: Cut and apply the Metallic Heat Transfer

Cut the shell shapes from metallic heat transfer material (remembering to place the shiny side down, I use a mat, but it is not essential).


Apply the shells to the backing piece with the vertical slits (the front) with a heat press or iron (I press with a heat resistant sheet in 10 second increments until the backing paper can be peeled away, peel it, then press similarly until the surface texture of the faux leather is visible on the heat transfer material).


STEP 4: Measure, Cut & Add the Fold-Over Elastic

For the front section, thread the end of the elastic through one set of vertical slits and the pens, cutting it off to leave sufficient to overlap on the back. Repeat for the other set.

Thread the remaining elastic through the horizontal slits and ensure there is enough to wrap around your notebook, planner, or journal, with sufficient to overlap on the back. Trim off the excess at the red line (right hand picture below).


Make your own pen holder for planner notebook or journal from faux leather paper. Designed by Janet Packer (CraftingQuine.blogspot.co.uk) for the Silhouette UK Blog


Apply adhesive where indicated by the red shapes to attach the elastic.  Similarly, adhere the front to the back piece behind the shells.

Make your own pen holder for planner notebook or journal from faux leather paper. Designed by Janet Packer (CraftingQuine.blogspot.co.uk) for the Silhouette UK Blog


That's it - job done! Once the adhesive is dry just install your pen holder to the outside, or within the planner/notebook or journal to act as a place marker.

Make your own pen holder for planner notebook or journal from faux leather paper. Designed by Janet Packer (CraftingQuine.blogspot.co.uk) for the Silhouette UK Blog


This design can be adapted for different themes, just choose a relatively simple shape to weld to the basic rectangle. I hope you'll try it.


Bye for now,


   Profile | Crafting Quine Blog | Instagram @CraftingQuine


DESIGNS USED:


PRODUCTS USED: