Showing posts with label Silhouette Glitter. Show all posts

Saturday, 5 November 2016

Polar Bear Christmas card - Screenshots, speech bubbles and a hoop border.

Polar bear card with simple border and speech bubble

Equipment:

Silhouette Cameo + mat + printer
Silhouette Double sided adhesive
Silhouette Glitter
Card stock
Foam stickies
Hessian or fabric
Font: LD Charming Bold
Christmas tree by Basic Grey #50472
Eskimo Pie Polar bear by Scrap 'n' Fonts #111331
Heritage Park Pattern by American Crafts #22134

I was looking for inspiration in the Silhouette Design store when I came across this adorable polar bear and owl. The card is fairly simple, but the tutorial covers how to make a simple border and the speech bubble itself. If you want to make a Thought bubble, simply draw a few ovals and Merge them along the edges of the speech bubble!

Everyone should know how to take a computer screenshot, so you will find links to easy explanations how to do this, below.

How to take a screenshot:

Click on the link above to the polar bear file. Take a screen shot of it from the Design store website, showing how it will look when finished by using the snipping tool on your computer. 
  • If using Windows 10 see here
  • If you have not updated to Windows 10, see how to take a screen shot here
  • To take a screenshot on your Mac read here.
Once you have taken a screenshot, and saved the image to your desktop, within the Silhouette software click File/Merge. Now you will see a small image on your design page at the top left corner. This must be one of the most useful skills to learn, and yet many people are not aware of it. When you make a design file and save it, always take a screenshot of your design file to save in the same folder as your Silhouette file, because as we all know, when you have a folder full of Silhouette files all showing the Silhouette logo, it is near impossible to find the file you want at a later date.  If you label your Sil file and the screenshot with the same name, they will always sit side by side in the folder to make them easy to find in the future!

You can choose to cut all the separate pieces out of appropriately coloured card, but I wanted to
  1. re-construct the bear
  2. use double sided adhesive to give him a glittered white coat
  3. give him a speech bubble to wish happy Christmas.
  4. add in a background or background items
STEPS:
Open up the Regular Cut polar bear design file and Ungroup. If you want to add glitter to your final design, make a copy of the grey bear body, the pink scarf and the Christmas tree for later.

Carefully place the pieces on top of each other. Zoom in to ensure neat placement. I wondered why there was a pink and a red scarf, but that has cleverly been done so that the owl's beak and the bear's cheek are in exactly the right place! 

Once your bear is re-constructed, group the pieces and make an Offset. Go to Cut conditions. Select Cut edge. See image 4 below.

Image 1

How to make a speech bubble

See Image 2
Image 2

To make a doughnut border

Image 3
After I had done this, I realised it would fit my card better to have a similar border down the sides as well. I hit Undo a couple of times so I had the separate rings again, and adapted their length for the  sides whilst Rotating them by 90 degrees. Repeat the Welding process for all sides.

Here is my final layout. I gave the bear an offset to help him stand out from the background. I also selected the background and under advanced fill settings, increased the transparency to 40% for the same reason. I decided to cut out two Christmas trees to use some more of the card. 

Select the text tool and write your message within the bubble, changing the font size as necessary. Make sure the writing is set to No cut.

Enable registration marks. Send to printer. Place the printed card on your cutting mat, check the cut settings are correct n all the pieces and adjust the machine blade as needed. Cut the pieces.
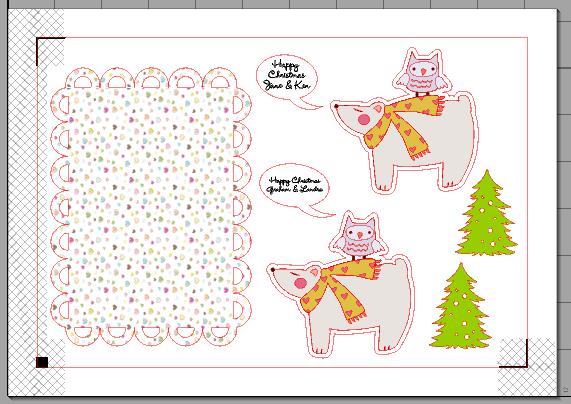
Image 4

My penultimate step was to cut out the polar bear shape in double sided adhesive and apply it to the bear. In this image I also applied double sticky to the owl, but did not do this for the final outcome. I sprinkled on white glitter to the bear, then chose a pink glitter for his scarf which was cut out of a separate piece of card, and then double sided adhesive applied. 
I layered the pieces together as shown, and added the scarf using sticky foam pads to give it a little depth. Now the card is easily customised for different friends, just by changing the speech bubble sentiment. Have fun with this!


PRODUCTS USED:



Friday, 28 October 2016

Mini square "explosion" photo album

Explosion mini photo album by Hilary Milne for Silhouette UK


Today I am showing you a quick and simple tutorial for a super cute photo album that will easily fit in your bag to show to anyone at a get together, and it is more unusual than a phone photo album! I have given a couple to friends and they have been delighted. The finished size is 3.25" or 8 cm square and then it accordions out.

EQUIPMENT:
Silhouette Cameo
3D Lori Whitlock square album #42691
Silhouette Chipboard or strong Kraft card stock for the covers
3 pieces A4 Cardstock for the inner folded card
2 pieces Ribbon, each 30cm long.
4 Photographs 7 x 7 cm
Silhouette Essential glitter in turquoise for embellishment
Glue

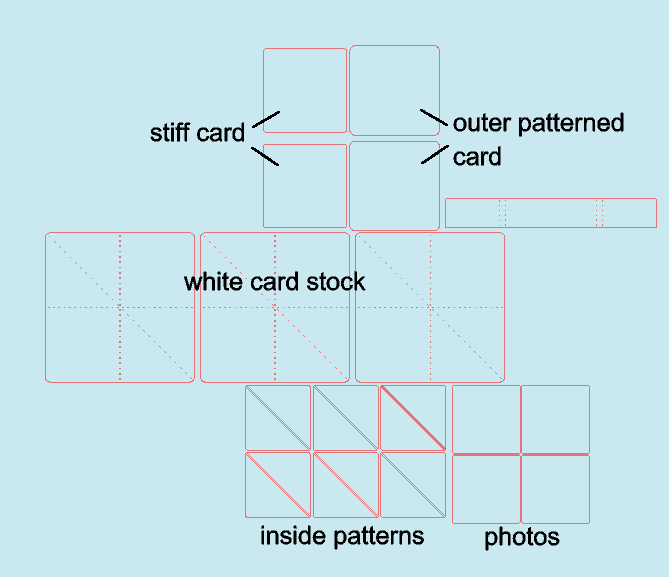
Open the library file on your design area and identify the pieces as shown. Ungroup everything, then re-group dotted lines with the three "white card stock" squares. I haven't named that long rectangle as it is not used in Lori's video tutorial, and I can't think what it is for!
  1. Cut what will be the two outer covers from thick Kraft card or Silhouette chip board.
  2. Cut the two patterned outer covers, and if wanted, two more patterned inner covers to hide the Kraft card or chip board.
  3. Cut three pieces of white card stock for the folding inner pages.
  4. Cut 12 pieces of coordinating patterned triangles
  5. Cut 4 photos for the front and another 2 photos if you are going to use the back. I cut mine by hand into squares 7 x 7 cm.
Lori Whitlock has an excellent video to show you how to put this together here.
Explosion mini photo album by Hilary Milne for Silhouette UK

The ribbon must be long enough to wrap around the album, so cut two pieces 30 cm long. Stick a piece of ribbon either side sandwiched between the layers of the outer, stiff cover and the patterned paper. N.B. Make sure they are stuck so that they are pointing to the back of the booklet, to wrap around it and be tied at the front. Have a look at the photo below. Also as shown below using two pink daisies, there is room for 2 more photos.

Using a thick font, I cut out the letters for "Leo 2016". I then cut out some  double sided Silhouette adhesive sheet, applied it to the letters following the instructions on the packet, and sprinkled on the turquoise Silhouette glitter from the Essentials glitter stack. As you can see above, it is a lovely deep colour. Once I stuck these onto the front of the album, the present was ready. I hope you like this enough to make one for yourself. It takes less than an hour and is very versatile. Here is one I made earlier!
Explosion mini photo album by Hilary Milne for Silhouette UK


PRODUCTS USED:


Saturday, 23 July 2016

Sleepy Penguin door hanger


Our granddaughter was coming to stay the other day, and she was going to sleep in a room that was "new" to her. I thought if I made her a door handle hanger, it would be a bit of fun and perhaps help her to go to bed without a fuss when visiting. She loves penguins, so I found a cute simple penguin shape from Snapdragon snippets. The only thing I wanted to change was to make the eyes look like he was asleep. I love using the double sided sticky sheet from Silhouette with their glitter, so his tummy got a party makeover. Making the hanger part for the door is really easy, so this is a good project for a beginner as it introduces you to many essential techniques as well as placing text to path.

EQUIPMENT:
Silhouette Cameo
Cardstock in black, white and peach.
Silhouette double sided adhesive sheet
Silhouette glitter
Glue stick
Snapdragon Snippets #52932

STEPS:
1. Sticky body - Open the file in Silhouette, and Ungroup the pieces. I colour the pieces to make it easier to identify them. Select the white body shape and Release compound path. Delete the two eye circles. Draw a small circle and copy it. Put one on top of the oher as shown. Select both, click on Modify and Subtract. You should be left with a "sleepy" eye. Select it and Mirror replicate. Position them back on the body, select all those pieces and Make compound path. You should now have a shape as in number 4. Pop a sheet of double sided adhesive sheet on a carrier mat. Select the correct settings on the software for this medium, check the actual blade in the machine, then send the job to cut.


2. Door hanger - Now we have to make the hanger for the door knob. My penguin was 14.5 cm across. I drew a circle about 10.5cm in diameter, then made an internal offset of 2cm. Select these two circles, and Make compound path. Use the knife tool to cut out a portion as shown. I like to make the cut end rounded by welding on a small circle as shown below.


3. Text to path - Make a circle that is a little bigger than the internal diameter of the ring. This is to be the path for the words you type. Now type the message you want and Double-click the text to enter text-edit mode and you'll see a green boundary box and little circle with a cross in it at the start of your word. This circle can be dragged to the circle and the text will 'snap' to it and curve around that shape. Once you are happy, right click and Convert to Path. This will lock the text into the curved and can be moved away from the shape.

Make sure you select the writing and make it No cut! Fill it with whatever colour you want. I chose a peach to match the penguin bill and feet. 

4. Card stock body pieces - Enable Registration marks. Place the penguin body parts (gosh that sounds gruesome!) within the registration marks. You should have 6 pieces in all: a white body, a black body with flippers, an orange bill, two feet, and the door hanger. Print out the pieces, load the card onto the Silhouette carrier sheet and feed into the Silhouette with the knife set at the correct height, and the software set on the correct settings. 

Peel off the side of the adhesive sheet that will allow you to carefully apply it to the white "tummy". Peel of the other protective liner and sprinkle on glitter liberally, catching the excess on a sheet of paper to return to the pot for use another time. 

Assemble the penguin, using a glue stick to attach all the pieces including the hanger.
Let your child hang it on their door handle as part of their bedtime routine and sweet dreams to all!


PRODUCTS USED:


SaveSave

Sunday, 5 June 2016

Pinwheel Penny Slider Spinner Card


Immediately I saw a short video on line of these cards in action, I knew I had to make one. Be warned, they are quite addictive to play with! If you Google "penny spinner card" you will see they come in various shapes, but I really liked the pinwheel as it evoked happy, childhood memories. I have a friend who loves taking part in vintage car rallies, so the sentiment seemed perfect for her. The spinner card file I used is by Lori Whitlock. Instead of the pinwheel it could also look really good with a child doing a cartwheel such as using the file A hug and a heart by Samantha Walker #37787.

EQUIPMENT:
Silhouette Cameo
2 pennies or similar small coins
Cardstock
Adhesive tape
Small brad
Glitter
Double sided adhesive sheet
Sticky dimensional pads
Pinwheel Penny Slider card by Lori Whitlock #61616
American Crafts Central Park Flower pattern #20862

STEPS:
1. Open the file and ungroup the shapes. Move the pinwheel aside, and then re-group the horizontal cut with its surround, the second piece like this, and then the card shape needs grouped with its dotted fold.
2. I cut the background card on my first piece of white card stock.
3. For the larger, slotted layer and the pinwheel shape I used a background fill (Central Park flower pattern). I printed some cardstock with these and with registration marks enabled.
4. For the top slotted layer I used plain cardstock and simply cut the shape out. If you want to print a sentiment on it, enable the registration marks, type your sentiment and print a sheet from your printer. before putting it on the Silhouette mat and sending for cutting. Once done, stick the two layers with the slotted hole together, so that the holes align.
5. I wanted to introduce a bit of sparkle, so I used the double sided adhesive sheet and cut another pinwheel shape.

I peeled off the backing and carefully applied this to the white, unpatterned back of my pinwheel. I then peeled off the other protective backing. With adhesive side up, I liberally sprinkled on some glitter powder, and then reversed the shape, pressing it down into the mound of glitter to get even more to adhere. Fold in the pinwheel wings, rolling them over a pen, pencil or knitting needle, so that the tiny holes for the brad are on top of one another in the centre. Thread a brad through all four layers and splay out the back of the brad to fix.


CONSTRUCTION:
6. I roughly cut a foam sticky pad into a rounded shape and stuck it onto a coin. The other side of the coin is stuck with another sticky pad onto the pinwheel. This is then introduced through the front of the double slotted layers, and the second penny can be stuck from the back of the card. Make sure it all slides freely, and rotates, by rocking it back and forth.

7. Pop more sticky pads on the back of the double slotted layers, making sure they do not impede the movement of the penny slider.
8. Fold over the main piece of card and attach the slider layers. If you didn't print or stamp on a sentiment, you can stick one to th front, but you will need to make sure it is out of the way of the travelling pinwheel. Play with the pinwheel as it will gradually move better and better as the sticky foam pad is rounded off. Well, that's my excuse!


PRODUCTS USED:


Sunday, 15 May 2016

Glitter is my Signature Colour Wall Art


Niki here with you again today, with another project using the Double Sided Adhesive Sheets. They are basically large sheets of double sided tape which you can run through the Silhouette machine and then peel off the top sheet to reveal sticky surface which you can then cover in something pretty - in my case, usually glitter :)

Today's project was designed to go in a frame that has gone on my craft room wall. I have a bit of a gallery wall thing going on in there but there was one empty 8x8" box frame that needed something to go in it and because I usually scrap in 12x12 size I didn't have anything ready made.

I was looking for some word art to sum me up and came across 'Glitter is my Signature Colour' in the Design Store - perfect!!

I opened it up in Silhouette Studio and re-sized it to a size that would fit in my frame. I also added a 'u' in 'colour' so it was UK spelling rather than US, I just picked a standard font from my PC that was similar and you wouldn't know the difference would you?!


I then cut it using the default setting for 'Double Sided Adhesive'. Now, to position the whole file onto the white cardstock background, I actually used Transfer Paper. First I peeled the yellow backing off and weeded out all the bits whilst it was still on the mat. I then placed the Transfer Paper over the design and carefully peeled it away. I could then position my design over my white card and get it perfectly in place. Becuase the double sided adhesive is clear, it was hard to see the design through the transfer paper so I got my 4 year old daughter to shine a light for me. This worked brilliantly. I then scraped over the whole thing with the scraper tool and very carefully peeled the Trnasfer Paper away. I then sprinkled Silhouette Glitter over the words. I finished off by mounting it onto foiled background paper  and popping it into the frame.


I had great fun creating this frame for my craft room wall - what will you make?


DESIGNS USED:


PRODUCTS USED: