Showing posts with label Vinyl. Show all posts

Saturday, 4 May 2019

Faux Pearlised metal bear cushion


Hello, it's Verity here from Pretty Little Button. This week the design team is using reflective heat transfer vinyl. This vinyl is great to use on clothing to increase your visibility in low light conditions. However, I love the look of it normally. It has a pearlized look to it as though it is burnished metal and thought it would look great as a modern style cushion. Even when it does catch the light, it still looks really amazing and such an interesting cushion and currently takes pride and place on my craft room chair!

Faux Pearlised metal bear cushion process: 

Insert your design into your design space, for this design see the end of the post of the design ID.
Now the reflective HTV comes in rolls of 9"wide by 12" and you can cut this without your Silhouette mat.  To ensure your position is correct, open up the page set up window and adjust the page size using the width and height settings. 


Next, open up the transform window. In there, select the rotate tab.


You can either use the green button on the design to rotate the design freely, or you can use some of the pre-programmed rotate options with the rotate tab. This allows you quick and straight rotation to align with your media. 


If you still want to work with your design, but the orientation of it is a bit confusing, you can orientate the viewpoint of your design space to continue working with your design. In the page setup window, select the best suit option in the 'Rotate view' section.


Lastly, when you are ready to send, remember you are working with HTV. The software comes up with a friendly reminder asking whether you wish to mirror. If you have already flipped your design prior to this, press send-ad. As I hadn't flipped my design, I selected send mirrored. Remember, if you select this option it will mirror your design, but it will the flip design to cut from the opposite side of the mat, so you need to be aware of where it will cut in relation to where your media will be in the machine.


Once cut, weed all the excess vinyl to leave the bears on the backing sheet. I used a hot iron on cotton setting to heat set the vinyl. I didn't end up using the writing in the end as I loved it just with the bears. 

Faux Pearlised metal bear cushion photos:


If this has inspired you to try this out, please post below. I would love to see it!

Until next time,

Verity


Profile | Pretty Little Button Blog | Instagram | Facebook

DESIGNS USED:

MAMA BEAR by Tommy and Tilly Paper Design, Design ID #289771

PRODUCTS USED:
    

Monday, 1 April 2019

Dotty stencilled painted cup - Adhesive vinyl and warp tool


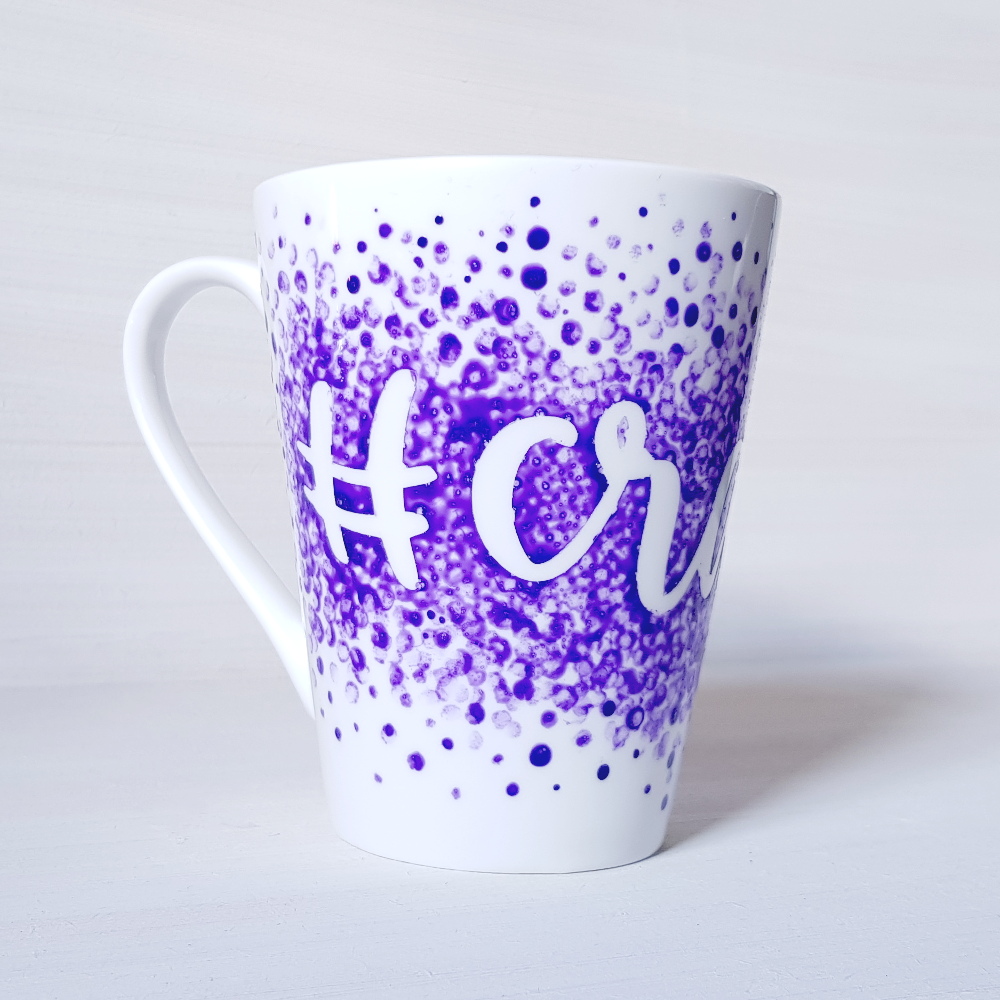
Hello, it's Verity here from Pretty Little Button. A few weeks ago, I went to the Creative Craft Show at the NEC. Whilst I was there I won a mug making kit which included two mugs along with porcelain paint. As they were blank mugs, I thought they were perfect for adding a 'Silhouette' touch to them. Adhesive vinyl can act as great stencil material on surfaces like this, and as long as you don't use permanent adhesive vinyl you can easily create a positive paint effect like this.

Dotty stencilled painted cup process: 

For this cup, I went with a simple design using '#crafter'. Change the font style to a font of your choosing; I used 'Sweet Mia' from the Silhouette store. 


Next, you need to make sure all your letters in the design is welded together. With the text selected, right click and select weld. 


If you have more than one word, then these will not weld together, for example like the # in my design, you need to group all of the parts together to adjust the size of your design. Right-click again with all the elements selected and click group.


To adjust the size of the design, use the object size options in the top toolbar.  Make sure the little padlock appears closed as this will adjust your design proportionally and if you change the width, it automatically changes the height proportionally. 


To use the arp feature, you need a designer edition of the studio software or higher. The icon that appears warped in the right-hand toolbar opens up the warp window. 


There are two tabs to the warp feature, the second tab has template warp shapes - allowing you to take out the guesswork for you. Select the shape most appropriate one for your object. 


When it applies the warp, you will notice additional adjustments lines around the design (in green, blue and grey).


For a bit warp fit, you can adjust these to suit your object. My cup gets thinner as it gets near the bottom. Therefore adjusting the bottom right square allows me to move the bottom of the design in and thinner in width. 


Remember to do this the same on the other side for symmetrical warp. 


When you are happy with the warp, you are ready to send your design to cut. 


For the cup, I wanted the word to be left bare for the cup but the dotted paint to appear around the words to negative dotted design. Therefore, I weeded all the negative vinyl to leave a positive design on the back sheet. Use transfer paper to adhere the vinyl to your object. 


To apply the porcelain paint, I used a cotton bud and varied the pressure and size of the dots. However, you could use any shape to apply the paint. 


This was left to dry for 24 hours before removing the vinyl from the cup. To heat set the paint, the cup was baked at 150C for 35 mins to set the paint.

Dotty stencilled painted cup photos:


 If this has inspired you to try this out, please post below. I would love to see it!

Until next time,

Verity


Profile | Pretty Little Button Blog | Instagram | Facebook

FONTS USED:

Sweet MIA SCRIPT FONT by Skyla Design, Design id#229372

PRODUCTS USED:
    

Saturday, 23 March 2019

Make a 3D Lightbox using Carbon Fibre Vinyl

Make your own 3D Cardstock Lightbox - Using Silhouette Carbon Fibre Vinyl - by Janet Packer https://craftingquine.blogspot.co.uk for GraphtecGB Silhouette UK Blog.


Hello, Janet from the Crafting Quine Blog here using the Silhouette Carbon Fibre Vinyl and saying farewell* with a 3D Lightbox design. This speciality vinyl is available in black with a pattern that gives the look and texture of carbon fibre in an easy to apply material. For this project I have applied the vinyl to cardstock which I then used to make the box. I also used it in a more conventional way to make the letters.

The lightbox design (#251632) is from the Silhouette Design Store. I adapted it to take three rows of letters, which allows for longer words and then cheated on the letters, putting the  words onto long strips. Far quicker and less fiddly to change out than individual letters. Finally I added a string of led fairy lights inside.

Design ID #251832 in Studio and SVG format


DESIGNS USED:
Lightbox by Nilmara Quintella (#251632)
LW Perfect Type font by Lori Whitlock (#55159)


MATERIALS USED:
Black & White Cardstock
Shiny/Mirror Card, Paper or Vinyl
Strong Tack Transfer Tape
Liquid Craft Adhesive
Strong-Tack Tape Adhesive
Vinyl Scraps for Emojis
Silhouette Premium Carbon Fibre Vinyl
Silhouette Vellum
Set of Battery-Powered LED Lights

You'll find instructions for assembling the box on the designer's website and there is a link from the file's description in the Silhouette store. I'll just highlight the things I did differently.

HINT: The designer's instructions are in Brazilian, for English instructions just copy the link into a Google search and you get the option to translate the page. 

Preparing & Cutting Carbon Fibre Cardstock
Cut a piece of vinyl slightly larger than the box base and smooth it onto a piece of black cardstock. Cut the piece, increasing the blade depth and force as necessary, to cut all the way through. Use a bone folder to make crisp fold lines.

Make your own 3D Cardstock Lightbox - Using Silhouette Carbon Fibre Vinyl - by Janet Packer https://craftingquine.blogspot.co.uk for GraphtecGB Silhouette UK Blog.

Adding Reflective Panels
Use the panel pieces cut from mirror card to line the reverse of the box if you have it. I didn't, so I used some sticky-backed reflective paper that I had on hand. In this photo I've left the backing on at the ends of the long strips. When assembled these can be removed so the reflective paper hides the  box tabs on the inside also giving a bigger reflective surface.

Make your own 3D Cardstock Lightbox - Using Silhouette Carbon Fibre Vinyl - by Janet Packer https://craftingquine.blogspot.co.uk for GraphtecGB Silhouette UK Blog.


Add Extra Supports
The translucent part of the lightbox is effectively an adapted box lid. In order to add an extra line of text it is necessary to cut an extra centre support bar. I'd also recommend cutting extras of all of the bars in case they don't all fold straight. It is also necessary to add one extra aperture and reduce the height of the existing apertures in the lid. Check they are all of the same height, evenly aligned, and are equally spaced using the alignment and spacing tools in tools in the transform panel.

Make your own 3D Cardstock Lightbox - Using Silhouette Carbon Fibre Vinyl - by Janet Packer https://craftingquine.blogspot.co.uk for GraphtecGB Silhouette UK Blog.


Applying Vellum
Vellum is applied to the reverse of the lid. I recommend a strong adhesive tape so that no excess glue can get onto the vellum.

Make your own 3D Cardstock Lightbox - Using Silhouette Carbon Fibre Vinyl - by Janet Packer https://craftingquine.blogspot.co.uk for GraphtecGB Silhouette UK Blog.


Adding Lights
Here are the assembled top and base parts of the box with the fairy lights inside.

Make your own 3D Cardstock Lightbox - Using Silhouette Carbon Fibre Vinyl - by Janet Packer https://craftingquine.blogspot.co.uk for GraphtecGB Silhouette UK Blog.

Arrange the lights around the edges of the inside, adhering them to the box sides using adhesive tape. For an even neater effect, adhere the battery pack in the box (with double-sided tape) and cut a small slit and a rectangle out of the side so that the controller can be switched on and off with the lid in place (then no-one has to see the light 'spaghetti').

Make your own 3D Cardstock Lightbox - Using Silhouette Carbon Fibre Vinyl - by Janet Packer https://craftingquine.blogspot.co.uk for GraphtecGB Silhouette UK Blog.


Text Cheat
Instead of cutting individual letters and mounting them on small acetate rectangles, cut strips of acetate and mount the words in carbon fibre vinyl directly to the strip. This isn't quite so versatile, but you can just cut more strips and vinyl when you need new words. So much quicker and less fiddly to change them out. With this method you can choose just about any font you want. I picked LW Perfect Type as its quick to weed and easy to read, but any cuttable font will do, even script fonts work (don't forget to weld any overlapped letters together before cutting though).

HINT: For ease of application, cut your letters in weeding boxes of the same size as the acetate strips. Place your acetate strip on a card strip cut to the same size so that is easier to see. Align your transfer tape with the top of the weeding box, lift the word, then align the top of the transfer tape with the top of the strip and burnish it onto the strip. 

Make your own 3D Cardstock Lightbox - Using Silhouette Carbon Fibre Vinyl - by Janet Packer https://craftingquine.blogspot.co.uk for GraphtecGB Silhouette UK Blog.


Layered Emojis
These crying emojis were made using layered vinyl. Using transfer tape, pick up the blue 'tears' first, then the yellow faces next, and finally the black circles (with weeding box the same height as one of the acetate strips as for the words). Then they are easy to align onto an acetate strip in the same way as the letters.

Make your own 3D Cardstock Lightbox - Using Silhouette Carbon Fibre Vinyl - by Janet Packer https://craftingquine.blogspot.co.uk for GraphtecGB Silhouette UK Blog.


You may have realised, if you've been following the Silhouette UK Blog for a while, that I have a passion for adding lights to my projects. If you have a weakness for lights too, you might like to check out these earlier projects.

Wedding Marquee Letters
Marquee Lights
Light Up Big Ben - Cutting Thicker Cardstock
Big Ben Lantern 
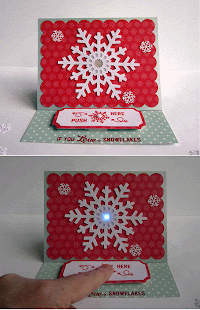
Light Up Cards
Light up Cards
Vinyl and Foil Lanterns
Vellum & Foil Lanterns
Polar Bear Luminary
Acetate Lantern


*Saying Farewell
This is the last regular post I'll be doing with the Silhouette UK Blog Design Team. I've been on the team since it started in 2016 and I'm away to do a real world job which won't allow me as much crafting time. I may be back with a special post now and again. Meantime you can catch up with my crafty creations (Silhouette and otherwise) at the Crafting Quine Blog.


Bye for now,

Janet Packer https://craftingquine.blogspot.co.uk for GraphtecGB Silhouette UK Blog.
  Crafting Quine Blog | @CraftingQuine


DESIGNS USED:
 Lightbox by Nilmara Quintela  LW perfect Type font by Lori Whitlock


PRODUCTS USED:
 Carbon Fibre Vinyl  Silhouette Vellum  Silhouette Cameo 3