Showing posts with label pix scan mat. Show all posts

Monday, 14 January 2019

Stepping up your stamping with PixScan


Hi everyone. It's Verity here from Pretty Little Button bringing you another project. For today's post, I'm showing you how you can step up your stamping with your PixScan mat. There are a lot of fun and interesting stamps out there that more than just regular stamping. I'm exploring how we can use our Pixscan mat with turnabout stamps to create depth and dimension. Most turnabout stamps don't come with a die - you stamp, turn 90 degrees and then stamp again in a different colour. But I wanted to take it on step further and foam mount the different layers for more interest. The Pixscan made it very easy to do, so read on how you can create a card like this too!

Card storage and organiser details: 

For details on how to set up your camera or phone with Pixscan (calibration), please see this post HERE. For the first layer of stamping with my turnabout stamp, I stamped this directly onto the card panel in my choose ink colour. Usually, with a turnabout stamp, you would the rotate your card panel 90 degrees and stamp directly onto the card panel in another colour. However, to step this up to give dimensional look, you need to stamp the remaining 3 layers separately on white card panels of the same size.  

Position these separate layer panels on to your PixScan mat, and load this up into your design space (again, refer to post above on how to do this). 


In order for you to cut out the stamps, you need to trace the images to generate a cut line. Use the trace tool draw around the area you wish to trace. 


Next, select solid fill and adjust the threshold so the shapes you wish to trace turn yellow. If you turn this too high, the whole area will turn yellow. Make sure you just adjust the level until only your stamp image is yellow. 


Next select trace. A red cut line will now outline you stamp images. You can either cut them out like this or add an offset around your image. 


To add the offset, select the cut line and open the offset window. Adjust the offset to your choosing - I went for 0.0675 however, I do wish I went for a small offset. 


Once you press enter you will now have two cut lines - the initial trace cut line and the offset cut line. Delete the trace cut line to avoid confusion when you send this to cut. 


When you have traced and offset all your design on your mat, send this to cut with your machine making sure you load up you Pixscan mat without moving stamped images on the mat. Remember to do a test cut before cutting the design out. 


Assembling the card:

When the machine has cut out your stamped images, do not discard the negative pieces. You need one of these to act as the turnabout template. Position one of these negatives over your initial stamp card panel, but rotate the design by 90 degrees. 


 Next, apply foam pads to one colour layer stamping and adhere through the negative parts of the die cut turnabout card panel. You can easily lift the negative card panel up and over the foam mounted pieces once complete.


Next, position the negative die cut turnabout panel on top of the foam mounted layer but again, rotate this 90 degrees, making sure it is centred.


Again, add next colour layer pieces through the negative pieces foam mounting these. You need to double foam mount this and for stability, you will need to add foam pads to areas where there is no raised layer to adhere to - see below. 


Again, you can easily lift the negative die cut panel, up over the foam mounted pieces once complete. 


 Repeat this process once more rotating the negative die cut panel 90 degrees for the last colour layer. This card panel was adhered to a 5.25" x 5.25 kraft card base, and a small heat embossed sentiment was added to the middle. 


If this has inspired you to try this out, please post below. I would love to see it!

Until next time,

Verity


Profile Pretty Little Button Blog | Instagram | Facebook


PRODUCTS USED:


Monday, 10 September 2018

Mixed Media Floral Wreath Card - Printable cotton canvas


Hi everyone. It's Verity here from Pretty Little Button bringing you another project. Today's project features the printable cotton canvas. This media allows you to print any design out onto cotton canvas, which is more sturdy and thicker in comparison to the normal printable cotton sheets from Silhouette. This cotton canvas is adhesive too, meaning it makes it easy to apply to objects should you wish to. My idea was to use this canvas, well as a canvas to paint on. It is a different material to regular canvases you buy from an art shop and if you really do want to use this material for a lot of heavy paint, I would advising priming it first. However, as I was doing minimal painting I was able to get away with it - though note you paint will absorb into the cotton canvas. I just applied a couple of layers of the colour to blend and colour. Originally, I was going to apply this to a thick piece of heavy chipboard to create a minute painting to use as decoration. However, I got an inky handprint and therefore needed to trim it down. Instead, I turned it into a mix media card. 

Mixed Media Floral Wreath Card details: 

Start off by loading your design into your window. I drew a square (red line) to mimic the size of the area I wanted to apply this to so I could scale the design down.  As you are going to print this out, you need to make sure of the line for the design has weight to it - usually it is set to 0pt. I opted for a pale grey line at 0.5pt. This line was darker enough to see when painting but light enough not to show through once painted. 


Once it was printed, I proceed to paint the design in with acrylic paints. As this canvas was not primed, the paint initially absorbed into the media, but after one layer, the paint stopped doing this allowing me to blend and shade.

As I mentioned, I, unfortunately, got an inky handprint next to the design, so I had to change the project slightly. Instead, I decided to make a card, for which I wanted the wreath to be popped up and I didn't want the inner of the wreath to remain. I could have used my scissors to fussy cut this out, but that would of be tricky for the inner. Instead, the PixScan mat came to the rescue.

I trimmed down the canvas sheet to a small size, pealed the backing off and adhered to a thin sheet of card. I did this to add stability to the wreath when adhered to the front of my card. The card sheet was placed onto my PixScan mat and I uploaded a photo into Silhouette through the PixScan window. If you are unsure how to do this, check out this post HERE.


Next, I used the trace feature to trace the floral wreath. I cannot give you precise settings that will work for every design each time, you will have to do a bit of trial and error to work out which is best for your design. However, in order to cut the inner out, I need to make sure I just selected 'Trace' and not 'Trace Outer Edge'.


Once I had traced the wreath, I created an offset and removed the traced cut filed inside the offset. The PixScan mat was loaded into the machine, and I had to do several tests cuts to make sure the blade would cut through the cotton canvas and card. In the end, for my machine and blade, I had the following settings: Blade 10, Pressure 33, Speed 1 and 4 passes. I did worry that this would mark my mat a lot, but you can hardly see any cut lines, showing all though the setttings looked a lot, they were just right!


To assemble the card, I applied Tonic Nuvo mouse through a striped stencil. I created this stencil for a previous post which you can find that HERE. Once this was dry I foam mounted the wreath and added a layered die cut sentiment with an offset shadow. To finish I added lots of Tonic Nuvo Drops matching the mouse.

Mixed Media Floral Wreath Card Photos:


If this has inspired you to try this out, please post below. I would love to see it!

Until next time,

Verity


Profile Pretty Little Button Blog | Instagram | Facebook

DESIGNS USED:

Flower wreath by Paige Evans, Design ID #232488


PRODUCTS USED:


Monday, 23 July 2018

Getting more out of patterned paper


Hi everyone. It's Verity here from Pretty Little Button bringing you another project. Today I've created a card using the All Occasions Patterned Paper pad from Graphtec and used it with the Silhouette PixScan Mat. The PixScan mat is a great way to get more from patterned paper other than to cut it up to create a mat layer for backgrounds. Instead, use your PixScan mat to cut out elements to create as focal elements to your papercrafts. It is so easy to do!

Getting more out of patterned paper cards detail:

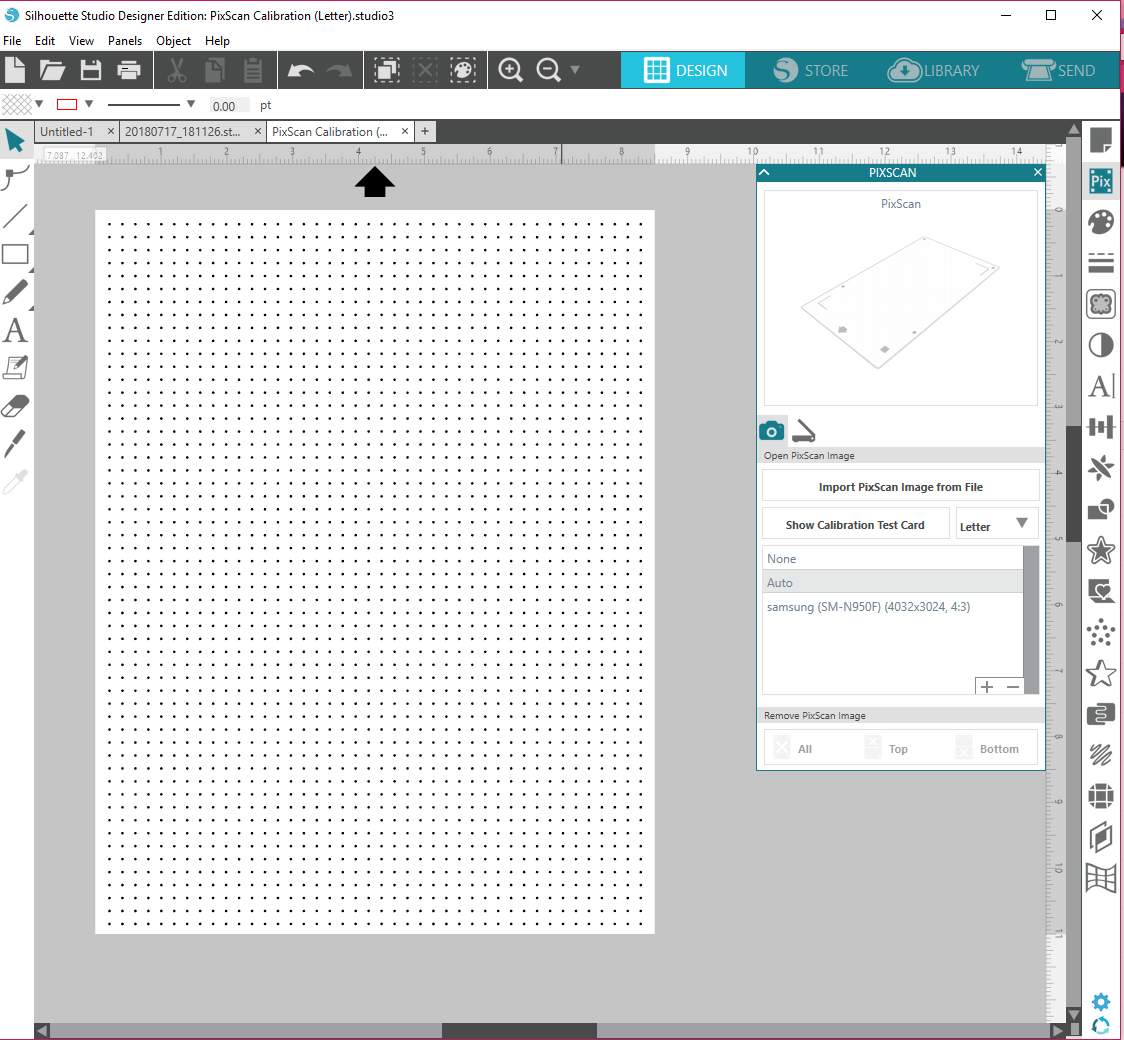
To start off, you will need to calibrate your phone or camera to use the PixScan mat. Open the Pixscan window and select 'Show Calibration Test Card'. This will change the your desing window to have an 8.5 X 11" screen full of dots. Send this to print. 


You need to take a picture of this print out, making sure the dots fill the whole screen on your camera. Next, transfer your photo onto the computer and load into the softwared. To do this,click on the little '+' sign in the Pixscan window and locate your photo file. Now you will have your camera listed in the window above.

It is now time to take a picture of your patterned paper to load into the software. Trim down the paper to the area you want and adhere to your PixScan mat. Now take a picture of your PixScan mat, making you can see all the mat, not just the patterned paper. It doesn't need to fill the screen like the calibration print out did. Once you have your photo, load it onto your computer.

To add the photo into the studio, select your camera/phone from the list in the PixScan Mat. I took mine on my Samsung phone. As you can see, I have my 'Samsung' calibration selected. The press I'Import PixScan Image from file'. The studio will attempt to load the picture.


When this is successful the software will load your patterned paper (or whatever else you had on your PixScan mat) into the design window, with a PixScan mat around it.


If you were unsuccessful and it the software is unable to load the photo, this will often be due to poor light of your PixScan mat when you took the photo, or the photo quality is poor. The best thing to do is to take another photo in better light and load this into the software. 


In order to cut items from the patterned paper you will find the trace tool will be your best friend. I initially trace the whole mat using the trace by colour tool. All the butterflies on the paper are the same colour so this was an easy way. I altered the 'tolerance until I was happy with the 'yellow trace'. 

To make it easy to see, I changed the line colour of my traced elements to blue - this stood out more from the background compared to red. 


As this has also added tracelines for all the insides of the butterflies, I need to work out a way to remove this. I only want to cut around the butterfly. To do this, I selected all the items, and release compound path. This create a lot of individual cut lines. 


I selected a few butterflies to cut, and removed the inner cut lines, keep the outline cut line visible.


If like me, you deleted all the other lines from the butterflies, but then decided you wanted one more butterfly, then try out the trace area and trace by colour tool together! First of all, use the 'Trace area' tool to create a little box around one butterfly you wish to trace. The in the Trace window tool, click on the 'Trace by colour' tab. Using the dropper, select the butterfly colour in your 'trace area' and manipulate the tolerance like you did previously. Due the trace area, only the colour within that box will be traced, as opposed to the whole photo as before.


 To cut around the butterfly, I used the offset tool to add a small offset and once complete deleted the outline cut line.


When you have all the items traced and ready to cut, load your PixScan mat into your machine and send to cut. Remember to do a test cut first. Also the PixScan mat is very similar to print and cut - it will need to register the 'registration' marks on the mat. Make sure you have could lighting over the blade, and it need be manually align your blade over the top  black square and manually register the mat.

Getting more out of patterned paper finished photos:

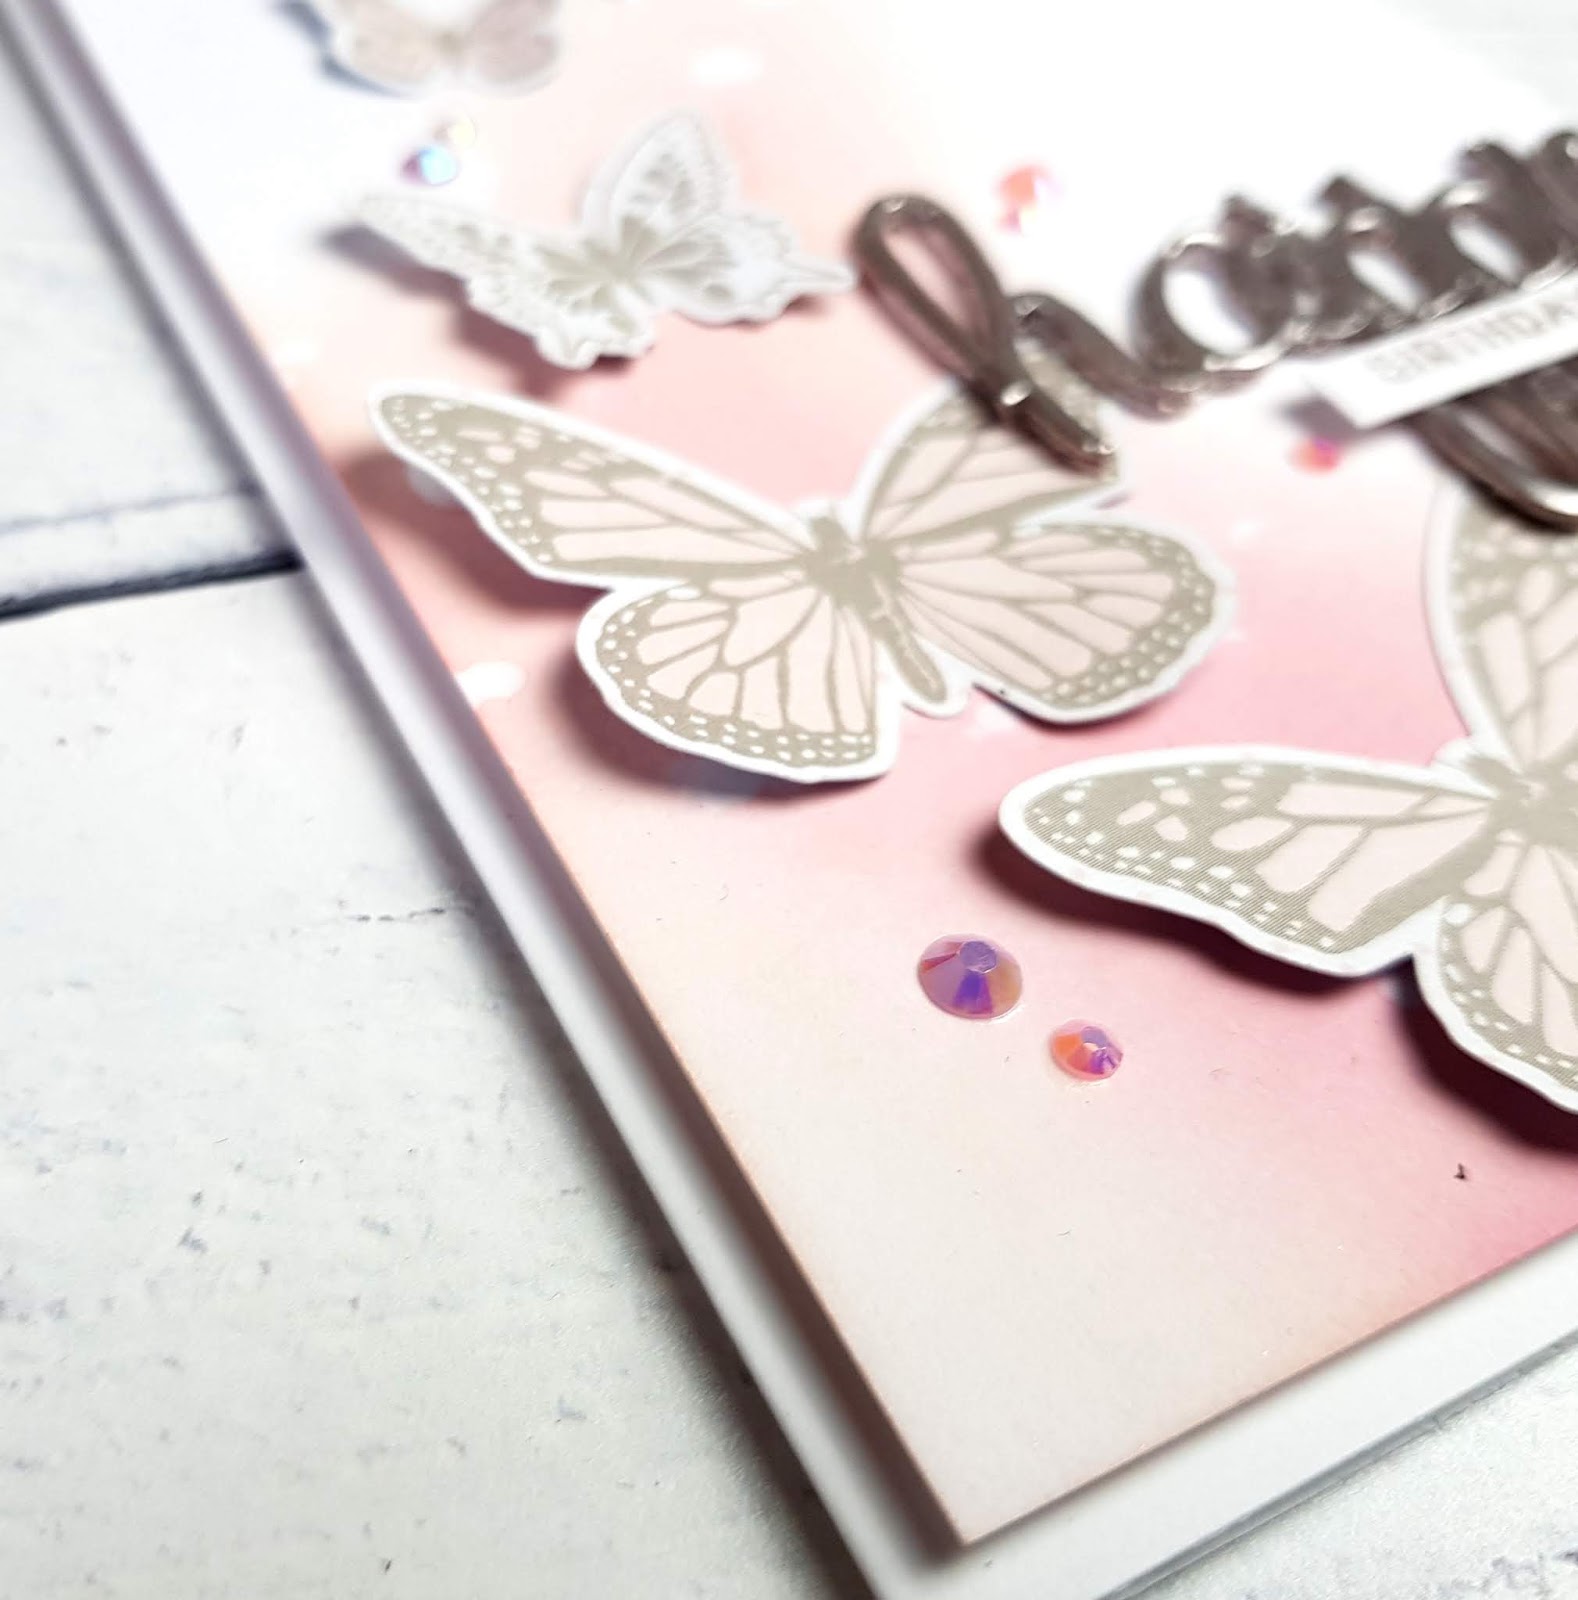
To assemble these cards, I added Tattered Rose and Picked Raspberry distress oxides to two card panels.  Onces I was happy with the blending I added a few drops of water, left it for 20-30 second before soaking up with a kitchen towel for a distress look. 


Next, I foam mounted the wings of the butterflies onto the card, applying glue beneath their bodies for dimension.


To create the sentiments, I cut the word 'Happy' and 'Hello' three times using my cameo. This font is SNF Miss Molly by ScrapNFonts. These word die cuts were layered up with glue and several layers of Pink Champagne embossing powder was added for a metallic finish.


The sentiments were added to the card panel, along with a few colour corresponding gems. The whole card panels were foam mounted onto side folding A6 card bases.


If this has inspired you to try this out, please post below. I would love to see it!

Until next time,

Verity

https://www.graphtecgb.shop/wp-content/uploads/2014/08/silhouette-cameo-cutting-mat-pixscan.jpg


Profile Pretty Little Button Blog | Instagram | Facebook

FONTS USED:

SNF Miss Molly by ScrapNfonts -Design ID #8759

PRODUCTS USED: