Hi gang, Nadine here with another copper etching tutorial, this time using a solution called Edinburgh Etch, an alternative method to the salt-water electro etching which I shared last time. This method is also safe and effective and again costs under £10 in materials.
Ferric chloride is a salt crystal which which has been used since the turn of the century as it gives and accurate and controlable bite. It has benefits over other 'nasty' etching chemicals such as nitric acid as it is odourless, does not produce toxic fumes and, though corrosive, is not absorbed through the skin.
Whilst you can etch with plain ferric chloride, Friedhard Kiekeben, artist and researcher at the Edinburgh Printmakers Workshop has invented a better version called Edinburgh Etch. After lots of experimentation, he found that by simply adding citric acid, the acid naturally occuring in lemon juice, the etched sediment is dissolved as soon as it is produced, preventing clogging. This simple addition makes the etch faster, cleaner and last longer.
What you need:
- Ferric chloride
- Citric acid powder
- Water
- Plastic or glass beaker
- Copper piece to be etched
- Silhouette Cameo or Curio
- Vinyl
This tutorial will make up 500ml of Edinburgh Etch solution, simply scale up or down depending on your needs. Whilst this solution is safe to use, it is still a corrosive and can stain skin and clothes, so be careful, protect your work surfaces and wear rubber gloves.
Edinburgh Etch Recipe
- 1/5 Citric Acid Solution:
- 3 parts water to 1 part powder
- 4/5 Ferric Chloride
- 40% strength - available premixed or in crystal form
Step One: Make Citric Acid Solution
Dissolve the citric acid powder in a ratio of 3 parts water to 1 part citric acid. We're making 500ml of Edinburgh Etch, so dissolve 30ml (2 tablespoons) of citric acide in 100ml of water. Citric acid can be bought from chemists or shops that sell winemaking kits. I got mine from Wilkos.Step Two: Add to Ferric Chloride to Make Edinburgh Etch Solution
Measure 400ml of 40% strength ferric chloride and add your 100ml citric acid solution to it. I bought my ferric chloride premixed from eBay, but it is also available from printmaking supppliers and electronic supply companies.Step Three: Cut and Apply Vinyl
Prep your copper so it's free of grease and dirt - the easiest way is to buff with some fine wet and dry paper. Cut your vinyl, weed the parts that will be etched, then transfer to the copper using transfer tape. Remember to protect the back of your piece.Step Four: Etch
I popped some double sided tape on the back of my pieces and attached a little section of foam to make the pieces float, face down. Set your timer for 20 minutes - adjusing the time depending on the depth of etch you would like.Once you are happy with the depth of etch, pop a little sodium carbonate (
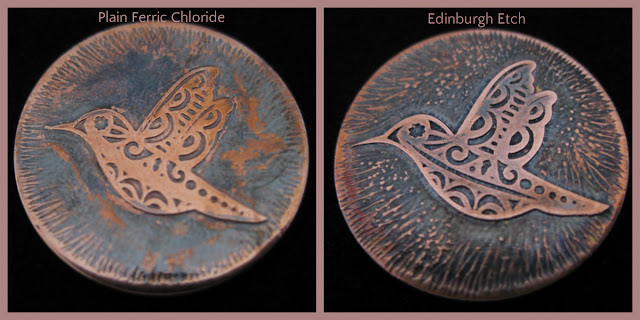
soda crystals) on your piece to neautralise and prevent further etching. I etched one piece with plain ferric chloride and one with Edinburgh Etch. I found the latter etched better, and also surprised me by producing a beautiful rainbow effect when removed from the solution. If you like this effect, it can be protected with Renaissance Wax or resin. Finish as desired, I oxidised with platinol and then polished the bird to highlight.
Step FIVE: Reusing - Testing Freshness
Edinburgh Etch can remain active for several years and allows for a great many pieces to be etched without dimished performance. You can tell if the solution needs replaced by dipping a strip of white paper into the liquid and checking the colour: |
| Edinburgh Etch Freshness Colour Chart. Courtesy of http://www.nontoxicprint.com/etchcopperandbrass.htm |
Step SIX: Neutralising and Disposal
Neutralise with sodium carbonite, also known as soda crystals. I bought a big bag from Wilkos for a pound, but I've read that bicarb and plaster of paris also works. Once neutralised, as with salt-water etching, take it to your Local Authority waste disposal site.For more information on Edinburgh Etch, check out the inventor's website nontoxicprint.
FINISHED PRODUCT
DESIGNS USED:
 |
PRODUCTS USED:
 |
 |
 |
 |


Hi Nadine, I like your blog! Can you tell me what type of vinyl you are using? Is it 651? Best wishes, Kirsty
ReplyDeleteHey Kirsty, any type of vinyl works well for this technique, I've tried Oracal, Ritrama and even a roll of stuff that a local sign marker gave me for free!
ReplyDelete