Thursday 30 June 2016

Making Fabric Elements for a Scrapbook Page


Hello, Karen here with yet another discovery from the Graphtec site - printable cotton fabric.

I was sent a pack of this last month and initially thought I would print a photograph onto it and then stitch it to a cushion.  BUT then I had the idea of making scrapbooking elements with it - very tactile and they gave my page a soft, feminine feel.

STEP ONE - Making your elements.
  • Knowing the photo I wanted to use (one taken of my girls in May) I opened it in the Silhouette Studio software, this can be done the same as opening any other file that is compatible. 


  • I then opened the flower flourish and used the dropper tool to choose colours from my photo to colour the flowers and leaves 

  •  I then selected all the shapes and under the cut settings chose 'No Cut' and layered up the flowers and leaves to make a swag a small cluster.

  • I next used the offset tool to add a white border to my flowers.

  • I chose a doily, frame and journal block and coloured them in the same way as above - remembering to make the lines 'No Cut'.   
  • I then wrote my title using the font LW Bunting 100pt to make my title and changed the character spacing to 140. 
  • Use the 'Divide option to separate the letters and colour the penents with a colour picked from your photograph and use the 'Offset' option to to give you a white border around each shape.
  • Open a letter size page and add registration marks.  Arrange your elements onto two pages - I used the knife tool to remove the bottom of my doily so that everything would fit. 


  • I drew a 3in x 2in rounded rectangle for my journaling card and used the perforated line feature as a 'No Cut' and coloured purple. 

  • Print onto your printable fabric and then load it into your Silhouette and cut out your elements. 
  • I drew a faux stitched line around the edge of a piece of 12 x 12 cardstock with my silhouette and a Silhouette Sketch Pen. 
  • I then constructed my page and added some garden twine, purple gems and letter stickers to finish.


DESIGNS USED:


PRODUCTS USED:

Light hold cutting mat for Cameo

Wednesday 29 June 2016

Bluebird Shadow Box card using vellum.

Fancy a bit of a challenge? My name is Hilary, and today I am making a 3D shadow box card from a design by Lori Whitlock, but with a little twist of my own.

I remember going to the pantomime as a child and loving the way the scenery would layer in at the sides, so that dancers could come in at different areas of the stage, and you visually got a feeling of depth. Then the lighting engineers could alter the lighting so that the scenery would become semi-transparent. It was magical! As I practised and experimented with this file, it occurred to me how the shadow box card looked like a tiny theatrical stage setting, and I thought that by using vellum I could create some magic of my own.

When the card is placed at a sunny window, light shines through, and when it is dark, a battery candle can be placed behind for more drama.

There is an excellent tutorial here by Lori Whitlock on how to put the basic shadow box card file together and if you have not made something like this before, I would definitely recommend a couple of practice runs, as I did.  As vellum is rather thin, it made sense to keep the supportive card "windows", and just cut the vellum for the pretty details. This involves a little bit of work, but I think the result is worth it! 

I would categorise this as a tutorial for those with moderate expertise. 

SUPPLIES:
File: Lori Whitlock, Bluebird Shadow Box Card #84282
Vellum - 3 sheets of A4
Card stock - 3 sheets of A4
Glue

STEPS:
1. Making the vellum shapes
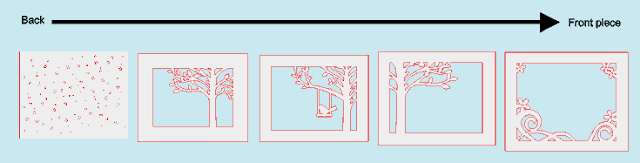
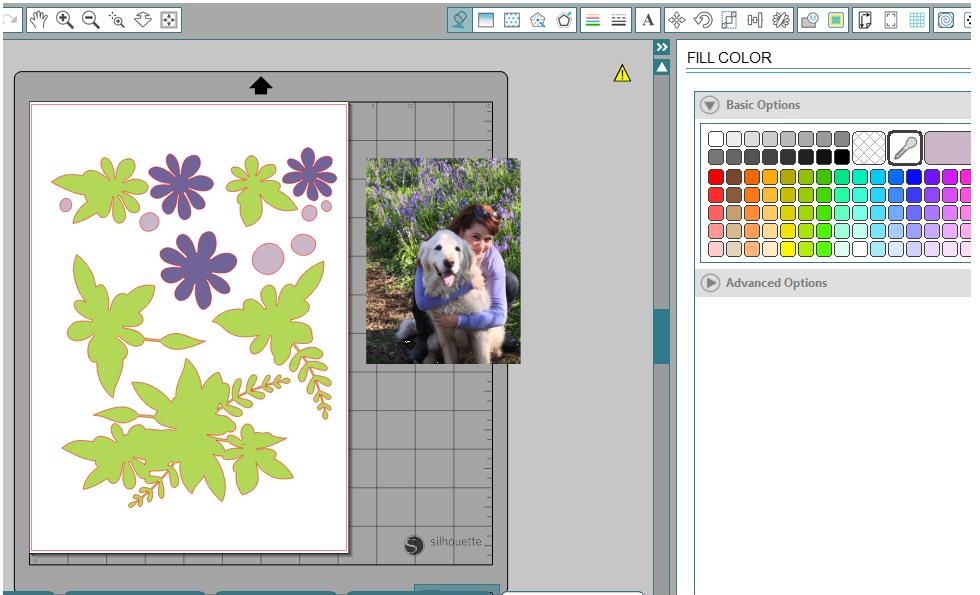
Open your file from the library and move it to one side of your design space. We will use those pieces later. Make a copy of the file and keep it on your design area (Edit/Copy/Paste). Ungroup the pieces as normal. You may need to ungroup them more than once. You should have 7 layers now separated. Delete the bluebird and the plain rectangle. You should be left with the peices as shown in image 1.

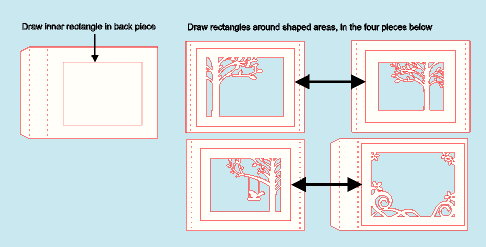
2. To cut out what will be vellum areas, continue as shown below. The size of the rectangle does not have to be exact, but you want a border big enough to apply glue. I find the pieces are easier to work with if you give them a fill colour. Any colour will do. Select two pieces, and when you hit Modify/Crop it acts like a biscuit (cookie) cutter whilst deleting the outer area at the same time. The inner rectangle for the back window should be around 9 x 11 cm.
Image 1
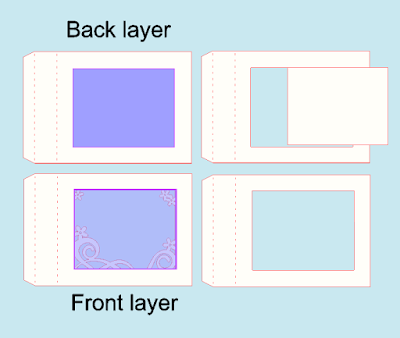
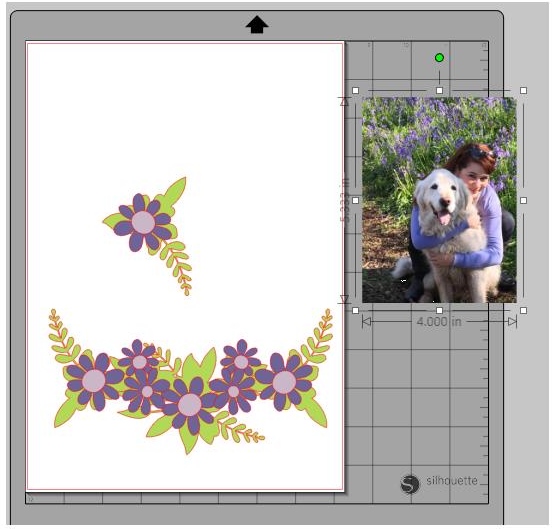
I drew some tiny stars and 1mm holes on the back, plain rectangle. Select all the circles/stars and the rectangle and Make compound path. You now have the 5 vellum pieces prepared, which should look like image 2. Move them off the design area, to one side.
Image 2
3. Making the card "windows":
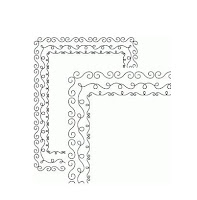
Using the copy of the original files that you previously saved beside the design area, bring them onto the design area. Ungroup them and deleted the unnecessary pieces (bird and rectangle) as before. You are now going to make the supportive window surrounds which will be cut from cardstock. Make the rectangular cuts as close to the original window aperture as you can, whilst removing all the shaped pieces. The window in the solid back piece of the box, where the stars will go, should be approximately 8.5 x 10.5 cm. See first row of image 3.

In image 3 I only show you two layers (before on the left, after on the right), but please note, the same operation must be carried out on all five pieces. For each piece, make a rectangle, place it in the centre of the area as shown. Select both pieces and go to Modify/Subtract. You will be left with the shapes as shown at the right hand site of image 3. Depending how your elements are grouped (i.e. the dotted lines and the surround), when you hit Subtract the centre may disappear, or you may have to delete it manually.
Image 3
4. Once you have done this operation with all five card layers, you should have 10 pieces to work with, as shown in image 4. Select all the soon-to-be vellum pieces and open the Scale window (top, right). In the custom area, type 103% and hit Apply. This simply ensures that the vellum inner edges will be hidden neatly by the card window frames. Drag the vellum pieces under the card frames just to check everything is sized correctly, then separate them again.


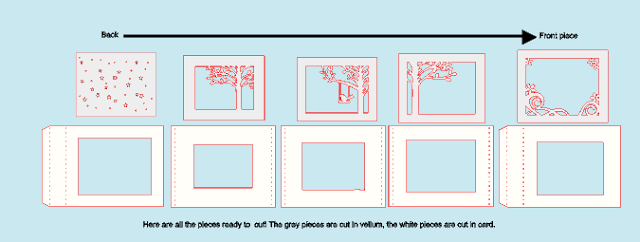
5. You can cut two shapes per A4 sheet. Select the shapes I have shown above in light grey. Pop vellum into your Silhouette on the carrier sheet, set the software cut settings, and adjust the machine knife accordingly. Do a test cut, and if everything is OK, cut out the 5 vellum pieces. When lifting the vellum off the carrier sheet, take great care not to tear or bend your design pieces. When vellum is bent or scratched you get white lines. Remove the vellum shapes from the cutting area, and start to arrange the card pieces (shown as white, above). You can fit two pieces on each A4 sheet.

Put your card into the machine, adjust the knife settings on the machine and within the software, and cut out the 5 card pieces.

6. I use a Scotch tape glider to apply glue down four sides of the back of each card window and carefully position and stick on the vellum. Your five layers are now complete, so it is time to have a close look at Lori's video, to understand how to actually construct the shadow box card.

MAKING IT YOUR OWN:

  • By using "Print and cut" you could write a sentiment or personalisation on the front window of the card with Silhouette silver and gold pens. This would need to be done before cutting out the frames. Or you could cut a sentiment from silver or gold sticker material. 
  • You could make small embossed, cut and (even) coloured, vellum flowers on the front window.
  • You could design your own vellum layers to make a completely different picture. For example, what about layers of growing flowers, or perhaps a garden scene of flower pot, boots, a wheelbarrow and a deckchair?
  • I made the box from classic white card, but you could use patterned card for a completely different look.
Shadow box card tutorial on SilhouetteUk.blogspot.com

The variations are endless, and the finished effect is very impressive. Amaze me, and amaze yourself! Come on...show and tell time!


PRODUCTS USED:
Light hold cutting mat for Cameo
All products are available from Graphtec.

Tuesday 28 June 2016

Challenge :: Free Design of the Week - Thank You Card

Good Evening,


I am back with another challenge for you, this weeks free shape is a super versatile thank you card, great for so many uses and you can really embellish it as you choose too!
Did you enjoy the fab tutorial from Janet for notelets using it in today's blog post?

Well we have a little bit more inspiration for you too, this beautiful card was made by our guest designer Scatty Jan, be sure to check out her blog for more super makes!

I hope you are feeling inspired and join in with the challenge
See you next week!
Lisa x


Free Design of the Week - Thank You Notes Kit - with PixScan™ stickers


A set of thank you note cards is always a useful gift, especially a set suitable for a child to give, but even better if they can embellish the cards themselves. Fortunately this week's FREE design of the Week is a printable thank you card. I made a gift box including a set of cards, and envelopes and a sheet of stickers that can be used to decorate the cards.


In this post I will show you how to quickly make a batch of cards, the presentation box and a full
tutorial on how to make the set of stickers from pattered paper using your scanner and PixScan™ mat
.


MATERIALS USED:

Patterned Papers
Heavy-weight Plain Coloured Cardstock (for box & card bases)
Double Sided Adhesive Sheets
White Vinyl
Transfer Paper
Vellum
Envelopes
Paper Adhesive
Vellum Adhesive


THE CARDS

Now if you are in a tearing hurry you can just print off the cards with registration marks, one to a sheet of A4 cardstock and cut them out with your Silhouette. The pieces are customisable so you could fill the card background with any colour or even a pattern and change the colour of the lettering to suit.


However, my printer won't take heavy-weight cardstock and I prefer a more layered look to my cards (but without too much additional effort). I decided to make a set of four cards using these parts:
  • White card base
  • Patterned paper front
  • Vellum panel
  • Sentiment in white vinyl


The file contains the card base, and the pattered panel is made by using the knife tool to cut the card base along the centre fold line.

The vellum panel is made by reducing the size of the pattered panel using one of the corner drag handles.

I decided to cut the sentiment from white vinyl, but it needed a little editing first.


When I turned on the cut settings, I could see that the letters were separate from each other and needed welding before sending to cut. The flourishes were single lines, so to make them into cuttable shapes, I created an offset for each of a similar thickness to the lettering. Firstly I reduced the line width (beige part) to zero, and then created an offset for each of 0.03", removing the original lines.


Once all the pieces were cut, assembly was straight forward, with each printed panel aligned to a card front, and the vellum panel applied on top (small pieces of double-sided adhesive tape were hidden behind the loops on the letters to secure the vellum). The vinyl sentiments were weeded using the hook tool and then the sentiment transferred to the velum with transfer paper.


THE BOX

The box was simply cut, folded and assembled, with the decorative panels added, cut from patterned paper.


The wording was more white vinyl using additional wording in Lori Whitlock's Friendly font and decorated with the some of the stickers which I'll show below.


THE STICKERS


To make the stickers I used pattered paper, the PixScan™ Mat and (my new discovery) double sided adhesive sheets.  The PixScan™ feature allows printed images to be used which have not originated from the Silhouette Studio® software. The PixScan™ mat provides cut lines at the image’s actual size (or with a margin if an offset border is required).  The use of the double sided sticker sheet, adhered to the printed images prior to cutting, transforms those images into stickers!

The images from the printed paper can be imported into the software using a camera or a scanner. I always use my scanner, part of my regular all-in-one office printer as my phone has a rubbish camera.

These are the steps involved.

STEP 1:
Remove either the white or the yellow layer from a double sided sheet. It is easier to remove the yellow layer, but if you leave the yellow one on, it is easier to remove the stickers later. Smooth your patterned paper onto the sticker sheet. N.B. These pics show the yellow layer removed.


STEP 2:
Place the two papers onto the PixScan™ mat ensuring that the whole sheet is within the mat’s cutting area shown by the black line border on the mat. 


STEP 3:
Click on the PixScan™ Icon in the Silhouette Studio® software. Select 'Import from Scanner'. 


Place the image on the PixScan™ mat face down onto the scanner. 


STEP 4:
Select your scanner from the drop-down list and click Import PixScan™ Image. It is likely that 

the PixScan™ mat will be larger than the scanner. If so, you can scan in two passes and the software will knit the images together properly. If you find this confusing, watch Brian from Graphtec GB's video Silhouette Studio® - PixScan with a Scanner. I find that I sometimes need to scan several times, alternating the orientation of the mat each time, until both are read in. 


STEP 5:
Once the whole image is displayed on your computer screen you can create the cut lines. Open the Trace Window, click Trace Area and drag the trace box around around the images. Then untick the High Pass Filter and drag the threshold slider until the individual images are JUST filled entirely with yellow and click Trace Outer Edge. Just slightly more than in the picture below.


STEP 6: (optional)
If you'd like a white border around your images create a small offset around the images and delete the original cut lines. Delete any unwanted cut lines by releasing the compound path and selecting any stray cut lines or dots and delete. 


STEP 7:
Once you are happy with the cut lines feed the PixScan™ mat, with papers attached, into your cutter. Set cut settings appropriate to your pattered paper and sticker paper mix (a test cut is advisable). 


Once cut, you'll be able to place a selection of the stickers onto a piece of the the waste sticker backing paper cut to fit inside the box lid. Add a few extra to the lid front.


Now you'll have a great gift for a child, or if you change up the designs make a kit for a friend. Whichever your preference, I hope you have fun with your PixScan™ mat and make a whole host of stickers - do share your makes!


   Profile | My Blog | Pinterest | Twitter | Instagram


DESIGNS USED:

FREE Design of the Week


PRODUCTS USED: