Saturday 30 April 2016

Vellum Meadow Flowers window decoration


I have the city bypass being built right outside my front door. You can just see the yellow digger behind the top right pane of glass. After living 22 years in the countryside this is a trifle upsetting, so I thought I needed something to improve my view. I absolutely love this design by Nik Squirrel, which is called Meadow flowers papercut and I knew it would help to disguise what lies beyond.

I began by using frosted vinyl, but with such a delicate design I had problems getting it off the backing paper and onto the transfer sheet.  After much coffee, I persevered, but then as I approached the window the design jumped onto the glass, probably due to static electricity. This left me with a horrible silver spaghetti junction style mess.
 

The final straw was trying to remove the design which took about an hour, using a razor blade. There was no way I was going to try that again, but I utterly loved the look of the design on the window, so I switched to using vellum. As you can see from the first photo, it worked a treat. Best of all, it is not permanent, and can be updated at another time if wanted.

SUPPLIES:
Vellum
Silhouette hook
Tweezers, scalpel and scissors
Re-positionable spray glue such as Crafters' Companion Stick and Spray

STEPS:
1. The sheets of vellum are a little smaller than A4 so you need to resize your working area. From the top menu open  the Design Page Settings. Select Custom, and type in 21.5 x 28 cm. Open the flower design and resize it to fit your needs. I wanted as large as possible to fit the pane so I resized it to 20.5 x 27 cm.

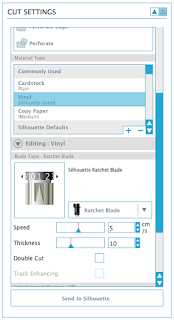
2. Click on the Cut settings on the top menu. Go down to Material type, and select Vellum Silhouette brand. Go to your Cameo and check your blade depth is set to 1. Do not remove from the machine after the first cut, but check if it has cut properly. My vellum had not cut cleanly so I increased the Thickness of the blade setting and did a second cut. This was much better.

I weeded the pieces that were to be removed, using a scalpel if there were any troublesome areas. Once that was done, I carefully removed the vellum from the sticky carrier sheet. I laid it on the grass outside and gave it a very light spray of re-positionable glue. It can give you trails like cobwebs, but simply clear off what you can, and position on the glass. The fantastic thing is that if you don't get it exactly where you want it, you get a second and third chance, unlike with the vinyl! The other great thing is that it gives me pleasure from both inside and outside the room.

I have a lot of windows and panes of glass in my workshop, so I suspect more will get decorations during the year. Of course this will be great at Christmas for snowflakes, deer, snowmen, quotes, polar bears and anything else that takes your fancy. In the meantime I am going to sit with my feet up, coffee in hand and admire my new, easy care garden!


PRODUCTS USED:
Light hold cutting mat for Cameo

These are all available from GraphtecGB.


DESIGN FILES:
Meadow Flowers Papercut #120401 by Nik Squirrel


Friday 29 April 2016

Faux Leather Mystery Braid - FREE Cut File

Faux leather mystery braid with free Silhouette cut file by Nadine Muir for UK Silhouette Blog
Hello, Nadine here with a tutorial making mystery braids using Silhouette's new faux leather paper.

This paper is remarkable stuff - starts as a thick, fibrous card, but transforms to a soft and strong leather-like fabric when washed.  In this tutorial, I washed it by hand in the sink with some dish detergent, but I have also machine washed and tumble dried it too.

A mystery or magic braid is a plait that is closed at both ends.  Rather than separate strands, it is made from a single piece of leather with evenly spaced slits.  This is particularly handy for belts, bracelets and hairbands, as it creates a stronger and neater finish than a regular plait with loose ends.

The free file includes mystery braid templates with for 5 and 7 strands.  There are three bracelet designs,  one with a button closure, one with plain ends that can be used with snap closures and a 7 strand one that can be fitted with a jewellery clasp.  I have also included a longer design for a headband.  The roll is 152cm long, so if you have the longer 24 inch mat, you can even make a child's belt!

What you’ll need:


STEP ONE: Prepare and Cut the Design

Download the Silhouette compatible free cut file, and open the file from within Silhouette Studio. Select your chosen design and resize as required.  It's worth noting that the plait will make the final piece about 5-10% shorter depending on how tightly it has been braided.
Using your stickiest mat, make sure that the faux leather is well stuck down.  I used the default blade settings pre-set for faux leather and the cuts were great, but always do a test cut when using new media.

STEP TWO: Wash the Faux Leather

Wash in the sink or washing machine.
Washing the Faux leather paper for the mystery braid tutorial by Nadine Muir for UK Silhouette Blog

STEP THREE: Uncover the mystery

Here's a short video showing the trick to creating the mystery braid.


STEP FOUR:Fasten

Use a button, snap fastener or jewellery clasp to make the bracelet closure.  For the headband, I threaded  some fold over elastic (scretchy ribbon), through the loops and tied a flat knot which will sit at the nap of the neck.

 THE FINISHED PRODUCT 

7 strand faux leather mystery braid with magnetic fastener by Nadine Muir for UK Silhouette Blog
7 Strand Mystery Braid Bracelet using a Magnetic Clasp

5 strand faux leather mystery braid with wooden button fastener by Nadine Muir for UK Silhouette Blog
5 Strand Mystery Braid Closed with Wooden Button

5 and 7 strand faux leather mystery braid bracelets by Nadine Muir for UK Silhouette Blog
Silhoutte Faux Leather Mystery Braid Bracelets - 5 and 7 Strand

Mystery braided braceletes with snap fastener, magnetic class and wooden button closures by Nadine Muir for UK Silhouette Blog
Mystery braided braceletes with snap fastener, magnetic class and wooden button closures.

Mystery Braid Hairband with Button Bow and Pink Elastic by Nadine Muir for UK Silhouette Blog
Mystery Braid Hairband with Button Bow and Pink Elastic

Mystery Braid Hairband using Fold Over Elastic (FOE) with a flat reef knot bow by Nadine Muir for UK Silhouette Blog
Mystery Braid Hairband using Fold Over Elastic (FOE) with a flat reef knot bow

Mystery Braid Hairband using Fold Over Elastic (FOE).  Faux leather plait and bow, decorated with a hotfix rhinestone by Nadine Muir for UK Silhouette Blog
Mystery Braid Hairband using Fold Over Elastic (FOE).  Faux leather plait and bow, decorated with a hotfix rhinestone


PRODUCTS USED:

Light hold cutting mat for Cameo


Thursday 28 April 2016

Rhinestone Decorated Candle


Supplies needed:

Candle (or LED candle)
Vinyl
"Pick me up" tool
Rhinestones
Rhinestone setter
Silhouette CAMEO/CURIO/PORTRAIT
BUTTERFLY Design (ID #5637)

1. Preparing your design: 


  • Add your rhinestone butterfly to your silhouette page.


  • Remove the text. As we are using vinyl to cut the shape on, put cut settings to vinyl.


  • Send to your silhouette and cut your design.

2. Working on your design:

  • Put the vinyl on your candle. Here's the part that will take some time, you need to use your "pick me up" tool and set each rhinestone at its place. When its on, use your rhinestone setter to "glue" it on its place.

  • Once you're done. Remove the vinyl slowly.
A beautiful rhinestone candle, ready to be wrapped as a gift or to be used at your home.


DESIGNS USED:


PRODUCTS USED:

Light hold cutting mat for Cameo


Wednesday 27 April 2016

Paper Tassels - with FREE Tassel File

Tassels are quite the craft accessory of the moment. They are a little more contemporary than a bow and they look great crafted in paper. Not only are they a great embellishment for many different paper crafting projects, they also look fabulous as a decorative element on gift packages.


I couldn't find a tassel file that was quite right for what I needed and thought I'd design my own from scratch. This file available for you to use for FREE!

This is what you'll need to make some tassels:
  • Silhouette CAMEO®, Silhouette Curio® or Silhouette Portrait®
  • Silhouette Studio®  (Designer Edition for the enhanced tassels)
  • Coloured Paper and Card
  • Paper Adhesive
  • Cocktail Stick or Bamboo skewer
  • Tool for Curling Paper (e.g. Silhouette Universal Hook)
  • FREE Tassel File


STEP 1: Prepare and Cut the Design


Download the FREE file from the Silhouette UK Blog website. Open it in your Silhouette Studio® Software. Move non-cutting parts away from the cutting area and re-size and duplicate as required. I recommend cutting several at once, and in more than one colour, so that that you can mix and match the parts. Cut the file from paper or card. The general rule of thumb is, the smaller the tassel, the thinner the cutting medium. These were cut at 2" tall in 135gsm (90lb) paper.


STEP 2: Enhance your Tassel Design FOR DE USERS (optional)

You can use the Designer Edition of the Silhouette Studio® software to make your tassels a little fancier by adding decorative edges to the Wrap and Fringe. Skip to STEP 6 and then return to STEP 3.


STEP 3: Prepare the parts


Once you've removed the parts from the cutting mat, curl them over the rounded handle of a tool (like the Silhouette Universal Hook).

STEP 4: Make up the Tassels


Apply adhesive to the length of the non-cut area of the Fringe. Add the Tie, and roll up the tassel carefully using a cocktail stick (bamboo skewer works for larger tassels)


Once rolled, separate the Tie parts with a cocktail stick so the outside of the Tie sticks to the interior of the rolled Fringe.

Apply adhesive to the  length of the Wrap and roll it around the top of the Fringe. Trim off the excess. 

STEP 5: Embellishing
You can decorate the tassels further by adding extra bands of coloured paper, decorative string, washi tape etc.


STEP 6:  (optional) FOR DE USERS - Enhance your Tassel Design
You can use the Designer Edition of the Silhouette Studio® software to make your tassels a little fancier by adding scallops to the edges of the Wrap and Fringe. This requires the use of the Advanced Knife Tools.


Making sure that the 3 parts are grouped together, Click on the Knife Tool (A), choose Serrated 1 Knife (B), uncheck Auto Apply (C) and ensure Treat Unfilled Shapes As Solid is highlighted (D). Holding down the Shift key, draw a cut line below the Fringe aligned with the left hand edge of the Fringe.


While holding down the Shift key, move the Slider (E) to the far right, make the scallop shape as small as possible. The idea is to match the size of the scallop with the cut lines. The quickest way to do this is to re-size the tassel pieces (remember you grouped them all earlier). Do this by holding Shift and moving the Fringe piece using the right-hand sizing handle (the left hand edge will remain static) until they match. Making sure that the cut line is aligned with the left edge and within the fringe, include it in the Group. Then apply the cut line, by putting a tick in Auto Apply (C).

Make a similar sized cut line and apply it to the bottom edge of the Wrap. Holding down Shift, stretch all pieces back to their original size (width 3"). You can try other patterns for different effects. Cut your pieces and continue to Step 3.


I hope you enjoy your free file and make many, many tassels - you will if you're as tassel crazy as me!


Profile  |  My Blog |  Twitter |  Pinterest  

DESIGNS USED:
FREE Tassel File

PRODUCTS USED:
Light hold cutting mat for Cameo