Showing posts with label Painting. Show all posts

Monday, 1 April 2019

Dotty stencilled painted cup - Adhesive vinyl and warp tool


Hello, it's Verity here from Pretty Little Button. A few weeks ago, I went to the Creative Craft Show at the NEC. Whilst I was there I won a mug making kit which included two mugs along with porcelain paint. As they were blank mugs, I thought they were perfect for adding a 'Silhouette' touch to them. Adhesive vinyl can act as great stencil material on surfaces like this, and as long as you don't use permanent adhesive vinyl you can easily create a positive paint effect like this.

Dotty stencilled painted cup process: 

For this cup, I went with a simple design using '#crafter'. Change the font style to a font of your choosing; I used 'Sweet Mia' from the Silhouette store. 


Next, you need to make sure all your letters in the design is welded together. With the text selected, right click and select weld. 


If you have more than one word, then these will not weld together, for example like the # in my design, you need to group all of the parts together to adjust the size of your design. Right-click again with all the elements selected and click group.


To adjust the size of the design, use the object size options in the top toolbar.  Make sure the little padlock appears closed as this will adjust your design proportionally and if you change the width, it automatically changes the height proportionally. 


To use the arp feature, you need a designer edition of the studio software or higher. The icon that appears warped in the right-hand toolbar opens up the warp window. 


There are two tabs to the warp feature, the second tab has template warp shapes - allowing you to take out the guesswork for you. Select the shape most appropriate one for your object. 


When it applies the warp, you will notice additional adjustments lines around the design (in green, blue and grey).


For a bit warp fit, you can adjust these to suit your object. My cup gets thinner as it gets near the bottom. Therefore adjusting the bottom right square allows me to move the bottom of the design in and thinner in width. 


Remember to do this the same on the other side for symmetrical warp. 


When you are happy with the warp, you are ready to send your design to cut. 


For the cup, I wanted the word to be left bare for the cup but the dotted paint to appear around the words to negative dotted design. Therefore, I weeded all the negative vinyl to leave a positive design on the back sheet. Use transfer paper to adhere the vinyl to your object. 


To apply the porcelain paint, I used a cotton bud and varied the pressure and size of the dots. However, you could use any shape to apply the paint. 


This was left to dry for 24 hours before removing the vinyl from the cup. To heat set the paint, the cup was baked at 150C for 35 mins to set the paint.
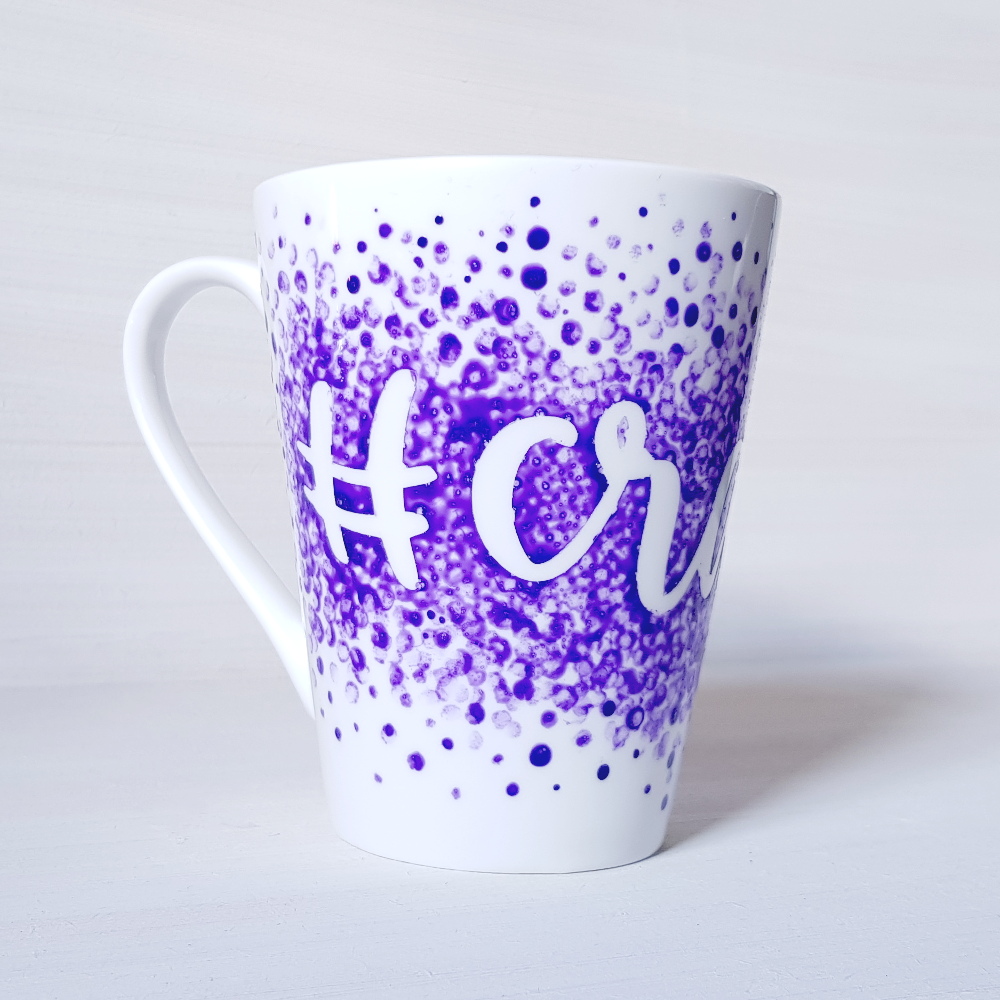
Dotty stencilled painted cup photos:


 If this has inspired you to try this out, please post below. I would love to see it!

Until next time,

Verity


Profile | Pretty Little Button Blog | Instagram | Facebook

FONTS USED:

Sweet MIA SCRIPT FONT by Skyla Design, Design id#229372

PRODUCTS USED:
    

Monday, 10 September 2018

Mixed Media Floral Wreath Card - Printable cotton canvas


Hi everyone. It's Verity here from Pretty Little Button bringing you another project. Today's project features the printable cotton canvas. This media allows you to print any design out onto cotton canvas, which is more sturdy and thicker in comparison to the normal printable cotton sheets from Silhouette. This cotton canvas is adhesive too, meaning it makes it easy to apply to objects should you wish to. My idea was to use this canvas, well as a canvas to paint on. It is a different material to regular canvases you buy from an art shop and if you really do want to use this material for a lot of heavy paint, I would advising priming it first. However, as I was doing minimal painting I was able to get away with it - though note you paint will absorb into the cotton canvas. I just applied a couple of layers of the colour to blend and colour. Originally, I was going to apply this to a thick piece of heavy chipboard to create a minute painting to use as decoration. However, I got an inky handprint and therefore needed to trim it down. Instead, I turned it into a mix media card. 

Mixed Media Floral Wreath Card details: 

Start off by loading your design into your window. I drew a square (red line) to mimic the size of the area I wanted to apply this to so I could scale the design down.  As you are going to print this out, you need to make sure of the line for the design has weight to it - usually it is set to 0pt. I opted for a pale grey line at 0.5pt. This line was darker enough to see when painting but light enough not to show through once painted. 


Once it was printed, I proceed to paint the design in with acrylic paints. As this canvas was not primed, the paint initially absorbed into the media, but after one layer, the paint stopped doing this allowing me to blend and shade.

As I mentioned, I, unfortunately, got an inky handprint next to the design, so I had to change the project slightly. Instead, I decided to make a card, for which I wanted the wreath to be popped up and I didn't want the inner of the wreath to remain. I could have used my scissors to fussy cut this out, but that would of be tricky for the inner. Instead, the PixScan mat came to the rescue.

I trimmed down the canvas sheet to a small size, pealed the backing off and adhered to a thin sheet of card. I did this to add stability to the wreath when adhered to the front of my card. The card sheet was placed onto my PixScan mat and I uploaded a photo into Silhouette through the PixScan window. If you are unsure how to do this, check out this post HERE.


Next, I used the trace feature to trace the floral wreath. I cannot give you precise settings that will work for every design each time, you will have to do a bit of trial and error to work out which is best for your design. However, in order to cut the inner out, I need to make sure I just selected 'Trace' and not 'Trace Outer Edge'.


Once I had traced the wreath, I created an offset and removed the traced cut filed inside the offset. The PixScan mat was loaded into the machine, and I had to do several tests cuts to make sure the blade would cut through the cotton canvas and card. In the end, for my machine and blade, I had the following settings: Blade 10, Pressure 33, Speed 1 and 4 passes. I did worry that this would mark my mat a lot, but you can hardly see any cut lines, showing all though the setttings looked a lot, they were just right!


To assemble the card, I applied Tonic Nuvo mouse through a striped stencil. I created this stencil for a previous post which you can find that HERE. Once this was dry I foam mounted the wreath and added a layered die cut sentiment with an offset shadow. To finish I added lots of Tonic Nuvo Drops matching the mouse.

Mixed Media Floral Wreath Card Photos:


If this has inspired you to try this out, please post below. I would love to see it!

Until next time,

Verity


Profile | Pretty Little Button Blog | Instagram | Facebook

DESIGNS USED:

Flower wreath by Paige Evans, Design ID #232488


PRODUCTS USED: