Showing posts with label sketch pen offset. Show all posts

Monday, 31 December 2018

Thank you cards with simple offset background - Metallic Sketch Pens


Hi everyone. It's Verity here from Pretty Little Button bringing you another project. As Christmas is over, you might be needing to send out a few Thank you cards, so I have a card that is very easy to make and uses your metallic sketch pens to create a simple offset background.  

Thank you cards with simple offset background details: 

To start, write your sentiment in your chosen font. I used Parisian solid font from the Silhouette store.  Next, using the offset tool and create multiple offsets at around 0.09.

Keep continuing the offset until your card panel is filled. You might find it easier to add a square representing the size of you card panel. 


Once you offset completely fill the square, you need to crop the offset to the square pane. You could leave it as is, you can cut the square panel out of all the offsets, but why waste the ink of you pens when you don't need too!


Highlight all the offsets - if you use your mouse to drag and highlight over the area, make sure you deselect the square the sentiment before the next step. With all the offsets highlighted, right click and select make a compound path. Now all the offsets are one item/ 'path'. These are not a group, and grouping these will not work in the next step. 


With the new 'path' of offsets and the square selected, use the modify panel and select crop. This will crop your 'path' of offsets to the square shape selected. Make sure you add a square panel around the edge of your design again, in order to cut the card panel out.


In your send panel, you may find it easier to cut/sketch your panel by line colour as you can set each line colour to the cut or sketch properties.

To assemble the cards, the panel was foam mounted onto a white card base. Behind the open window sentiment, gold or silver mirror card was added for a touch of glam. Lastly, colour corresponding sequins were added to finish the cards off. 


If this has inspired you to try this out, please post below. I would love to see it!

Until next time,

Verity


Profile | Pretty Little Button Blog | Instagram | Facebook

FONTS USED:

PN Parisian solid by ScrapNfonts, Design ID#135791

PRODUCTS USED:


Tuesday, 18 December 2018

Naughty, Nice, I Tried | NIki Rowland | Adding a Sketch Pen Offset


Hiya, Niki here today sharing this fun Christmas Layout. I loved this cut file when I saw it in the store. I wanted to cut it from different patterned papers but I was worried that I would lose the definition of the letters amongst the patterns, so I thought I would put a sketch pen offset onto them.

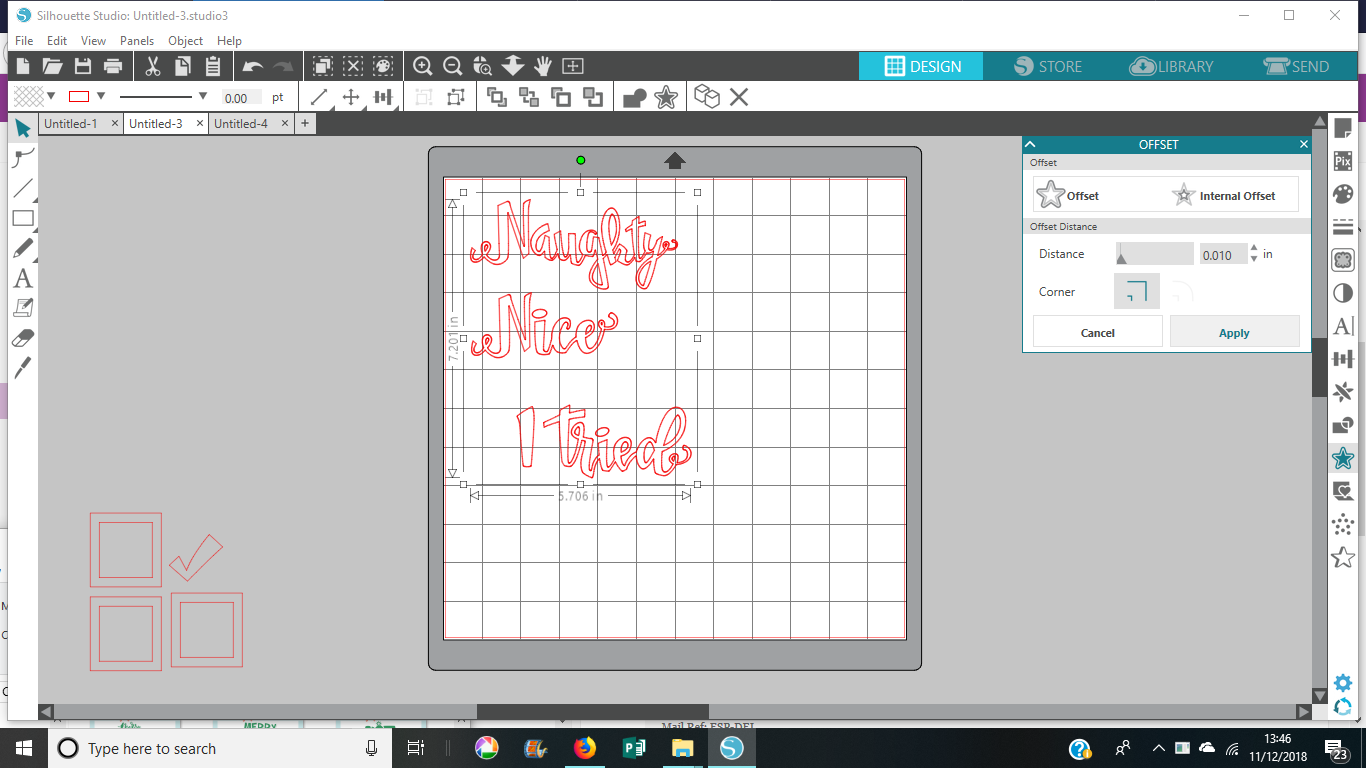
I started off by opening my design on screen:


I ungrouped and removed the pieces I wanted to cut from black cardstock without an offset. I just put these to one side. I then selected the parts of the designs that I wanted to apply an offset to. I opened the 'offset' window and clicked on 'internal offset'.

This added a large offset but I turned it right down to 0.010. This puts such a small tiny offset on my design that it can't really be seen on screen!

I ungrouped the offsets and then moved the offsets (the lines I wanted sketched) over to the right side of the screen. I needed them to be separate from the lines I wanted to cut.

At this point I realised that the middle parts of the letters also needed offsets. So I ungrouped and moved the little bits out the way of the rest of the files. I created an offset (not an internal offset) for these and set them to the same size (0.010). I then left the offsets over on the right side and moved the original cut lines back onto the words so they were in the right position.

In the 'send' screen, I could then select all the offset pieces and on 'tool 2' I selected 'sketch'. They then went blue. So the red lines will be cut by Tool1 and the blue lines will be sketched by Tool2.

Back in the Design screen I could then move the offsets back onto the original files. To do this accurately I zoomed right in so I could make sure my offsets sat perfectly inside my cut lines. As you can see from the screenshot below, you can hardly see the difference!

Once all files were back together and in the right place I was ready to send to my Silhouette.

Here they are in the 'send' screen. The red cut lines aren't visable other than the tiny loops (I realised I'd missed creating offsets for these but decided not to bother!!) I then sent my file to cut and sketch at the same time.

You can see the effect here: The sketched offset is so extremely close to the edge of the design, it's given the patterned paper a great outline so that the design has definition on the edges and the words show up beautifully.

I then put together the rest of my layout. I wanted the words to show up well so I kept the rest of the layout fairly simple.


I've used a few embellishments from a mixture of this year's Christmas collections, a gorgeous sequin mix and finished off by splattering with some paint.

Thanks for joining me today. Give this technique a try, it's a really great way to make your cut files pop off the page.

 Happy scrapping xx 


 DESIGNS USED: Naughty Nice I Tried Christmas Phrase Design ID: 231114

Wednesday, 25 April 2018

Design of the Week - Puppy Face - 23 April 2018


Hello, hello Silhouette fans, Karen here with how I used this week's free design - Puppy Face.

This was another fortunate turn of events as my daughter and her partner have recently acquired a new Curly Coated Retriever puppy.  Also, as they had been away to the Lake District for a few days there were plenty of photos of them with 'Baby Isla'.

I decided to use the design as a border for a scrapbook page and wanted to backfill the ears and tongue so after downloading and resizing the design changed the outline of the ears and tongue to a blue line.  I then repeated it around my page.

I used this design as my title


Remembering from above that blue lines = cut and red lines = sketch pen, I changed the outline to blue and gave it an external offset, changing the colour of this to red.

Lastly I added some journaling using Sister's Sketch font and a line border around my page.


This is how my design area looked with the red and blue outlines.


After sketching and cutting my design I backfilled the title and ears in black and the tongues in pink. I also decided to colour the eylashes, nose and spots with a black pen.


All that was left to do was to add my photo and fussy cut some elements to add to my page.


Thursday, 5 April 2018

The Best Present | Paper Piecing Complicated Designs | Niki Rowland


Hey there Silhouette Fans! Niki back with you today and I'm showing you how to paper-piece a more complicated design. I always love the little thumbnails that are shown in the store and think, great, what a fab layout they will make, but then I download them and open them on my screen and they look like this...eek!

My first instinct is always to immediatly close the design down and do something else! But I now have a method for tackling challenging designs like this and it works every time. So the first thing I did with this design was to ungroup it so that all the pieces were separate.

I then played around to arrange the pieces in the right order. This was I can make sense of what bit is what and I can also start visualising what colours I want to cut each piece in. I knew that I wanted to use a Christmas collection for this layout as the photo was taken just before Christmas. I also knew that lots of the papers in that collection were not solid patterns but white backgrouds with multicoloured patterns such as polka dots and snowflakes. These types of pattern don't work that well with cut out shapes becuase the edges arent defined, so to get around that problem I decided to draw a line around them (internally) with my sketch pens.

At the bottom right of this screen, you can see that I've selecgted one of the presents, gone to the Offset menu, chosen 'Internal Offset' and applied a narrow offset.

 I then started to apply colours to the pieces - all the red ones are going to be cut from red paper etc. The colours don't appear or necessarily represent the colour paper I'm going to cut them from, just that they are going to be cut from the same paper. I did this by selecting the pieces, then going up to the Fill drop down menu (top left).

I applied more offsets on the other pieces that were being cut from patterns rather than solid colours.

...and then arranged each colour onto my mat. I then loaded my mat with small pieces of paper. In the 'Send' screen, I had to select the internal offset and set those to 'sketch' with Tool 2 - see screenshots further down for more about this. I then send it to cut and sketch.

I did the red bits next (cut out of glitter card) and the little tiny tags were being cut out of white. These also needed a very tiny internal offset with a black sketch pen to give them definition. I selected them in the same way as the presents and applied a tiny internal offset.

When it came to cut the white tags, I selected all the internal offsets and selected the Sketch option under Tool 2. This turned the internal lines blue which indicated they will be sketched with Tool 2. The external lines remained red, indicating they will be cut with Tool 1. I then sent to the Silhouette which cut them and drew them for me at the same time. 

Once all my pieces were cut I began assembling my stack of presents - the fun part!
I also built the rest of my layout to the right of my presents.


I absolutely loved making this layout and think that designs like this make owning a Silhouette soooo worth it - the results that can be achieved just by knowing how to use your machine and make it work for you and the things you want to do are totally awesome!

Make sure you give it a go and don't be too intimidated by those complicated files that look daunting when you first open them up on screen - I promise it's worth a bit of effort!

Happy scrapping xx

DESIGNS USED:
Present Stack

PRODUCTS USED: