Showing posts with label Thelma. Show all posts

Monday, 23 October 2017

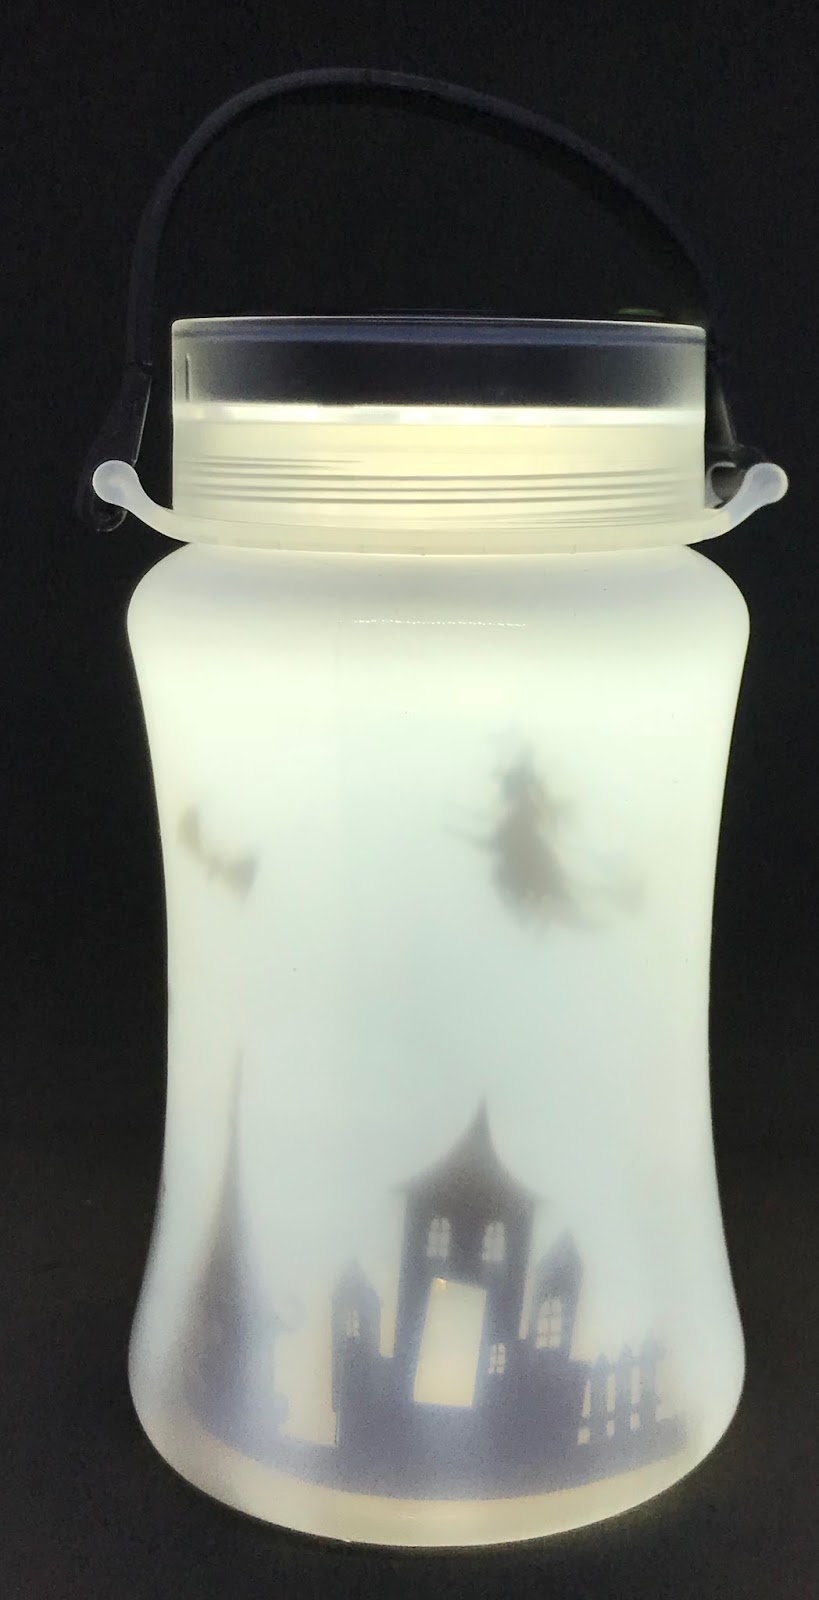
Trick or Treat safety lantern.

With Trick or Treating just around the corner and the nights getting darker, use this little trick to help keep your little one safe while out and about this Halloween!


Turn any storm lantern into a temporary spooky Halloween lamp.


Open a new project in Silhouette studio and select some spooky silhouettes from your library (or from the Silhouette store).


Trim a sheet of paper to the correct height to fit within your lantern. Measure the inside of your lantern by rolling up the sheet of paper and placing it inside the lantern. Allow the paper to unroll until it touches the sides, mark the paper where it overlaps. Remove the sheet from the lantern and trim off the access. Measure the sheet of paper and create a rectangle the same size on your virtual workspace.
 Use the scale tool located in the top toolbar to easily get the correct measurements. This rectangle gives you a guideline to keep your design within. I have turned this line blue as I will cut it separately from the main design.

Arrange your silhouettes within the guidelines.


Tip: Remember that the left edge will meet with the right edge when curled around inside the Lantern, make sure they will match up. You can check this easily by copying your design and placing the copys next to each other. Remember to delete the copy before sending to the cutter.

Load a sheet of acetate onto the cutting mat and load into your machine. click "send" in the software.

When the send window opens choose cut by "line" and ensure that only the blue line will cut.

Tip: Active cut lines are bold and inactive lines that will not cut on this pass are faded. 

Choose the correct cut settings for your media and remember to carry out test cuts to ensure a clean cut.  Send the project to your cutter and allow the job to complete. unload the mat and remover the media.
Place some dark coloured vinyl on the cutting mat and load into the machine.

 In the send window unselect the blue line cut and select the red line to active cut.


Select the correct media in the material list and carry out test cuts to ensure a clean cut. Send the project to the cutter and allow the job to complete.  Unload the mat and remove the media from the mat.
Remove all the unwanted pieces of vinyl leaving only the design on the backing sheet. Lift the design from the backing sheet with some transfer tape and apply to design to the piece of acetate.


Roll the acetate so it fits into the lantern. Lower into place and allow to unroll to the inside edges of the lantern. Replace the lid in the lantern and enjoy some safe trick or treating.


After all the fun, simply remove the sheet and store for next years fun.


Desing used:

haunted house border.studio by PHOTOPLAY

PRODUCTS USED:

Light hold cutting mat for Cameo


Saturday, 16 September 2017

Kids Craft personalised bookmark

With the start of a new school year, a whole new group of friends could be on the horizon. What better way to forge friendships than an after-school craft party. This little project will not only keep them busy expressing themselves but also gives you the chance to learn everyone's names, (I can never remember anyone's name but I can remember what they made) here's a fun little bookmark project suitable for all ages.

Open silhouette studio and type the intended participants names by clicking on the text tool and then on your virtual page, use your keyboard to add names.
 By opening the text panel you can choose any a font that is installed on your computer, simply select one from the drop-down menu. If you are unsure what your text will look like in a particular font simply type the word and select the word by clicking at one end and dragging the mouse to the other end, the word will become highlighted click on any font type in your menu and the word will change to that font ( you can scroll through all your fonts one by one using the arrow key on your keyboard .   Big blocky fonts work best for this project. I have chosen Accord Heavy SF, bear in mind the age group you are working with when making your choice.

Select a flag type file from your library (lots of different styles are available from the silhouette store if you do not have one). You will need a flag for each name. Resize each of the names to make it fit nicely inside one of the flags.

Arrange the flags and names to make the best use of your media. I am using silhouette chipboard as its sturdy but not too bulky to place inside a book.(ensure your page settings match the size of your media).

 Select some designs from your library or the store to use as embellishments. Resize the designs so they will fit onto the flags. This is done by clicking on one of the boxes in the corner of the design and dragging it inward.
Arrange the embellishments to make the best use of the media.use the rotate button located in the transform panel to rotate you pieces where necessary.
Send the project to your silhouette from the material menu select chipboard and carry out a test cut, adjust the settings if necessary. Click send to cut your project.

Give each child a flag and place all the letters and embellishments in the center of the table with some markers and/or paint, perhaps put out some glitter and gems.
Let the children's creativity flow.
For younger children, this project also works well if the letters and embellishments are cut from silhouette self-adhesive card  weed the unwanted card away leaving only the "stickers"


Designs used:

File: flags
Artist: Silhouette
File: brontosaurus dinosaur set.studio
Artist: Studio Ilustrado
File: car.gst
Artist: Silhouette
File: Heart.gst
Artist: Silhouette
File:flower
Artist: Silhouette

PRODUCTS USED:


Light hold cutting mat for Cameo

Thursday, 24 August 2017

Designer Windows, inspirational faux frosted glass.

Have you ever looked at the windows in designer boutiques and admired the word art in the frosted glass. By using a roll of Etched Vinyl we can give our windows the appearance of frosted glass, then by adding a few inspirational words can create a unique designer look that we can easily remove when we want a fresh look.

Open a new blank project in the silhouette studio and type a few inspirational words off to one side of the mat.


In turn drag words on to your virtual mat. Resize and arrange the words on your mat to make the best use of all the space on your media.


Try different fonts from the "Text style" panel. By clicking at the end/beginning of your word and dragging the mouse over all of the letters, you can select the whole word. Once a word is selected, click on one of the font types in the text style panel and the word will change to that type face.


( you can use the up and down arrows on your keyboard to scroll through the "type style" section. You can watch the words change in real time, making it easy to see how the word will look in that font) 
if you choose to use a font where the letters overlap remember you will need to tell the software that you want these pieces to all become one continuous shape or you will end up with lots of little pieces of vinyl everywhere the lines intersect.

If we were to simply convert the text and make a compound path we would lose all the centers from our letters.


instead, we must make out text solid objects by using the fill tool.
With all of the word selected click on the fill panel and select the same color as your cut line.


Now that all your text appears as solid pieces. right-click on your mouse and select weld. The selection box around your word will change and will give you a new selection of boxes depending on how your word over lapped. You can use the left and right arrows on your keyboard to adjust the position of the remaining sections until you are happy with the overall layout, repeat the weld command to join any new overlapping sections.

As I want the "I" to remain separate from the rest of the word but still want it to move around my mat with the other letters I must let the software know that the letter still belongs with the rest of the word it is still part of this words Path. With all sections of the word selected right click and choose make "compound path".  There will now be one select box around all of the word and it can be moved, rotated, stretched and flipped into position anywhere on the mat as one piece.


 When you have filled the available space on your vinyl click on the send button.


  you can now check visually that all the cut line are correct in the project. Make any changes by clicking back on the design tab which will bring you back to the general work area. when you are satisfied the cut lines are correct carry out a test cut on your chosen media and adjust as necessary to ensure a clean cut. when cutting vinyl, it is not necessary to use a cutting mat if you are using larger pieces of vinyl that can be adequately held by the rollers on your machine, however, if you are using small pieces the carrier sheet is required. your blade and cutter are set correctly if the blade cuts through the vinyl but not through the backing/carrier sheet.


Remove all the unwanted vinyl from around the text and use a weeding tool to pick out the center of any O's, A's etc. Once you have completely weeded the text, apply a sheet of transfer tape over the word ready for application,


Continue cutting enough text to complete your project. if you would like some of your text to be read from the other side of the glass reverse you text by right clicking on your mouse and selecting flip horizontally.


Cut a piece of the etched vinyl slightly larger than your window. lightly spray your window with a mist of water and remove the backing from the back of the etch vinyl. offer the vinyl up to the window. The mist of water will allow you to position the vinyl easily on the window when you are happy with the position, use an applicator tool to rub down the etch vinyl forcing the water and any bubbles of air out as you go. Trim off any excess vinyl with a craft knife. Use some low tack tape to loosely attach the text on the window. Once happy with the layout of your text, one by one remove the backing sheet from the vinyl text and apply to the window.  

This project allows you to use all sorts of scraps of vinyl you have been saving from previous projects or perhaps that really nice vinyl you have been saving for a very special project.

PRODUCTS USED:


Etched Vinyl

Etched Vinyl

Thursday, 27 July 2017

Box frame. Writing on mount board.


 Box frames make really nice gifts for lots of occasions. They allow us to add dimensional elements to our projects while keeping everything protected behind the glass.
 These box frames often come with a pre-cut mount but when you know you only have one mount the pressure is on to get it perfect.

Heres how I get my frames right every time.

Open Studio and in the page settings menu set your page size to the same size as the mount the clever Swedish people frame I used was 9"x9" or 23cm x23cm


Next measure the size of the cutout where the photo will go and draw a square to match using the shape tool. I just draw any size of a rectangle and then adjust the size by entering the exact dimensions manually into the top bar.


Open the Align panel and select "center of page" this will move the selected shape to exactly the center. This is now your template for this type of frame. At this point I change the color of the line, as this line will not need to cut if I change it to a different color and set the same line colour to no cut, the next time I use the template the software will remember for me not to cut this line (handy because I'm bound to forget). You may also want to color fill this box as a visual reminder.
Open the text panel and select the font you would like to use and continue to add text to your project. Align the text only in the area where the mount board will be, taking care not to get too close to the edges as the lip within the frame will obscure the view of anything in that area.

Now comes the fun bit.

 Load your mount board on to the carrier sheet so the wrong side is facing upwards. Allow the mat to load into the machine. Use the control panel on the cutting machine to position the blade holder over the top of the mount board and place you chosen color of pen into the pen holder.
As your mount is thicker than other materials you would normally place into your machine to cut when you position the pen into the holder you may find that the pen is already touching the mount board. 
If we were to send the file to our cameo now, the pen may drag along the mount board marking it along the whole course of its path and not only where the text should be. To counteract this there is a simple trick, place a piece of scrap card below the tip of the pen then lock into position.
Click on the Send option and select action by line. Uncheck the box next to the color you drew the inner box in. From the drop down menu select sketch for the action and change the tool to pen

Make sure you have placed the pen in the corresponding holder if using a cameo 3

Send the file to the silhouette machine and allow the job to complete if the pen is still dragging, pause the machine and use a thicker piece of card to raise the pen nib a little higher. By allowing the job to complete you can check the position of your text and then make any necessary adjustments. 
When you are completely happy with the positioning, unload the mat and remove the mount board and turn it over to the correct side. Taking care to align the edges correctly reposition the mount board on the carrier sheet. Resend the file to the silhouette cutter or select repeat job on the cutter.

Position your scrabble tiles and/or embellishments and glue into place. Allow the glue to dry thoroughly before placing
back into the frame and closing up to aviod sealing damp into the frame.


 PRODUCTS USED:


Light hold cutting mat for Cameo