Showing posts with label party planning. Show all posts

Tuesday, 5 September 2017

Duel aspect bunting

Those of you who have attended the NEC to pick up your Silhouette supplies may have wandered into the artists' avenue and seen the beautiful bunting.


The lovely ladies of Crafts of hearts, the driving force behind the artists' avenue, will this year be hanging their bunting with a twist, With the help of silhouette and Picscan, we are personalising the bunting.


Carefully the stitches are removed from one of the flags to act as a donor to create our template.

As our bunting is cream we will not get a great contrast for tracing, so a piece of black card was used as a background.
The black card and the flag are placed on the Picscan mat and photographed. For help with Picscan please see the blog by Nicky pixscan-from-start-to-finish
Open silhouette studio and open the Picscan panel, click on import Picscan image from file.


When your Picscan image has loaded open the trace panel.

select your trace area using the outline trace, and adjust the threshold until the trace picks up all the areas of your design. Click trace in the trace style section to trace the entire image.
Drag the newly created cutlines off the mat and release compound path by right clicking on the design and clicking on release compound path.
 This will separate all the pieces of your design picked up in the scan, any areas such as the outside border that are not required should be selected and deleted using cut, located in the top toolbar.
After editing, drag a box around your cutlines to select them all, and right click. From the pop-up menu select "make compound path".
You may want to save this new cut file to your library.
With the cut line of the flag selected, click on "copy" from the top toolbar and then open a new silhouette page.

With this new page open, select paste from the top toolbar and a copy of your flag will appear on your virtual workspace.
To make things easier, I have rotated my flag to the way it will hang, I have also used fill to colour the flag in for ease of viewing.

Draw a box on the flag to determine the usable space in which the letters can be placed, type the first letter you will use and using the box, determine the size your letters.
Individually type all the other letters that will be needed for the project to one side of the mat for later use. delete the box it is no longer needed.
As I have 12 letters, I will require 12 flags to place them on. Of course, the bunting will be viewed from both sides so it needs to read correctly from both sides, so if we were to simply merge the letters into the bunting, they would not read correctly. To create an illusion we will add a piece of reflective card between two pieces of bunting and add separate letters to both sides allowing the text to be read correctly.
Ensure your silhouette machine is plugged in, switched on and connected to your computer. Depending on the size of media you are using, you may be able to arrange a number of flags on your mat at one time. I am using A4 stock, so I must cut my flags one at a time. Place your chosen material on the cutting mat and load into your machine.
Click on send, choose your material type and adjust your blade accordingly and carry out a test cut to check your settings, adjust again if necessary. Proceed to cut out the file by clicking send at the bottom of the control panel. Repeat this until you have twice as many flags as letters in your word or sentence, for example with Craft o hearts I will need 24.
Only 12 of my flags require a tab, so it will be necessary to adapt the original file. Select Paste from the top tool bar as before and another copy of the trace will be added to the workspace. Open the fill panel and fill your new flag with any colour, I have used yellow (as the cut line will show up better) select the knife tool and cut the tab as shown.
Proceed to load media and cut out the original number of flags, for example, I will be cutting out 12.
Move your flag off to one side off the mat to clear your workspace.
 Arrange your letters to make the best use of your chosen media,(silhouette adhesive card works well for this project) load your media for the letters onto your cutting mat and load into your silhouette. Choose the correct setting for the media and carry out a test cut to ensure a clean cut, repeat this process until you have two of each of the required letters.

To create the reflective central piece of card open the modify panel and select open the offset panel with internal offset selected, create an offset on the flag without the tab.
 Ensure you leave enough area for the application of glue. Click Apply and move the original to one side. With the newly created cutline selected, right click and select "release compound path" select the outer line only and move to one side delete the rest of the offset, this gives you a solid triangle slightly smaller than your flag. You will need one of these for each of your letters, I will require 12. Place your reflective card stock on your cutting mat and send to your machine, (remember to carry out a test cut)

Sandwich a reflective triangle between one of each of the other two types of flags using the pointed tip as a guide, 


Use wet glue to allow yourself some wiggle room


Place a letter on each of the flags with tags and glue into place. Then assemble the letters in order to spell out your phrase.


Decide how your bunting is to be hug. Artist avenue has it zig-zagged over the main walk way so I drew a zig-zag on a scrap of paper a wrote down the words as they should read when hung, rotate the piece of paper and write the text again, this is your template to follow when applying your letters.
Keeping your flags in this order lay down some cord or ribbon, close the tabs on each of the flags to enclose the cord making sure not to catch the cord in the glue. This allows for repositioning of the flags after hanging. For a professional finish run a single line of stitching along each folded tab.


Remember when you next visit the NEC to pick up your silhouette supplies, pay a visit to artists avenue to see the finished project.


PRODUCTS USED:


Light hold cutting mat for Cameo


Sunday, 7 May 2017

Personalising Boxes and Pick and Mix Display


Hi Silhouette fans, Niki here with you today with a bit of event planning to share. I love to plan and put together an event, whether it's birthday parties for the children or a scrapbooking retreat and my Silhouette is my best friend when it comes to pulling off something beautiful.

This event is a GoGo Dayaway event, of which I now hold two per year in St Albans. I have 25 people and we all spend the weekend making a LOT of layouts and learning new things. One of the biggest things about this event is the massive kit that everyone recieves to work with over the weekend. No joke but these kits are huge. And as such, they need to be presented in something fabulous. This time I went for these gorgeous black and white 12x12 boxes by Crate Paper. They are gorgeous on the outside and even more pretty on the inside. Everyone recieved one of these to hold their kit and I personalised them all with Silver Foiled Vinyl. I used a large font that we use for all our events and cut everyone's name after welding the letters together and re-sizing so their name stretched across the width of the box. Everyone was SO happy with their boxes, no to mention all the wonderful goodies inside...


Next I had to design the Pick and Mix display. I bought pretty jars to display all the sweeties and I wanted to make them and the table look pretty.

So I went searching the Silhouette Design Store for Rosettes. I found three that I decided to go for and opened them all up on screen. I ungrouped and arranged all the bits onto my mat so I could cut lots at the same time.

I also wanted a banner to go across the table and for it to say 'Pick & Mix'. I used a pennants file from the design store and arranged it on my mat so I could cut as many out of one sheet as I could.

I then cut the letters to go on the flags.

These are the cute rosettes I made for the smaller sweetie jars...

and the banner looking beautiful...

and the larger rosetter that I stuck to the corner of the table...


Thanks so much for stopping by and I hope that whenever you next host a party or an event, that you use your Silhouette to add those personal touches and cute details.

Instagram: @nikiclaire

Designs used:


PRODUCTS USED:


Thursday, 18 August 2016

Harry Potter Party (part 2) Banner, scratch off sorting hat and owl straw

PaperspotUK Hilary Milne for Silhouette UK Harry Potter party #2

In my previous blog post on 5th August 2016 I showed you how to make a temporary lightning tattoo and Harry Potter style glasses. This week I am going to show you how to make a) the banner and b) a sorting hat with a scratch off area to see to which Hogwarts' House you have been assigned, and a tiny owl to attach to a straw, just because it is cute!


EQUIPMENT:
Silhouette Cameo + mat
Printer
Scratch off sticker sheet
White card
Twine
Witch hat Loni Stevens #13410
Smart Owl by Silhouette #79470
Font: LD Lightning by ScrapnFonts #133919

STEPS:

The banner

Open the hat file from your library and onto the work area. As always, select, ungroup, and fill the pieces with colour. Rearrange the hat band and hat together if you want to print them as one piece, which I did. Group them. Select the hat and change its cut settings to Cut edge. 

To make the holes for the twine, draw a small circle about 2mm diameter, copy it. Align both of them and space them apart appropriately to fit the hat. Group the hat plus the holes and then copy as many as you need. 

To add names, Click on the Text tool (LHS). Select the Font style LD Lightning and write the names you want on the hats. I used fill colour white. Make sure you select all the names and select No cut settings for them! Place the names on the hat brims and make them an appropriate size. For the banner, my hats were 9cm wide. 

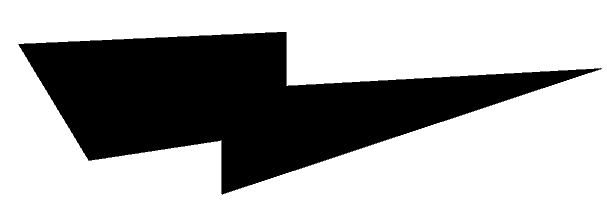
I showed you how to make this lightning shape in the earlier post (18th August 2016), but here is one you can Right click, and Save As to your desktop. Within Silhouette, click on File/Merge and select the image from your desktop. Now you can trace it. Delete the image and fill the shape with colour as you want. Make holes as you did earlier, and place them on the top of the lightning bolt for the twine to pass through.


I kept the stars separately to glue on top. I also cut extra to sprinkle on the table. Here was my layout.


Switch on your registration marks, print the design onto card, and then cut in the Silhouette with the blade at the right height and the correct settings selected within the software for your thickness of card. 

The Sorting Hat scratch card and Hedwig straw decoration

I am aware that for young children, this might end in tears, so it depends on their age and emotional make up, whether this is a good idea! My thought is that if you have many children, or adults, it would be a fun way to divide them into groups for a quiz, or a game.

The four houses are: Gryffindor (Lion), Slytherin (Serpent), Ravenclaw (Eagle) and Hufflepuff (Badger). There are many lovely insignia images on the internet, but to avoid copyright issues, I just used the names of the houses. The tiny Hedwig owl (with glasses) was simply too cute not to use, so I have attached him to a straw for fun. My owl measured 3.5 cm in width. The hat I used was 7 cm across. The small strip of paper was 1cm x 3.5 cm.

As before, make as many hats as you need. I made the band white this time to allow House names in different colours. I then copied the shape of the hat band which is cut from scratch off sticker sheet, then stuck on top of the card hat. 

Open the owl file and ungroup the pieces. Colour fill the pieces and re-construct the owl. Group it all and select Cut edge. The small strip of paper is glued to the back of the owl, allowing a hole through which the straw can go, and be held.


I hope you will give some of these ideas a try and have as much fun as I did!


PRODUCTS USED:


SaveSave

Friday, 5 August 2016

Harry Potter party (part 1) - Lightning bolt temporary tattoos and HP glasses

Harry Potter party decorations and temporary lightning bolt scar tattoo
Someone asked me for  some lightning bolt stickers for a Hen party, so I immediately thought what a brilliant idea for a kid's party. As I want to make a couple of different bits and bobs for the party, I am going to split the description into two blog posts. I am starting with the tattoo paper lightning bolts as I have never used this medium before. I will also show you how to make the round framed glasses.

My part 2 of the the Harry Potter party will be posted 18th August 2016 and cover the banner plus making sorting hat scratch off cards.

Also see Karen's recent blog post 31st July 2016 about cutting a Harry Potter quote from gold HTV.

EQUIPMENT:
Silhouette Cameo
Ink jet Printer
Silhouette Temporary tattoo paper
Black card
Design file round glasses by  Lisa Norris #60470
Silhouette Universal scraper tool or similar

STEPS:

1.The lightning bolt scar

It is such a simple shape, I decided to make my own lightning bolt. Using the Draw a polygon tool (seen at top left image below), make a triangle and then a quadrilateral shape. Weld these two shapes. If you want a two toned bolt, make an internal offset. Fill each shape with a colour, group them and then make sure Cut edge is selected under Cut settings. N.B. I found that the yellow does not stand out particularly well against the skin, so I would suggest giving it a black or grey surrounding line . Select the item, go to line colour, line style and give the line a weight so you can change the thickness at which it will be printed.


There are four important things to note before you start making tattoos. I forgot two out of the four!
  1. As with all Silhouette media, set your paper size to Letter as the sheets are not A4, and so if you try to print registration marks with A4 setting on, the marks will miss the bottom of the sheet as shown below! My only option with this is to hand cut them or use a Picscan mat. I did the latter.
  2. The packaging does not make it clear, but the green coloured sheets at the front of the pack are the adhesive sheets. If you print on them, you can clean the ink off with a paper towel, but it is a waste of ink. You want to print on the shiny side of the white sheets!
  3. Reverse anything that has writing on it, or has to be a certain way round, as shown below. That's the one I got correct:)
  4. Remember that anything you want to show as white, will actually be colourless on the tattoo, so I made the white clouds a light blue.


I wanted to fill the paper with designs, so I made some name tattoos for various little people I know, making sure all names were reversed. 

I checked that all the items were set to Cut edge, and made small offsets around each piece, which I later learnt are not actually needed. Select a piece, open the Offset window from the top bar, and click on Offset and Set distance by 0.1 - 0.2 mm. Enable your registration marks for the correct size of paper! Put the white sheet in your printer so that the shiny side will print. 

Take your printed sheet to a table and select the adhesive paper. Peel off the topmost piece of blue protective backing as shown below, and stick the adhesive sheet on top of your printed tattoos. Taking off this small strip allows you to align the adhesive sheet before peeling off the rest of the blue protective backing. You then gradually remove the protective backing sheet whilst smoothing down the adhesive sheet with your other hand, trying to minimise air bubbles. Once all the sheet is roughly adhered, use a bank card or something similar to further smooth everything out and get rid of air bubbles. I was worried I had made a mess of it, but it really improved as I rubbed my card over everything.


The printed tattoos with the adhesive sheet applied are now ready to be cut. Put the sheet onto your cutting mat and load into your machine. Select Temporary tattoo paper settings on your computer, and check your blade matches the recommended settings of depth 4. Cut them out.

To apply the tattoos: Follow the directions on the packet. You have to remove a thin top layer of plastic which I managed to lift, carefully using a scalpel. By removing this you expose the adhesive and can place the tattoo on the skin. Use a wet cloth on top for about 10 - 15 seconds and then remove the paper by sliding it off. Here is the result. Good looking huh?!

2. The glasses

Open up the file by Lisa Norris. I made the glasses 14 cm wide to fit my adult face. For a child, adjust the size accordingly. I designed the leg struts which simply glue on at the side, at a slightly upwards angle. Here they are. If you want them, right click, save the image to your computer desk top. In Silhouette click on File -Merge and select the image from your computer. That will bring the image onto our work space at the top left hand side, near the registration marks area. Enlarge the image to work with it more easily. Trace them and cut them, and the frames from thick black card. I would suggest making the front of the glasses from two layers of card, but you may only need one layer for the side struts. It really depends on how destructive your children, or your fellow adults are likely to be with them! Have fun dressing up:). My part 2 blog post of the Harry Potter party will be coming on 28 August 2016. I will describe how to make the banner and how to find out what Hogwarts House you belong to!


PRODUCTS USED:


SaveSave