Showing posts with label FAQs. Show all posts

Thursday, 4 May 2017

Decorative Curved edges as easy as ABC

Add decorative edges is as easy as ABC

Creating a decorative edge to curves can easily be achieved in Studio by adding some text to a path.
Open studio and create a curved shape to practice on, I drew a quick oval.
For this example, I am going to use "o"s to create an edge on my piece.
Select the text tool from the tools on the left and click anywhere on your virtual mat and type in a number of "o"s. At the start of the letters, you will notice a circle with a + in it.

Click on to this circle and drag it onto the line of your oval (you will need to hold down on the mouse button while you do this).


As soon as the circle comes in contact with your oval the letters will jump onto the line of the curve.


Note the bar with the dark slider. By moving this slider, we can affect where the letters sit on the line. I am going to set my letters with the letters half way on the line.
Having positioned the letters on the line we can add some more letters to better fill the shape. By changing the character spacing between the letters we can create a different look. Decreasing the space will mean you may need to add a few extra letters and likewise increasing the space may mean you need to delete some.
With all your letters selected on the mat move over to the tool window on the right and change the character spacing either use the slider or type in a new value into the box. The effect happens in real time and I find moving the slider a much easier option. 

If you have chosen to decrease the spacing between the letters you will need to add some extra "o"s to complete your shape again. To do this click anywhere in the line of letters and the Add text will become active again allowing you to type again. Fill your shape with letters. You may want to go back and change the spacing again to get a perfect fit.

In the end, I moved my spacing to 70.7 to get an even space which isn't a value I would have typed, I would have used the slider until it looks even.

Now we have created a design we like we want it to stay in this way. Select all the letters and use fill to fill in your letters to be solid shapes.
 We click on the letters to select them as a shape. Right click on the mouse and a menu will pop up allowing us to tell the software this is the path that we want the letters to follow without having the "map" of the guiding oval. Click convert to path. We can now move the new shape from the guide oval we drew at the start. Fill the oval the same color as the letters.

Increase the size of the oval so that when placed over the "o" it creates the desired mat. I have used a different fill color to help you see the overlap.

With both shapes selected center the two shapes using the align tool indicated in the image above.
Now your shapes are centered use the weld tool at the bottom let to weld the two shapes together to make one piece. You now have a scalloped edged oval. 
Now you know the process, why not have a go using different letters and fonts to create different effects. 
Happy crafting.


Friday, 11 November 2016

Silhouette Basics - Top 10 Tips to Troubleshoot Print and Cut

10 tips to Troubleshoot Print and Cut.  Silhouette Basics Tutorial by Nadine Muir for Silhouette UK


Hi, Nadine here with a Silhouette Basics tutorial with my top ten tips for mastering Print and Cut every time.  I hope these tips will help you troubleshoot any issues that you may be encountering, or prevent them in the future.

The premise of print and cut is very simple - marks are printed in the four corners of your page and the Silhouette machine reads these registration marks with it's optical eye allowing it to cut your shapes in exactly the correct position.  Have a wee read of Niki's beginner's guide tutorial if you've never tried Print and Cut before.  You might also be interested in my double-sided print and cut tutorial.

Top Tip # 1 - Lighting

The optical scanner needs to be able to see the registration marks, so if your room is too dark, the machine will have trouble detecting them.  I'm a night owl, so was initally confused when I had issues with print and cut if I was working into the small hours - doh!

Top Tip # 2 - No Shadows

Just as the room can't be too dark, if you shine a strong light at an angle towards the machine, this could create dark shadows.  This would also make it hard for the optical scanner to identify the registration marks.  Simply turning your machine around on your desk could be all that's needed.

Top Tip # 3 - Page settings

If your Design Page size on Silhouette Studio is set to A4 but Printer setting is Letter size or vice versa, your cuts will start out perfect, but will start to cut out of alignment as it reaches the bottom of the page.  So, make sure to match your real life page size to your Printer and also your Design Page Settings.


Top tip
Most of the Silhouette branded products are US Letter Sized instead of the more common A4 size that we are used to here in the UK.  Remember to change your Design Page and Printer settings when you're using these products.

Top Tip # 4 - White Sticker Trick for Coloured or Glossy Media

If you are printing onto media that isn't white, for example the Silhouette Printable Silver and Gold Foil or the Adhesive Kraft Paper, it's harder for the optical scanner to detect the registration marks.  Karen came up with a great little trick - add some little squares of white address labels in the four corners before printing.


Top Tip # 5 - Positioning on the Mat

Place the paper on the mat matching how it looks in Silhouette Studio (normally top left). The Silhouette will fail to register if the paper is too far right or down.  Rather than position the paper inside the outline grid on the mat, I find my machine tends to register on first try when I position the paper to cover the grid.

Top Tip # 6 - Check for Obstructions

Many pals have been at their wits end when their normally perfect print and cuts start failing.  The usual suspect - a rogue piece of vinyl that has obscured the optical eye! Sometimes the piece obstructing the eye is very tiny, so have a really close inspection.

Top Tip # 7 - Select the Correct Registration Style

There are two types, so make sure to pick the one corresponding to your machine.
I normally change the registration settings to get as much printable space as possible by making the length, thickness and inset as small as possible.  If you are having issues, reset the registration settings to the defaults, as this gives the optic eye a better chance to register.

Top Tip # 8 - Replace Low Ink or Fill In with Sharpie

If your printer is low on toner or ink, the registration marks might be too feint to register.  Replace your ink.  If like me, you've no patience, or a deadline to meet, try and see if a sharpie might help until you get your replacement cartridges.

Top Tip # 9 -  Don't Overlap the No Print Zone

If your designs overlap the hashed out no-print zone, your machine might not be able to register the calibration marks correctly.  Make sure to keep your designs within the allowed area.


Top Tip # 10 - Offset 'Full Bleed' Trick to Banish White Slivers

I've mentioned this top tip a couple of times before, but it's a real life saver.  Your print and cut could be really pretty good, but sometimes even if it's just a millimeter out, you still might be left with an unsightly white sliver.  Here's an easy trick to combat this: Create an no-cut offset shape which has the pattern or colour fill.

I'm told that professionals in the the printing business call this 'full bleed' printing. See the example below where the red cut line is inside the wider blue printed circle:

Full bleed offset trick for trouble shooting print and cut on Silhouette.  Tutorial by Nadine Muir for Silhouette UK

Conclusion

I love print and cut and use it often, so know that dreaded feeling if the registration fails or the cut is misaligned!  I hope that these tips will help you trouble-shoot any issues you encounter and will lead you back to perfect print and cuts again!


Saturday, 29 October 2016

How to do Double-Sided Print and Cuts

Double sided print and cut tutorial by Nadine Muir for Silhouette UK Blog

Hello, Nadine here with a tutorial showing you how to do double-sided print and cuts. All steps are covered, but I've also included a free download which has front and back cut files ready for you to simply drag and drop your design allowing you to make your own double-sided labels or business cards very quickly.

The key to double-side print and cut is the Center To Page option in the Alignment window.  This and other alignment tricks are covered in my Alignment tutorial.

What you’ll need

  • Silhouette
  • Optional Free Cut File –Download here
  • Card
  • Printer
  • Ribbon 

STEP ONE: Make Your Shape

The tags are included in the free download, but are very easy to make, just weld a rounded rectangle to a circle and then add a small circle for the ribbon and make this into a compound path as shown below:

How to make a tag for Double sided print and cut tutorial by Nadine Muir for Silhouette UK

STEP TWO: Make Your Front Design

Drag and drop your logo jpeg/png into your shape, or make a design within Silhouette Studio. For my design, the top line is Design ID 18548 and the text used is the LW Tall Sketch Font.  I used my free Crafter Stitch Font to make the border (lowercase letter w in size 4pt) as demonstrated below.
Crafter Stitch font to make embroidery style border.  Double sided print and cut tutorial by Nadine Muir for Silhouette UK

Top tip
Lines by default will not be printed.  This is normally good, for example we don't want the cut line of the tag printed.  If you do want any lines that are part of your logo or design printed, you can click this option in the bottom of the Line Settings Window.

STEP THREE: Cut Settings

Only the tag should be cut and not the printed components of the design.  This can be done by selecting the individual components and clicking on the relevant option within the Cut Settings window.

STEP FOUR: Replicate Shapes to Fill Page Within Registration Marks

The Registration Marks allow the Silhouette to align the cuts precisely.  I normally reduce the inset to 1cm left, right, top and bottom to allow me a larger cut area.

Group your first shape together and replicate to fill the page.  There is an option to automatically fill the page with your shape at the bottom of the Replicate Window, but I found I managed to squeeze some extra in by choosing the layout myself.
.

**KEY** STEP FIVE: Centre to Page

Here's the key to double sided print and cut - select all your shapes, group and then centre to page. this option is at the bottom of the Align Window

At this stage your front page is ready, so save the file with F or Front in the filename.

**KEY** STEP SIX: Mirror Shape for Back Page

Now lets work on the back page.  Save a copy of the front file, but put a B or Back in the filename.  If like me your design is not symmetrical, then you will need to mirror the grouped shape.


STEP SEVEN: Add your Back Designs

You don't need registration marks on the back page, so turn these off.

I used the the LW Tall Sketch Font for the TO and Bloom Font for the names.  If you have the same design for all your backs, check out my Alignment tutorial for some tips to quickly align each your designs within each shape. 


STEP EIGHT: Print and Cut

Print the front page, then the back.  If your printer is anything like mine, the page is loaded with the printed side facing away from you and the top of the page pointing towards the printer.  I printed two copies so you can see front and back together:


Load onto mat front page facing up and cut with your normal card cut settings.

FINISHED PRODUCT

Double sided print and cut tutorial by Nadine Muir for Silhouette UK Blog


DESIGNS USED:


PRODUCTS USED:
Light hold cutting mat for Cameo

Friday, 14 October 2016

Silhouette Basics - Mastering the Modify Tools

Modify tools Silhouette Basics Tutorial By Nadine Muir for Silhouette UK
Hello, Nadine here with another Silhouette Basics tutorial, this time all about the tools in the Modify window.

I made the following cheat sheet for a friend who was trying to work out how to subtract one shape away from another.  A lot of other friends noted that this infographic was handy for them, so I have decided to not only share it with you, but create a bumper edition, exploring all parts of the Modify window, including detach lines and compound paths :)

You can download a PDF with the four pages ready to print here.

Modify tools Silhouette Basics Tutorial By Nadine Muir for Silhouette UK

You will notice in the example above that crop and intersect give the same result.  This is because they only start to differ if three or more shapes are used.  See below:
Difference between intersect and crop, weld and compound paths.  Modify tools Silhouette Basics Tutorial By Nadine Muir for Silhouette UK
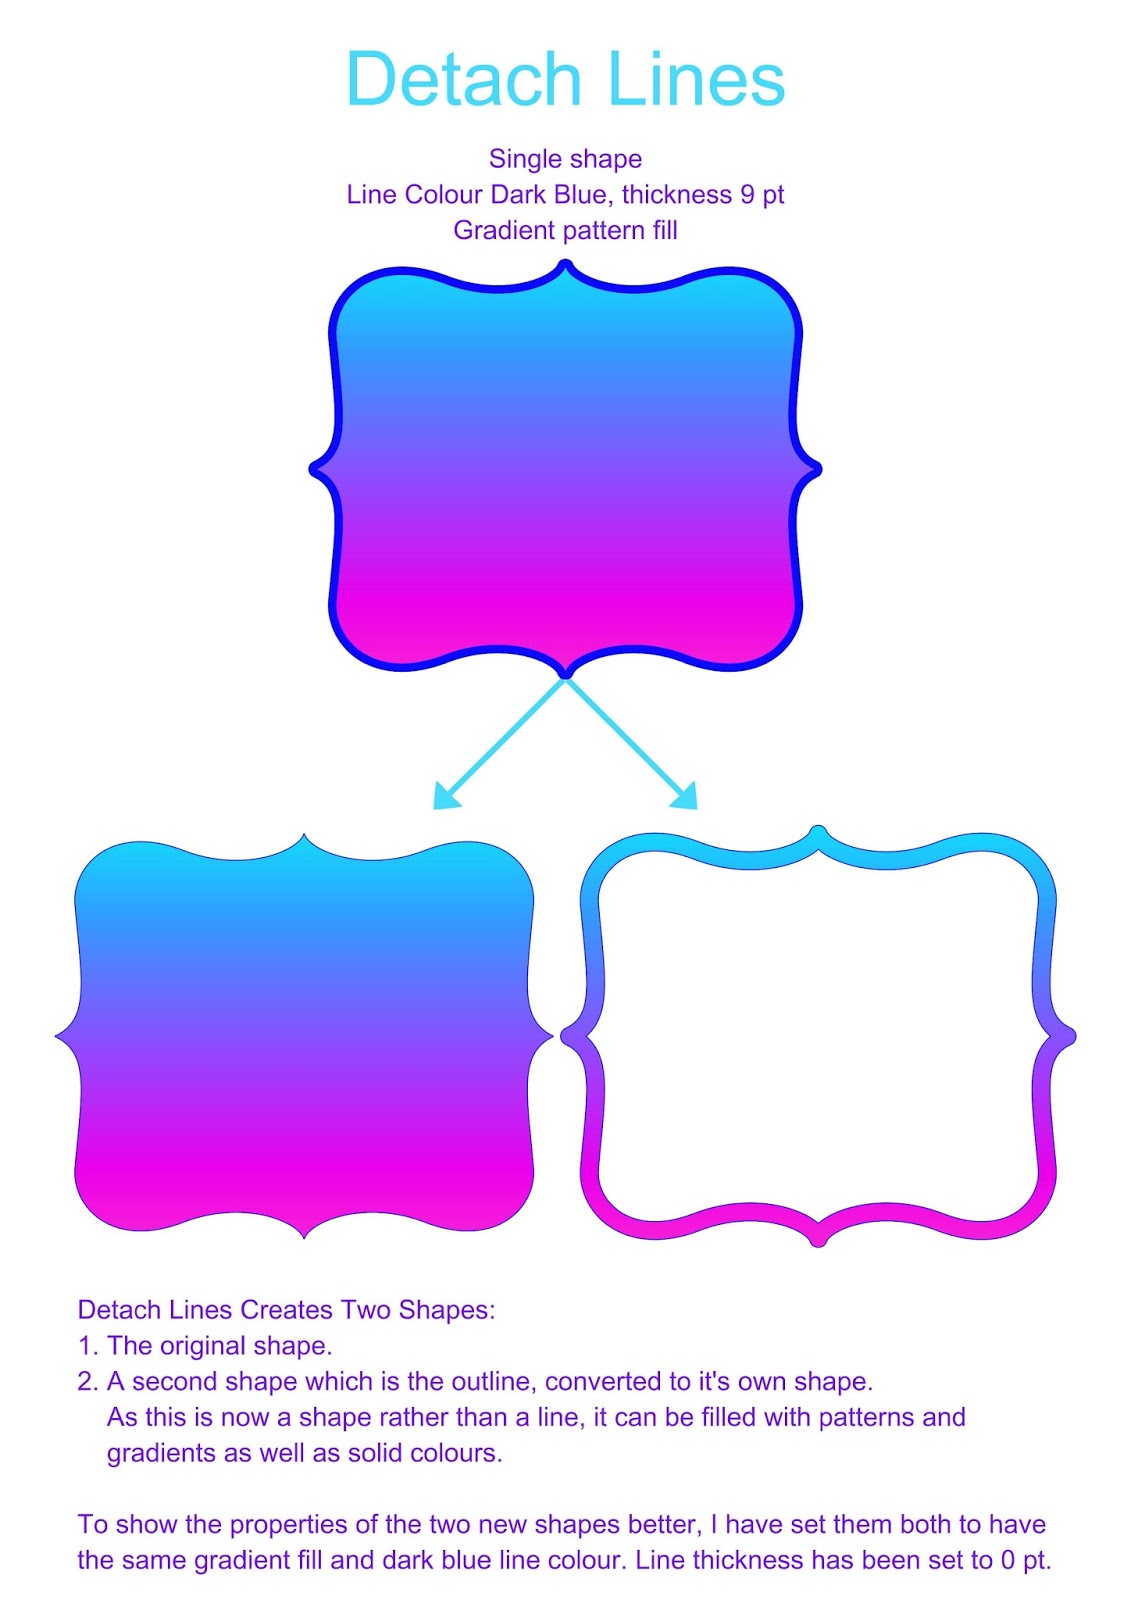
Now, I must confess that I haven't used the Detach Lines option until researching this tutorial.  Now I know what it does, I can certainly see some uses!
Detach lines - Modify tools Silhouette Basics Tutorial By Nadine Muir for Silhouette UK

Finally, my favourite tool.  Compound Paths are the secret to many technicques, including the Filigree Fill project I shared with you a short while ago.

Difference between Group and Compound Path.  Modify tools Silhouette Basics Tutorial By Nadine Muir for Silhouette UK


The Modify button is just to the left of the Trace button. You can also navigate to it from the Object menu at the very top.


Thursday, 29 September 2016

Silhouette Basics - Masterclass on Blades

Tutorial on Silhouette Blades by Nadine Muir for Silhouette UK

Hi there, Nadine here with a tutorial all about your Silhouette Blade.  A while back I was lucky enough to have a long chat with an expert on cutting here in the UK called Harry.  Harry's company manufacture the premium etching tool for the Silhouette Curio.  His tips, along with those from Brian, the fantastic technican at Graphtec, have made me more confident with how I use my blade and settings, ultimately giving me better cuts.

How the Blade Work

The Silhouette machine slides the blade left and right, whilst simultaneously feeding the mat in and out.  This combination of left and right, up and down means that it can cut any shape - remarkably accurately too!  The blade is on a spindle that rotates on a bearing. When the cutter changes direction the blade rotates around for the cutting edge to face forward so it can cut the media.  All of the cutting is done by the small triangle at the tip of the blade.

Close Up of Blade and Cutting Area.  Tutorial on Silhouette Blades by Nadine Muir for Silhouette UK
Image based on diagrams from Harry at Edward Mathias

Cutting Pressure

How deeply you cut is controlled by two things - the amount of the blade exposed and how much pressure is applied.

Imagine you have a large orange with a thick peel and you want to cut the skin but not the flesh.  You have a long dagger and you can adjust the crossguard.  If you set the guard to expose only a short length of blade, the same as the thickness of the peel, you can apply a lot of pressure and happy cut away knowing you are cutting to exactly the right level. Compare that with setting the guard back so you have a much longer blade.  In this scenario, you'd need to apply a very precise pressure to ensure you don't accidentally pierce the fruit.

I've made a little animation which hopefully illustrates this.  Notice how the blade on the right has the blade exposed to the correct depth, at low pressures, the blade won't cut through, but as long as the pressure is sufficiently high, it will cut correctly.  Contrast this with the overexposed blade on the left, here the pressure has completely perfect, otherwise it'll cut far too deeply.


Animation showing that an overexposed blade requires a very precise pressure to cut correctly.  Expose the minimum necessary blade for easier control.  Blade tutorial by Nadine Muir for Silhouette UK Blog

Golden Rule - Use As Little Blade as Possible

Taking what we've learnt from the orange analogy, we want to set our blade to the mimimal length that is needed to cut through the media.  We want the white nose of the blade holder to be pressed down on to the surface to give a consistent cutting depth.

In the diagram below you can see that the blade on the left is set too short and won't cut through the media.  In middle blade is just right and the right hand blade is too deep. 
Correct Blade setting for cutting.  Tutorial on Silhouette Blades by Nadine Muir for Silhouette UK


When I first started, I often put my blade setting a notch higher, thinking somehow it would cut better or with more pressure.  Winding back the nose does not increase blade pressure nor does it increase blade length or bring it closer to the media it simply EXPOSES more blade.

Here are some reasons why this isn't a good idea:
  • Notice how the triangle is much larger onthe overexposed blade on the right?  This means that a bigger the surface area that needs to be rotated, making the quality of your cuts less accurate.
  • The machine too will be under more wear, as all the pressure is on the blade itself and not the white nose of the blade holder.
  • If the pressure is too high, which we know is hard to perfect with an overexposed blade, this will cause:
    • the mat to be cut into and damaged shortening it's life
    • backing paper on vinyl or stickers will be cut, making it harder to weed and remove.
Top tip
Your blade comes with a little grey ratchet to change the blade setting, but the machine also has one, just to the left of the mat loading position - handy!!

Cut Settings In Silhouette Studio


The blade pressure is controlled within Silhouette Software, within the cut settings.  Referred to as Thickness, it ranges from 1 to 33 and each increment equates to 7 grams of force, so can cut with a maximum of 230 grams of force.

Cut Settings in Silhouette Studio.  Tutorial on Silhouette Blades by Nadine Muir for Silhouette UK


Harry's top tip
Think more about DEPTH rather about than pressure – don’t be afraid to use more pressure than the blade needs to cut the media - if only the correct amount of blade is exposed it simply cannot cut too deep because the nose of the cutter (if correctly set) will act as a stop and prevent it from penetrating further.

Test Cuts

There is a test cut button in the Cut Settings window(see the screenshot above). When pressed, the machine will cut a little square with a triangle inside it.  You want to will be able to lift the triangle from within the square of the test cut but have no marks from the test cut on the cutting mat itself, or at most a very light outline just on the adhesive.  Start with a light thickness, say 8 and work up from there with some test cuts to get the perfect pressure.
Top tip
The arrow keys to the left of the test cut button on screen are just the same as the ones on your machine. They will allow you to navigate the machine to the position that you'd like to make your test cut on.

Separate Blades for Different Media

My mum and granny used to despair if they caught me cutting paper with their fabric scissors.  The same principle applies here as paper is very abrasive, so a blade has been used on paper, will not cut fabric well.


Top tip
This is exactly the same as the regular black ratchet blade.  Silhouette have just made the housing blue to help you keep them separate.  Even if you don't cut fabric, but find these blades on sale cheaper, you can use it just you would the regular one.
You can take this principle a little further, so for example I have a separate blade for vinyl, paper and fabric.

Blade choices 

Along with the regular black ratchet blade and the blue fabric one, there is a premium blade that lasts three times as long.  The Curio and Cameo 3 have a deep cut blade for thicker media such as foam.

The Cameo 3 also hase an auto-blade which automatically adjusts the blade by “punching” itself up and down in the corner of the material until the right blade depth is achieved.  I'm excited to say I'm the proud owner of the new Cameo, so if you guys are interested in some tutorials on the new features of the Cameo 3, comment below and we'll be happy to oblidge.

Blade Care

All machines have limits – if you try to cut media that the machine does not have the power to cut exposing more blade will not help you will just damage blades.  This is why it is not possible to cut metals such as silver or steel.

Blade are fragile and any most damage can't even be seen with the naked eye.  Don't allow anything to touch the blade other than the media that you want to cut.  I read that running the blade along a ball of tin foil would clean and sharpen it - this is very bad idea!  For more information, this link is useful http://www.edwardmathias.com/plotterbladecare.html


Masterclass complete

I started this tutorial to cover the basics, but I think it became more of a masterclass!  As Harry says, you can have the most luxurious fountain pen in the world, platinum decorated with diamonds and rubies, but if the nib is chipped, the end result is ruined.  So, your machine is only as good as your blade.

I hope my tips will help you care for your blade, allowing you to produce high quality cuts and also save time weeding.  For extra info click here to see Graphtec Brian's Guide for Setting the Initial Depth.