Showing posts with label Christmas. DOTW. Show all posts

Wednesday, 9 January 2019

Design of the Week - You Are Magic Font - 8th Jan 2019 - Using Font Glyphs


Hello, hello Karen here with my usual Wednesday post using the free Design of the Week.  I am absolutely thrilled with this week's offering a gorgeous font called You Are Magic.  This font has some amazing glyphs (some with phrases) and I have used it on two projects.  You really should snag this font as, for this week only, it is free - saving you over £3.00!

First, I used the font and one of the Glyphs on a t-shirt using glow in the dark HTV - I noticed too late that one of the little lines at the bottom is missing :0(.  


To access the glyphs is really easy.

On the text panel (1) choose Glyphs (2)


This will then give you access to all the different glyphs available to a font.  These can be curly swishes to add to letters or in the case of this font lots of little graphics - see below.  To add a glyph simply click on it and it will be added to your page.


As you can see, along with the graphics there are also phrases with this font.  I decided to use one of them on a scrapbook page as I was curious as to how it would look in a larger size and whether it would draw well with a sketch pen.  I chose the 'You Are Magic' title and also repeated the moon phase glyph as a border around my page.  I also added two moons, flipping one to face the other way.


I used a dark blue metallic sketch pen for the title and border and was delighted how nice they looked.


I absolutely love this font and the possibilities it gives me.


Wednesday, 14 November 2018

Design of the Week - Autumn Word Art - 13th November 2018


Hello, Karen here with my Wednesday DOTW post and this week it's a word art design.

This design could be used for so many different things - home decor, clothing, a card or as I have for the title of a scrapbook page.

I decided that I didn't want any reference to Fall on my page so ungrouped the words and removed 'FALL' and I (heart) Fall.  I then decided to dispence with 'late nights' because to me autumn signifies dark evenings and early nights!


To make the remaining words fit around my design I rearranged them, adding some to the bottom left of my photo and then cut the design from adhesive backed cardstock.  This makes the job of backfilling so much easier when the card is already sticky.


Next I used this file, added an offset and then used three different coloured sketch pens to draw it.


My final, Silhouette, addition to this scrapbook page was to cut two banners of leaves from this design, which I reduced in size.

I then found some stickers and leaves that I had used on a previous page here which went perfectly with all the other elements on this page. 
PRODUCTS USED:

/>

Wednesday, 20 June 2018

Design of the Week - Summer Flower - 19th June 2018


Hello, hello Karen here with my weekly post featuring the Design of the Week. 

Look at this beauty - Summer Flower.


I  really liked this design and decided to make it into a really large flower on a scrapbook page.  

To make the design really pop I separated the pieces and gave them an offset, which I then cut from white card.

I then cut the individual pieces from patterned paper and added to the white offset.  These were then layered on top of each other to give me the over large embellishment. 


I finished with a few embellishments and a photo of my daughter and her boyfriend and their big beaming smiles. 


Saturday, 27 January 2018

Winter Gift Boxes

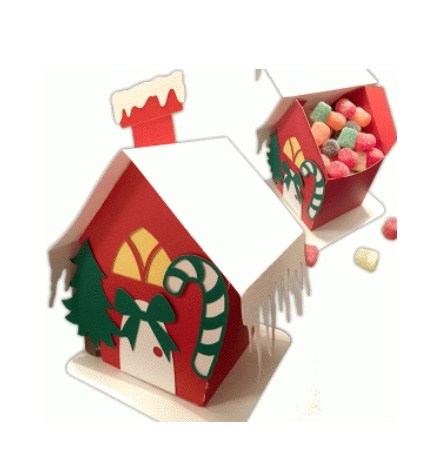
Hey there, Niki here today with some super cute winter gift boxes. I wanted to make these for little Christmas gifts but I don't do traditional Christmas colours, it's just not my thing, so I made something wintery, rather than Christmassey.


These little boxes came out super cute, they didn't take too much time to make (and I made 20 of them!) and they were easy to put together. I used them as table gifts for people at a crop I went to, and they also served as teacher and teaching assistant appreciation gifts too. I filled them with chocolate coins.

I initially went looking for a cute box 3D cut file in the store that I would be able to make 20 of quite easily but I got sidetracked by all the really gorgeous designs in there! I eventually decided upon this Christmas Candy Box House:

But when I opened the design on my screen it looked like this:

I find complex designs like this to be really daunting and my initial reaction is to immediatly close down the design and pick something else. The best thing to do when faced with a design like this is to use the Fill tool.

On screen I figured out what each part of the design was and used the drop down Fill menu (top left) to colour each shape. Whilst doing this I decided to do away with the chimney (that was going one step too far!) and choose to cut some of my pieces in the same colours ie the bows, trees and candy canes were all going to be the same colour. From this point, it is then, visually, very easy to see what needs cutting and how it will all fit together.


I focussed on the main body of the box first of all and arranged it so I could cut two on a sheet. I then cut 20 of these...

I then arranged the white items and cut 20 of each...

These are the white bases...

 and then I moved onto the nows and trees. I decided to cut the bows from white glitter paper and the trees from teal spotted card so I needed to arrange them on the mat in such a way that I could load the two different materials onto the mat at the same time.

Needing 20 bows, instead of copying and pasting 20 times, I selected one bow then went to the Object Menu, Replicate and selected Fill Page at the bottom. This filled my mat with bows, 25 in fact. The are all nicely spaced apart but this wastes cutting material so I re-arranged them so they were all close together.

Here are my bows all squashed together. I releated the same action for the trees and sent it to cut.

and finally, these were the windows.

With all those pieces cut all I then had to do was assemble and fill the boxes, my favourite part.


 I absolutely loved making these little boxes and loved giving them away as gifts too.

What 3D box files take your fancy from the Design Store?

Happy scrapping xx 

Find me on my own blog: Being Scrappy and on Instagram as @nikiclaire


DESIGNS USED:


PRODUCTS USED:


Wednesday, 20 December 2017

Last Minute Christmas Cards using Free Christmas Design


Hello, hello - Karen here with a quick Christmas Card.  I usually make my own Christmas cards and this year made them using a free DOTW from November.

I thought I had made sufficient cards but realised that I needed a couple more and so decided to make some quick and simple ones.


  • I used this Santa from Echo park.  I drew a 4.5 in square and turned this into a faux stitched border.  I used the colour picker to get the same red as the Santa.
  • Next I manipulated the 'Ho, HO, HO' phrase (which was a free design yesterday) and added to the bottom of my Santa.  I again used the colour picker to make this the same red as the Santa.
  • All was left to do was to print and cut them out.  Mat on a piece of red card and add to the front of a 5 inch pre-made card. 


I kept the file so that if any more cards pop through my letterbox from people I haven't sent to I can quickly 'knock up' a card in return and get it into the post that day.