Saturday 30 September 2017

Halloween Treat bag

With Halloween fast approaching, why not try this project to create a personalized treat bag. If you're hosting a monster mash movie marathon what better place to store the treats for those zombie's fingers to grab into.


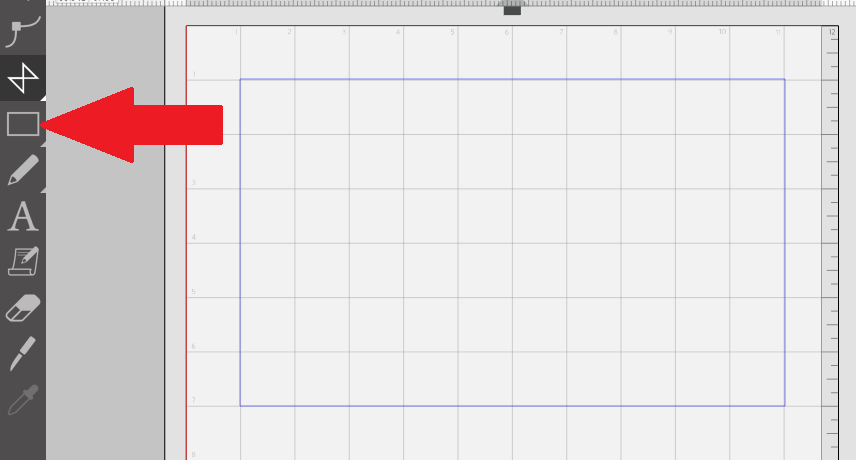
Open a new page in silhouette studio and select your page sizes from the page size setup panel. Using the shape tool, create a rectangle on the page.
 This will be the main body of your bag, this will not be a cut line so I have changed the line colour to blue.


This project will be easier if
you have your grid switched on 

Using the line tool, create tabs around the rectangle where the edges of the bag will be glued.

 Next, create a base for our bag. The base must exceed half the width of the side panel to create an overlap so both base pieces may be glued together.
If you are not happy with the position of your tabs adjust them using the edit points tool. Simply click on any point and drag it to the new position.
Continue using the line tool to complete the outer edge of your bag, using the rectangle as a guide.

Open the line style panel and change the line style to a dashed line, again using the line tool add score lines to your project as shown in the photo.

Holding tab on your keyboard will help you maintain a straight line


Select your blue rectangle and delete it, as it is no longer needed. You have now created the net shape for your bag. Select everything on your page and group them together.
This net shape can be saved to your hard drive or library and can be used for many other projects where a box or bag is the base.

Go to the silhouette store and select some fun Halloween shapes to decorate your treat bag. Proceed through the checkout process to download your files.


Load the card you wish to use for your bag onto the cutting mat and load the mat into your cutting machine.

Click send in Studio and select the appropriate material in the drop-down menu, carry out a test cut to assure a clean cut and adjust if necessary. Click send and allow your project to complete cutting. Unload the mat and remove the media from the mat.

Locate your designs in your library and open them onto your work area by double-clicking on them. Decide on a layout for your design. Use the net of the box to size the pieces appropriately .

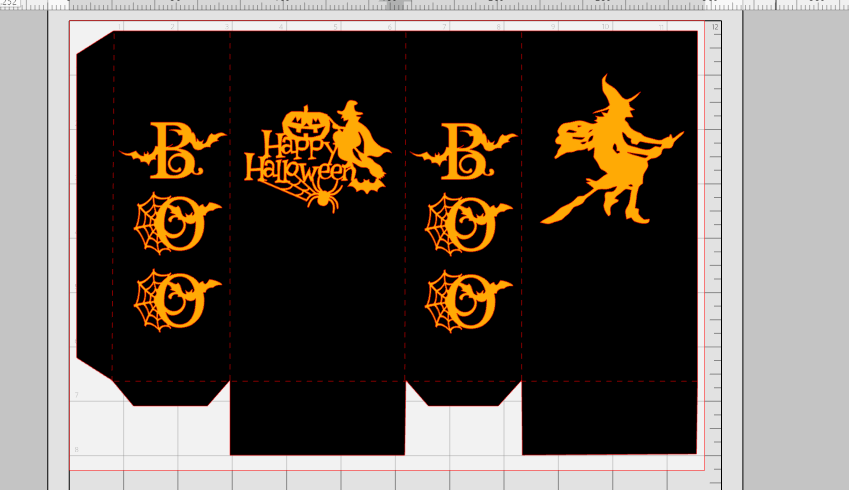
I have used fill to make my bag black and my
embellishments orange,
so I can see clearly how my design will look


Load your chosen media for your embellishments onto the cut mat and load the mat into the machine. Ensure your page setup matches the size of your media, I am using an A4 sheet of vinyl.
Use copy and paste to create enough pieces to decorate all the bags you need. Arrange your embellishments to make the best use of your media


Click on send and choose the correct media from the materials list, carry out a test cut to ensure a clean cut and adjust your settings if necessary, click send in the send panel and allow the project to cut.


For added personalisation use the Font tool or a pre-designed font from the silhouette store, to create initials to personalise each of the bags.


Fold along the perforated lines on your treat bag, apply glue or red liner tape to the long tab on your treat bag, Align and secure to the corresponding side of the bag. Use a strong glue or red liner tape to secure the tabs at the base of the treat bag.


 Now you can ensure everyone gets the treats they like in their bag. Just remember to slip a food bag in as a liner if any of your treats are unwrapped.


Designs used:

halloween monograms a-l
(Design #49168)
halloween monograms m-z
(Design #49167)

PRODUCTS USED:


Thursday 28 September 2017

Dream Big Layout: Creating Stitched Offsets


Hello! Niki here again with a tutorial on creating stitched offsets. I started off by choosing a hot air balloon file from the Design Store. I opened it and it appeared like this.

I enlarged all the pieces and and then wanted to add an outline.

Instead of creating an offset here I simply added the outline shape that came with the cut file around the pieces.

I then dealt with the basket part of the balloon. It was in a few different pieces and I wanted to simplify them a little and weld them all together. 

I had to fiddle around with this a little bit, but basically I placed them all on top of each other, and then clicked 'divide'. I was then able to remove the bits I didn't want whilst keeping the outline. 


I then wanted to keep the internal stripes solid, but the outline around the whole shape to be a stitched line. So I simply highlighted it and changed the line style to a perforated edge.

With my outline sorted, I could now work on all the middle bits. I wanted to cut each one out of a different coloured paper and create stitch lines within each one.  I selected the first stripe, created an internal offset and then changed the offset line to the perforated style. I did this for each stripe. I also grouped each stripe individually together with it's internal offset so I could move them around.

I kept my whole design in tact here and simply copied the stripes. I pasted them to one side for now.

I then removed all solid lines. This is becuase I wanted all stitch perforations to be also cut directly into my background. I was then able to send this design to cut on a white cardstock background sheet.

Moving on to the stripes (together with their perforations) I arranged these onto a new mat in a way that I could cut each from a different coloured paper.

Once everything was cut, I could then stick my hot air balloon stripes in the right place onto my background (carefully lining up the holes) and then add my stitching. I stitched the outline too. The result is fabulous! I love how it turned out.


Thanks so much for checking this out - it's a little complicated but if you love to add stitching to your cut files then give this a go, the results are always stunning.

Happy scrapping xxx

Find me designing for Freckled Fawn, Just Nick, Hey Little Magpie, GoGo Getaway, Silhouette UK, Stick it Down, and UK Scrap Addicts. Also on my own blog: Being Scrappy and on Instagram as @nikiclaire

DESIGNS USED:


PRODUCTS USED:

Monday 25 September 2017

Finding your way in Silhouette Studio (right click, keyboard shortcuts, user manual, search and quick access)


Hello Janet here to help you navigate around Silhouette® Studio. Have you updated your  software recently? Can't find favourite tools and actions in the new version?  Here are some ideas to help you if you lose your way.

  1. Right click menu
  2. Keyboard shortcuts
  3. User manual
  4. Interactive search
  5. Quick Access tool bar


1. Using Right Click

Using the right click with your mouse when a shape is selected brings up a menu of useful shortcuts which can be a huge time-saver, bypassing the menus and panels.


2. Using Keyboard Shortcuts

For alternative speedy access you can use keyboard shortcuts. There is comprehensive list in the manual on page 116.  You'll find much more than just Copy and Paste.  I've printed it in A4 to keep next to my laptop, and in A3 to wall mount next to my desktop computer.


3. Locating the User Manual

The user manual will show you where things are and is accessible from within the Silhouette® Studio software.

To find the manual, click on Help in the top Menu bar and select User Manual. 


It will open in the default PDF Reader on your computer, most probably Adobe Reader.


You might find it easier to navigate if you display Page Thumbnails.


Then it will look like this, and its a whole lot easier to find what you're looking for.


Page 2 has a useful Table of Contents.


The Find feature is useful to locate specifics.


You can print some or all of the pages (although there are currently 118 pages). New features are added to the Manual but it may be useful to know what version of the manual you are looking at.   This information is on page 115.


4. Using Interactive Search

Another way of navigating around the tools and actions is to use the interactive search feature.  This will actually guide you to the actions available from the Main Menu. Click on Help and then type the function in the search box. Here I've typed in 'zoom' and selected 'zoom - fit to window' it shows how to navigate to the action, and clicking on it carries out that action.


5. Quick Access Tool Bar

The Top white menu bar is now dynamic, displaying frequently used tools. Another time-saver when repeating actions.


I hope you find these tips useful. If you have any others to suggest please mention them in the comments to this post.


Bye for now,


   Profile | My Blog | Instagram


PRODUCTS USED: