For this project, you can use good old copy paper, Copy paper comes in lots of colors choose some to match your project to save on printing costs.You can, of course, use pre-printed papers or perhaps some photocopied love letters for an added personal touch.
Open Silhouette studio and click on the store tab, in the search box type "flowers", this will give you a LOT of results rather than search through all of these results use the filters to narrow down the search. We are looking to create a 3D project so we select 3D crafts from the filter menu.
NOTE: There is a Sale on in the store at the minute offering a 25% off 3D designs, but it is only available until the 28th so don't miss out.
Select the flowers you like from the store adding them to your basket and proceeding through the checkout process.
Your files will automatically be added to your library you can locate them in the recently downloaded folder.
Open the file onto the workspace by double-clicking on it.
Bear in mind the size you want your finished project to be. In this case, the file I have opened will produce quite a large flower if I cut it out the size that has opened on the mat. To resize the flower click on the file to select it.
Click on one of the corners and drag the mouse to change the overall size of the flower. The rolled flowers came with some extra pieces which I did not want to use, so I removed them by ungrouping the cut lines and deleting the unwanted pieces.

NOTE; It is advisable to make one of each style of flower in your project to gauge the completed flower size.The effect will be better if you vary the size from flower to flower.
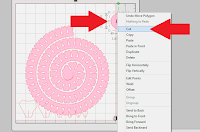
Arrange the flowers to make the best use of your paper you can ungroup any cut lines by right clicking and select "ungroup" from the drop-down menu that appears. Open the Transform panel and select the rotate window. select any cut line and use the "rotate to" options to fit as much on your mat as possible.
Ensure the paper size on your virtual mat matches the size of paper you will be cutting
Once you have filled your virtual page click "send". select copy paper from the media type drop-down menu.
If using a ratchet style blade adjust your blade to match the setting shown in the blade setting window.
Load your media onto the cutting mat and load into the machine.
Carry out a test cut and adjust settings if necessary.
NOTE; When cutting thin media, it is important that your mat is clean and has sufficient tacky remaining or the paper will tear. Try using a brayer to burnish the paper down if you're having difficulty.
You don't have to wait until all your pieces are cut obviously, you can start to create your flowers as soon as the first pieces come off the mat.
The first flower we will look at is the "small rose". we can create a straightforward rose by using each of the petals as they are.
The center of a rose is tightly wrapped, to create the center I like to use a cotton bud as the center base. Take one of the small petals and wrap it around the cotton tip curling back one end. Use wet glue or a glue gun to secure into place. use a ball tool to shape the rest of the petals. one by one starting with the smaller petals build up the flower overlapping the last petal with the next one.
It will depend on how big you want your flower to be as to how many petals you will apply. We can create variants on the rose by applying color to our petals. I have created roses by inking the tips of the petal for one look and inking the base of the petal for a completely different effect. Colouring the entire petal will give another look entirely. So there are 4 very different looks just using a bit of ink.
Using the same petals in any of these 4 ways. I created a further variation on the flower by using a pearl on some wire as the center, you could use any other beads to the same effect.Centers can also be created using pre-made stamens available at most good craft stores.
The other designs I have chosen for this project "rolled flowers" are just about the easiest to make. You can, of course, simply roll the flower up from the open end until you get to the circular end where you apply glue creating an instant flower. However using the same techniques as above you can create a number of variations.
NOTE; I'm not sure if it was intentional or not but the waste from the spiral flowers can also be used effectively to create a unique center to a flower.

Arrange your new flowers onto your bouquet handle. I have used a hot glue gun to secure mine. For an extra sparkle on your bouquet apply a glitter spray. These flowers can be made long before the wedding and will look as good on your anniversary as the did on the day you made them.
Designs used:
Design ID #130262 rolled flower.studio by Lori Whitlock
Design ID #193705 rose flower - small.studio by Echo Park
Design ID #130253 rolled flower.studio by Lori Whitlock
PRODUCTS USED:
 |  |  |  |


Such beautiful flowers - a lovely project.
ReplyDeleteThanks Janet.
Deletewhat a stunning project.
ReplyDeleteVery kind of you Karen.
ReplyDeleteSO beautiful.
ReplyDeleteFaith