Carefully the stitches are removed from one of the flags to act as a donor to create our template.
As our bunting is cream we will not get a great contrast for tracing, so a piece of black card was used as a background.
The black card and the flag are placed on the Picscan mat and photographed. For help with Picscan please see the blog by Nicky pixscan-from-start-to-finish
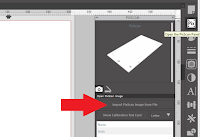 Open silhouette studio and open the Picscan panel, click on import Picscan image from file.
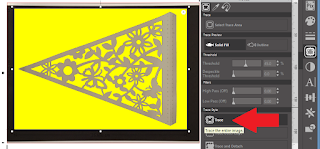
When your Picscan image has loaded open the trace panel.
select your trace area using the outline trace, and adjust the threshold until the trace picks up all the areas of your design. Click trace in the trace style section to trace the entire image.
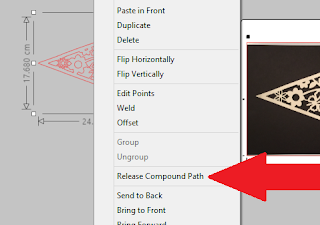 Drag the newly created cutlines off the mat and release compound path by right clicking on the design and clicking on release compound path.
 This will separate all the pieces of your design picked up in the scan, any areas such as the outside border that are not required should be selected and deleted using cut, located in the top toolbar.
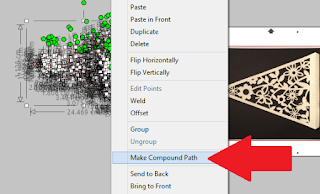 After editing, drag a box around your cutlines to select them all, and right click. From the pop-up menu select "make compound path".
You may want to save this new cut file to your library.
With the cut line of the flag selected, click on "copy" from the top toolbar and then open a new silhouette page.
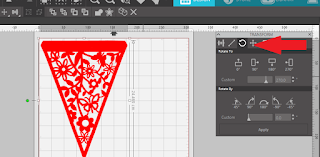 With this new page open, select paste from the top toolbar and a copy of your flag will appear on your virtual workspace.
To make things easier, I have rotated my flag to the way it will hang, I have also used fill to colour the flag in for ease of viewing.
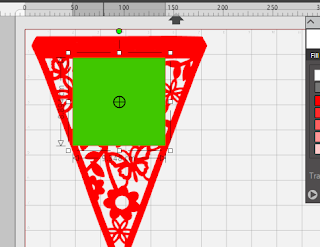 Draw a box on the flag to determine the usable space in which the letters can be placed, type the first letter you will use and using the box, determine the size your letters.
Individually type all the other letters that will be needed for the project to one side of the mat for later use. delete the box it is no longer needed.
As I have 12 letters, I will require 12 flags to place them on. Of course, the bunting will be viewed from both sides so it needs to read correctly from both sides, so if we were to simply merge the letters into the bunting, they would not read correctly. To create an illusion we will add a piece of reflective card between two pieces of bunting and add separate letters to both sides allowing the text to be read correctly.
Ensure your silhouette machine is plugged in, switched on and connected to your computer. Depending on the size of media you are using, you may be able to arrange a number of flags on your mat at one time. I am using A4 stock, so I must cut my flags one at a time. Place your chosen material on the cutting mat and load into your machine.
Click on send, choose your material type and adjust your blade accordingly and carry out a test cut to check your settings, adjust again if necessary. Proceed to cut out the file by clicking send at the bottom of the control panel. Repeat this until you have twice as many flags as letters in your word or sentence, for example with Craft o hearts I will need 24.
Only 12 of my flags require a tab, so it will be necessary to adapt the original file. Select Paste from the top tool bar as before and another copy of the trace will be added to the workspace. Open the fill panel and fill your new flag with any colour, I have used yellow (as the cut line will show up better) select the knife tool and cut the tab as shown.
Proceed to load media and cut out the original number of flags, for example, I will be cutting out 12.
Move your flag off to one side off the mat to clear your workspace.
Arrange your letters to make the best use of your chosen media,(silhouette adhesive card works well for this project) load your media for the letters onto your cutting mat and load into your silhouette. Choose the correct setting for the media and carry out a test cut to ensure a clean cut, repeat this process until you have two of each of the required letters.
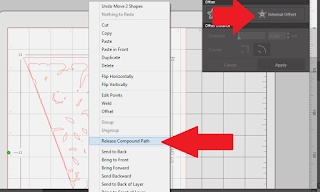 To create the reflective central piece of card open the modify panel and select open the offset panel with internal offset selected, create an offset on the flag without the tab.
Ensure you leave enough area for the application of glue. Click Apply and move the original to one side. With the newly created cutline selected, right click and select "release compound path" select the outer line only and move to one side delete the rest of the offset, this gives you a solid triangle slightly smaller than your flag. You will need one of these for each of your letters, I will require 12. Place your reflective card stock on your cutting mat and send to your machine, (remember to carry out a test cut)
Sandwich a reflective triangle between one of each of the other two types of flags using the pointed tip as a guide,
Use wet glue to allow yourself some wiggle room
Place a letter on each of the flags with tags and glue into place. Then assemble the letters in order to spell out your phrase.
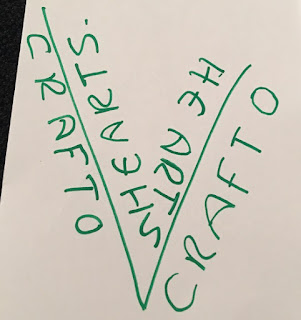 Decide how your bunting is to be hug. Artist avenue has it zig-zagged over the main walk way so I drew a zig-zag on a scrap of paper a wrote down the words as they should read when hung, rotate the piece of paper and write the text again, this is your template to follow when applying your letters.
Keeping your flags in this order lay down some cord or ribbon, close the tabs on each of the flags to enclose the cord making sure not to catch the cord in the glue. This allows for repositioning of the flags after hanging. For a professional finish run a single line of stitching along each folded tab.
Remember when you next visit the NEC to pick up your silhouette supplies, pay a visit to artists avenue to see the finished project.
PRODUCTS USED:
 |  |  |  |


No comments:
Post a Comment