

If you have never used Heat Transfer Vinyl (HTV) here’s a quick overview how you can get started. In this project, I am going to use an ordinary iron to apply the HTV.
Begin by opening a new project in Silhouette Studio©
In the "page" settings create a virtual page to match your media and set your mat size to match the mat you will be using (HTV) comes with its own built-in carrier mat and it is not necessary to have a mat in position when cutting it is personal as to if you use one or not).

In the "page" settings create a virtual page to match your media and set your mat size to match the mat you will be using (HTV) comes with its own built-in carrier mat and it is not necessary to have a mat in position when cutting it is personal as to if you use one or not).

Go to the store and select one of the skeletons I have selected a design by Carina Gardner detail are at the bottom of the page.
Measure the top that your design will go onto and size the cut file to fit within the given space.
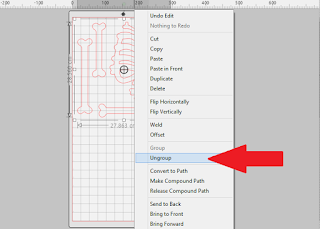 To make the best use of your media right click on the design and select ungroup. this will allow you to arrange the pieces to fit onto the media with as little waste as possible (this is a simple design so will be easy to reposition the pieces).
I am creating a t-shirt so I only need the upper body and have deleted the bones that would be used for the legs. It is requested that I make his body look small so his head looks big (apparently its a thing and it will be funny). If your design has text or a design the must be orientated a particular way it is at this stage you must mirror your project as we will be cutting from the back of the material ( the side with the glue).

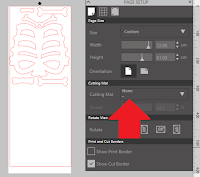 If you are cutting without the mat ensure you have selected no mat in the page set up panel if you have selected this method the mat will not be visible on screen in the Design or the send Tab.
 This is important as it tells the machine how far to feed the material into the machine.
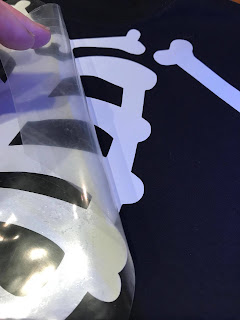 Allow to cool for a moment and peel away the carrier sheet. If any areas of your design have not bonded correctly replace the carrier sheet and reapply the heat and pressure.

Halloween skeleton bones by Carina Gardner To make the best use of your media right click on the design and select ungroup. this will allow you to arrange the pieces to fit onto the media with as little waste as possible (this is a simple design so will be easy to reposition the pieces).
I am creating a t-shirt so I only need the upper body and have deleted the bones that would be used for the legs. It is requested that I make his body look small so his head looks big (apparently its a thing and it will be funny). If your design has text or a design the must be orientated a particular way it is at this stage you must mirror your project as we will be cutting from the back of the material ( the side with the glue).

When you happy with your layout click the SEND tab. if you have chosen to use the cutting mat load the HTV onto the mat and load the mat into the machine.
 If you are cutting without the mat ensure you have selected no mat in the page set up panel if you have selected this method the mat will not be visible on screen in the Design or the send Tab.
  This is important as it tells the machine how far to feed the material into the machine.
In the materials, list select the "Vinyl glow in the dark" carry out a test cut to ensure a clean cut, adjust the settings where necessary. Remember you are cutting through only the thin white layer and do not want to cut through the thick clear sheet.
click Send and allow the job to complete. remove the media from the machine and remove all the unwanted areas of vinyl from the clear backing sheet.
Turn on your iron and set to no steam the recommended settings for applying this HTV is given in Degrees, as most irons don't have actual temperature readings you will need to gauge the correct setting for your iron. take a scrap of material and some of the clear carrier sheet Snip a piece off the corner. Place the piece of carrier sheet onto a scrap of fabric, to obtain the right temperature slowly increase the heat of the iron and press onto the carrier sheet remember to protect your iron as suggested on the packaging. When the heat starts to crinkle the carrier sheet turn the iron back down a little you now have a good temperature to work with.
A heat press will apply an even pressure over the whole of an area at once, With an iron, we can only apply pressure in an area as big as the plate on the iron. Place the Iron on an area of the HTV and apply pressure allowing the Iron to move slightly back and forth. You want to maintain the heat in one area long enough to melt the glue into the fabric, I recommend the use of a timmer as it is very difficult to judge accurately the lapse of time. Proper application of HTV relies on the correct temperature for the correct length of time.
 Allow to cool for a moment and peel away the carrier sheet. If any areas of your design have not bonded correctly replace the carrier sheet and reapply the heat and pressure.
Glow in the dark HTV needs to be "charged" before it will glow. to do this hold a bright light in front of the design and allow the vinyl to absorb the light. If there is a Blacklight source the HTV will glow without the need for charging.


Designs used:
Design ID #49873


No comments:
Post a Comment