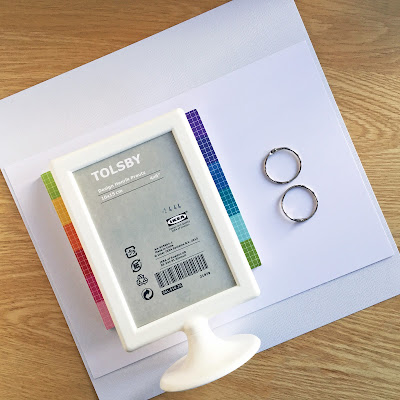
Hello and Happy New Year. It's Janet here with a useful calendar project using Silhouette's Print & Cut and Move functions. This is cheap to make (the frame I used cost just £1), but looks great on a desk, beside a telephone, or even as a small gift. I used the 2018 Calendar set by Alaa' K (parts 1, 2, 3, 4), resizing them to fit a bought picture frame. I also adjusted the position of the holes using the Move function. If you're not familiar with it, just skip down to the coloured box to learn how to use this useful feature.
SUPPLIES REQUIRED:
Printable Cardstock
Selection of Patterned Papers (e.g. scraps, or a 6x6 pad)
Liquid Paper/Card Adhesive
(optional) Silhouette Textured Adhesive Cardstock
Double-sided Picture Frame (e.g. IKEA Tolsby)
Two 30 mm hinged Binder Rings
Silhouette Cameo® 3
Inkjet Printer
HOW TO MAKE THE CALENDAR
STEP 1: Prepare a Standard Page to Fit the Frame
Measure the opening of the frame and draw a rectangle of similar size in the Silhouette Studio® software. Reduce the size a little to make a suitable calendar page with some space around it when placed in the opening (my rectangle measured 130 mm x 85 mm).
Draw a circle with a diameter slightly larger than that of the binder ring (around 3.5 mm). Duplicate the circle and position them in the top corners with each hole the same distance from the top and side edges.
Cut one out from scrap card to see if the page sits in the correct position without touching any of the frame edges when hung from the binder rings. Adjust the position of the holes if necessary and re-test (I found a distance of around 8.45 to 9 mm from each edge worked well).
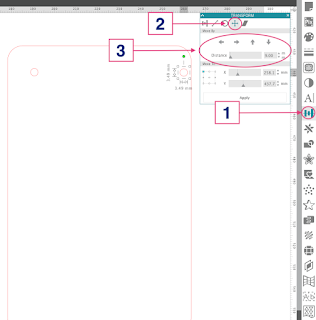
If you find placement difficult, try out the Move function (below).

MOVE function
- Open the Transform panel (1).
- Select the Move tab (2).
- Move hole to top corner of the rectangle and select the hole.
- Input Distance and then use the directional arrows to move the hole by the specified amount (3). Simple!
STEP 2: Size the Calendar to Fit The Frame
Open the Calendar files in the same tab as the above page (they will open in the same tab if all other tabs are closed). Ungroup one set of three, select all the pieces and reduced the size proportionately (click the mouse, hold down the Shift key and drag the mouse towards the centre of the design until each rectangle measures close to 80.18 mm and release the mouse). The cutout number and calendar panel should now be of a suitable size to fit the standard page rectangle.
Release the compound path on the individual months. Select all the parts of each cutout number in turn and group them. Duplicate the standard page rectangle so you have three and move the cut out number and calendar panels into the standard page rectangles. Select the page size to match the cardstock you are about to print on. Turn on the Print & Cut registration marks and arrange the three pages within the print and cut boundaries.
STEP 3: Print & Cut the Month Pages
Ensure that the Print Page Setup (Main Menu > File > Print Page Setup) page size matches that of the card and send it to cut on your printer.
Place the printed sheet onto the cutting mat, select a suitable cut setting for your card, and send the file to cut.
Substitute the cut out number and calendar panels from the next set of three months and repeat until all the pages are cut.
STEP 4: Cut Coloured Circles
Cut twelve coloured circles of a slightly larger size than the hole surrounding the cut out number (around 70 mm worked with these sizes). A timesaver when cutting from 6" x 6" paper, is to cut four circles at a time, one at each corner of the mat and repeat until all circles are cut.
STEP 5: Assemble the Calendar
Adhere the patterned paper circles behind the number cutouts with liquid glue.
(Optional) Add plain pages (without the number cutout) to the reverse of calendar pages cut from adhesive textured cardstock. Regular card could be used, but the adhesive-backed cardstock make s the task much quicker. [Note: I had intended to do this, but the pages were sufficiently thick and neat enough without this additional backing).
Thread the pages in order on to the binder rings and close them over the top part of the picture frame. Each month can now be flipped over to the back of the frame when the month is over.
Your calendar is now complete.
You can have lots of fun changing out the colours and patterns, or even add a personalised cover page. Why not share your version over on the Silhouette UK Facebook page?
Bye for now,
DESIGNS USED:

|

|

|

|
PRODUCTS USED:

|

|

|

|


What a fabulously useful project.
ReplyDeleteThanks Karen.
DeleteAnother great idea.
ReplyDeleteThank you Daffodil Cards.
Delete