

Hello Janet here again,
Today I'll show you how to make a custom-coloured piece of fabric, ideal for projects requiring small amounts of material. This tutorial will show you how to colour a cut file to create a uniquely coloured fabric design. For my no-sew project I need a 5.5" fabric square which I'll print on to Silhouette Printable Cotton. Of course, once printed, the cotton fabric is great for small sewing projects too.

If you are truly in a hurry you could use a printable pattern straight from the Silhouette Design Store. However, if you don't find what you need you can colour a cut file, and that gives you many more pattern options and colour choices.
NO-SEW PIN CUSHION PROJECT
MATERIALS REQUIRED:
Roses Background File by Tanya Batrak (Design #133943) or other cut file
Silhouette Printable Cotton
Inkjet Printer
Silhouette CAMEO® or Silhouette Portrait®
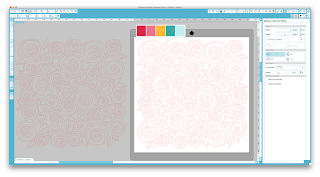
STEP 1 : Choosing a File
First choose your design. I like to use background designs as they cover a good sized area of the design space (often 12" x12"). If you choose a regular cut file you can colour in your design in the Silhouette software, without the need of tracing, as long as the design is made up from closed shapes. If you don't already have something suitable saved in your library, there are a wealth of designs to choose from in the Store. You can find them by selecting Search Designs, adding criteria to the Browse Designs box (I wanted a roses pattern so added 'roses background') and then filter by Cut Type, choosing Regular Cut.

STEP 2: Making a Colour Swatch (optional)
Once you have opened your chosen design in Design View, examine the elements and decide how you want them coloured and what colour scheme you want to use. I find it useful to make a colour swatch. To do this I make a line of rectangles and add the colours I want. There are many possible sources. You can select colours from the basic options palette from the Fill Colour Window or 'mix' them in the advanced options. Alternatively you can 'pick' colours using the colour picker (eye dropper) tool from an existing design or even find and use a ready-made swatch of colours online (try searching Pinterest for Color/Colour Swatches). You can pick colours from any object which you have in the drawing area. To get an external image from the Internet into the software take a screen shot and save it in png format. Open a saved screen shot in the Silhouette software by using File > Open > filename. I make swatches in a New File and save them to My Own Designs in the Library so they can be used over and over.

STEP 3 : Colouring a File
The plan is to group the elements that you want to be all the same colour together, and then colour the whole group at once.
This is how I'd go about it.
1. Open your swatch in the design window (optional). Open your design in the same window and make a copy, moving the copy away from the mat.
Silhouette Printable Cotton
Inkjet Printer
Silhouette CAMEO® or Silhouette Portrait®
STEP 1 : Choosing a File
First choose your design. I like to use background designs as they cover a good sized area of the design space (often 12" x12"). If you choose a regular cut file you can colour in your design in the Silhouette software, without the need of tracing, as long as the design is made up from closed shapes. If you don't already have something suitable saved in your library, there are a wealth of designs to choose from in the Store. You can find them by selecting Search Designs, adding criteria to the Browse Designs box (I wanted a roses pattern so added 'roses background') and then filter by Cut Type, choosing Regular Cut.

STEP 2: Making a Colour Swatch (optional)
Once you have opened your chosen design in Design View, examine the elements and decide how you want them coloured and what colour scheme you want to use. I find it useful to make a colour swatch. To do this I make a line of rectangles and add the colours I want. There are many possible sources. You can select colours from the basic options palette from the Fill Colour Window or 'mix' them in the advanced options. Alternatively you can 'pick' colours using the colour picker (eye dropper) tool from an existing design or even find and use a ready-made swatch of colours online (try searching Pinterest for Color/Colour Swatches). You can pick colours from any object which you have in the drawing area. To get an external image from the Internet into the software take a screen shot and save it in png format. Open a saved screen shot in the Silhouette software by using File > Open > filename. I make swatches in a New File and save them to My Own Designs in the Library so they can be used over and over.

STEP 3 : Colouring a File
The plan is to group the elements that you want to be all the same colour together, and then colour the whole group at once.
This is how I'd go about it.
1. Open your swatch in the design window (optional). Open your design in the same window and make a copy, moving the copy away from the mat.

2. Select the whole design on the mat and release the compound path (Object > Release Compound Path).
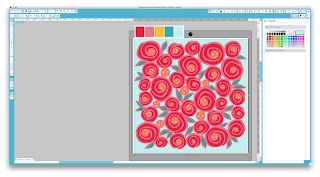
3. Colour the background shape and then move it away from the mat. To do that, select the outer shape, open the Fill Colour Window, click on the colour picker, then click on the required colour from the swatch. The shape changes colour. Click to select it, and move it to the side.


5. Now to select all the flowers - holding down the shift key, click on each flower shape and then select the group icon. Now click on the colour picker, click on the red colour in the swatch and the flowers will change colour. Select them and move them to the side.

6. Now select all the 'gaps' - do as before, select, group them, then colour them aqua and move them to the side.

7. Finally select all the flower centres by selecting everything left on the mat and as before, group them, then colour them yellow, but leave them were they are.

8. Now bring over the copy design, align it with the flower centres and then bring across the leaves, flowers and 'gaps'. Now select and delete the copy design (to select it, click on the outer line) and click delete (back space) on the keyboard.

10. (optional) Add a white outline. Select Line Colour and change the lines to white. Select the Line Width and change to 0.5mm. Finally, draw a square slightly smaller than the mat and fill it with aqua. Click Object > Align > send to back. Select everything on the mat and group.

STEP 4: Preparing to cut the file
1. Size your design as required (5.5" x 5.5" for my project). Hold down shift key and use a corner grab handle and move it towards the centre of the square until the size is correct, or use the Scale window.
3. Colour the background shape and then move it away from the mat. To do that, select the outer shape, open the Fill Colour Window, click on the colour picker, then click on the required colour from the swatch. The shape changes colour. Click to select it, and move it to the side.

4. Now select all the leaves - holding down the shift key, click on each leaf shape and then select the group icon. Now click on the colour picker, click on the green colour in the swatch and the leaves will all change colour. Select them and move them to the side.


6. Now select all the 'gaps' - do as before, select, group them, then colour them aqua and move them to the side.

7. Finally select all the flower centres by selecting everything left on the mat and as before, group them, then colour them yellow, but leave them were they are.

8. Now bring over the copy design, align it with the flower centres and then bring across the leaves, flowers and 'gaps'. Now select and delete the copy design (to select it, click on the outer line) and click delete (back space) on the keyboard.

9. Now bring across the pink background shape and align. Group everything on the mat together (Object > Group).

10. (optional) Add a white outline. Select Line Colour and change the lines to white. Select the Line Width and change to 0.5mm. Finally, draw a square slightly smaller than the mat and fill it with aqua. Click Object > Align > send to back. Select everything on the mat and group.

STEP 4: Preparing to cut the file
1. Size your design as required (5.5" x 5.5" for my project). Hold down shift key and use a corner grab handle and move it towards the centre of the square until the size is correct, or use the Scale window.
2. Set the Page Size in the Design Page Settings window to reflect the size of your media (Letter size for Silhouette Printable Cotton).
3. Print and Cut. Open The Registration Mark window and enable the registration marks by changing the Style to Type 1. They will now be displayed on the mat. Move the design so that it is within the area bounded by the registration marks, and does not overlap the hashed area. In the Cut Settings window choose Cut Edge. Load the media in your printer so that the printer will print onto the fabric (rough) side and send the file to print. Place your printed material on the cutting mat and load it into your Silhouette. In the Cut Settings window select material type Printable Cotton Fabric and adjust cut settings as necessary (don't forget a test cut if you haven't cut the media before), then click Send to Silhouette. The optical eye will read the registration marks and cut lines and then cut out your square.

STEP 5: Make up your project
Peel the paper backing from the printed cotton square, and your fabric is ready to use. I made a pin cushion from a kit and decorated the outside with a pattern and words cut from regular vinyl.


What an easy to follow tutorial and the possibilities are endless.
ReplyDeleteThanks Karen. I'm glad you found it easy to follow, I know it looks a long tutorial, but there is lots of repetition.
DeleteI love everything about this tutorial especially the design and your colours. I spend so much time cutting that I never thought of doing something like this. Thanks for the inspiration.
ReplyDeleteThank you Hilary. You can probably tell - I really enjoyed working on this. I love the stylized flowers too, a little reminiscent of Charles Rennie!
DeleteAbsolutely. I am tempted to merely follow in your footsteps, but I'll have a look at what lacy backgrounds I already have and go from there...
Delete