

Making designs for boys can be more of a challenge than making vests for little girls, so when I was reading about hieroglyphics the other day I thought it would be fun to make a little Pharaoh onesie for my new grandson. Apparently the Egyptians would drop the vowels in a name, so to write Baby would be BBY, and the pictogram would be leg (B), leg (B) and two reeds for Y. To indicate a Pharaoh, the name would be surrounded by a cartouche - a sort of lozenge shape. During my research, it seems that different sites give slightly different glyphs for different letters, so interpretation can be a little fluid! The pictorial alphabet I used is here. I found a couple of files in the Silhouette Design store by Snapdragon Snippets to help me with the shapes. The cartouche shape is easy enough to design.
Then (for more advanced users) I thought it would be fun to add some colour to the neckline by designing a simple Egyptian style collar in gold, red, royal blue and turquoise. So the tutorial below comes in two parts, depending on how much challenge you enjoy.
EQUIPMENT NEEDED:
Plain coloured baby vest
Gold, red, blue and turquoise HTV (Heat Transfer Vinyl) for the gold you need a piece about 8 x 8 cm. If you want to make the multicoloured collar, small pieces of HTV 4 x 4 cm are needed)
Scissors, tweezers and Silhouette hook
Silicon paper
Egyptian woman by Snapdragon Snippets ID #8110
Egyptian Symbols by Snapdragon Snippets ID #8005
STEPS:
1. To make the "Baby" name. Open the file that has the reeds in it. Ungroup the file and delete all but the two reeds. Put them to one side.
2. Open the file of the Egyptian woman. We need her leg, and the space shape between her legs. Select those two pieces, make a compound shape (fill with a colour if it helps you visualise what you are doing) and delete all the other unnecessary pieces. Digital amputation is now required! Using the knife tool, cut the leg as shown below.
 |
| Image 1 |
Delete the rest of her body. Select the leg and click on Edit Points on the left hand side. Click on any point that needs deleted. Click on any point that needs Make curve (right hand side menu), to improve the shape. Perfect!
|
|


3. I found an image of a cartouche on the internet to use as a design guide. You could try tracing it, but it is easy to make from scratch. On the left hand side, pick Rounded rectangle and draw one. Select this shape so you can see the rectangular bounding box (image below) and you will see the corner edit points. Because you selected the whole shape, when you move one of the points, it will move for the three other corners also. Move them around until you are happy with the shape. With it selected, open the offset window, and offset to whatever width looks good, and also so that when you go to cut it will be thick enough to make it easy to iron on. I made it between 2 - 3 mm. You can just use this oval shape, or give it a base by making a flattened triangle shape and welding it on.
|
|

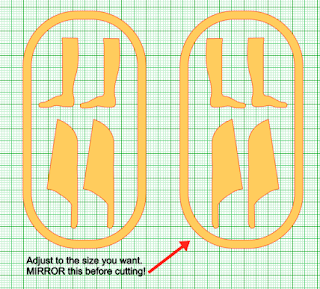
As the pictogram shapes are not symmetrical, we MUST make a mirror duplicate with the toes pointing to the right, so that when it is ironed on, it should have the toes pointing left! Goodness knows what it means if the toes point right! I made the cartouche around 3 x 7 cm.
 |
| Image 6 |
If that has exhausted you, then call it a day and make yourself a coffee. If you want to learn more about making your own designs, then here is how to make a design around the collar of a baby vest.
As in the image above, I measured the opening and found I needed a circle with an 11 cm diameter so that the design would sit around the sewn neckline.
MAKING A COLLAR SHAPE
STEP 1:
Draw an 11 cm circle (select ellipse, hold down Shift key and drag the mouse). If you prefer, open the Scale window (top right) and you can type in measurements. Select the circle and open the Offset window. Offset another circle by 3 cm. Now draw a rectangle and place it above your two circles so that the bottom is at the midline of the circles (image 7 left). We are going to make the circlet shape. Select all three shapes and click on Modify, Subtract. You will have the shape shown on the right of this picture. I have filled it with colour to make it easier for you to see.
 |
| Image 7 |
STEP 2:
Select the line tool and draw a line about 12 cm long. Select Line style and make it 11 pt thick. Now using Replicate, Advanced options, replicate it every 15 degrees. Select the star shape and group all the lines together.
 |
| Image 8 |
STEP 3:
Drag the star over the collar shape, make it larger and position it as shown in the screenshot below. Select both, go to Modify and select Subtract. Da da! We have made the lozenge shapes for the collar gemstones.
 |
| Image 9 |
I would strongly recommend printing this shape out on ordinary printing paper, as I used it for a guide when ironing on the different colours of "gemstones". See image 6 above, which shows the paper guide. You will see in that image that I only needed the central 8 lozenges, so two shapes on each side of the collar were deleted. If you want to cut this design in just one colour, keep the lozenges in this collar shape and simply cut it from HTV. If you want to cut in multiple colours, I separated the shapes and cut them in any orientation to save my supplies, and then ironed them on using the guide and my own judgement.
STEP 4: CUTTING HTV
Pop the gold HTV onto your carrier sheet and load into the Silhouette, making absolutely sure it has the clear plastic backing side, down. It can be difficult to work out which side this is, so use your hook to check that the thin vinyl is on the top side of the media. Check what the settings should be on your computer, and adjust the actual blade accordingly. Make a test cut. I found that the Silhouette recommended a blade of 2, but in practise I had to use a blade 5 and also increase the thickness to 10. Check that your design only has cut lines where you want them (cut settings), and send the file to the Silhouette for cutting. If you are using small scraps of HTV rather than new A4 sheets, sellotape the scraps on the corners to prevent them moving during cutting.
Remove the carrier sheet from the machine, and peel off the HTV still on its plastic backing. Weed away all the unwanted HTV with your pick tool (image 6). Cut around the plastic backing to separate the elements. Heat up your iron according to the instructions on the packet and carefully positioning them where you want them, iron them on to the cotton vest or T shirt. Another tip is to start with the central shape and then work your way outwards. Check by carefully lifting the shiny plastic layer every now and again, whether or not the HTV has stuck to the T shirt, and once it has worked, peel off the plastic, leaving the HTV on the clothing. Using silicon paper, or a clean, dry cloth, pop it on top of the HTV, and iron once more to fully apply it.
Although they are fairly simple shapes, using the gold HTV makes them stand out, and I think it is a bit of fun for a boy. The image on the right shows the letter HRRS for Harris. It gives you a better idea of how lovely the gold is. It will probably be a talking point when you change him in public!


PRODUCTS USED:
 |
 |
 |
 |
 |
| Heat Transfer Vinyl |
Egyptian woman by Snapdragon Snippets ID #8110
Egyptian Symbols by Snapdragon Snippets ID #8005
No comments:
Post a Comment