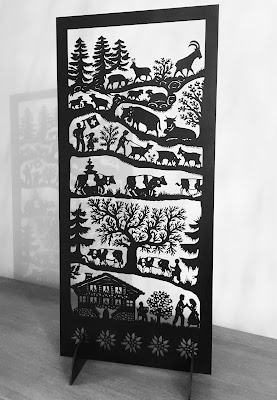
My friends have recently relocated to near Geneva. When I visited a couple of weeks back, I fell in love with Scherenschnitte, the Swiss art of papercutting. Here is a wonderful wooden example that they bought in a Désalpe festival celebrating the annual alpine cattle descent from the mountains:
 |
| Wooden Scherenschnitte Design |
In my design, I combined some gorgeous bird and cuckoo designs by Nic Squirrell from the Silhouette Design Store. My friends' surnames are Rosch and Newington, so we jokingly call them the Roschingtons. I couldn't resist then adding the slogan 'Swiss Family Roschington'! Rather than concentrating on the design elements, this tutorial will focus on the technique for successfully applying the vinyl design to the glass.
What you’ll need:
- Silhouette CAMEO
- Design of your choice
- Self-adhesive Vinyl
- Shadow picture frame
STEP ONE: Prepare and Cut Vinyl
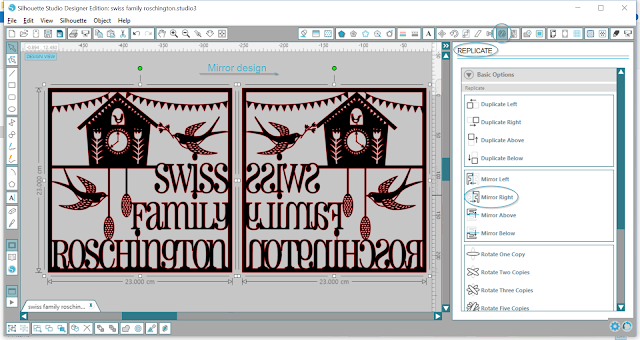
Decide which side of the glass you wish to use. Most vinyl is the same colour back and front, so I recommend applying the vinyl to the back of the glass, as this means the design is protected and the glass can be polished as normal. As you will be applying to the back of the glass, you will need to mirror the design. This option is found in the Replicate window.Some speciality vinyl such as metallic or glitter vinyls are single-sided. In this case, don't mirror the design and simply apply to the front of the glass. If you would like to sandwich this behind another piece of glass, local glaziers will often cut some sheet glass to your dimensions very cheaply. Alternatively, there are UK websites selling acrylic specifically cut to match dimensions of common frames, such as the Ribba one I'm using from IKEA.
STEP TWO: Weed
Once cut, the design needs to be weeded. This is the process of removing the unwanted parts of the design. The Silhouette tool is really handy for this as the hook allows you to pick up lots of pieces in one go. If you are finding it hard to see the cut lines, a lightbox shining light from below can help. For some very complex designs, I work from the outside inwards to make sure I'm not weeding parts of the design I need to keep!STEP THREE: Apply transfer tape
Transfer tape or paper is used to move the vinyl from the backing paper to your piece. It is needed for two reasons: firstly, as vinyl is stretchy this will prevent your design from warping and secondly, if you have floating sections, such the dot above the letter i, it will keep these shapes in position.Transfer paper/tape is low tack, so peels away easily from the design once positioned.
For small designs, masking tape can be used instead of transfer tape/paper.
STEP FOUR: Clean Glass
The ideal way to prepare your glass is with isopropyl alcohol, also known as rubbing alcohol. Some chemists sell this over the counter as it is used as an antiseptic. Indeed if you have wipes in your first aid kit, these will likely be perfect. As I haven't stocked up yet, I just used household glass cleaner with my Silhouette microfibre cloth. If you have disposable gloves or marigolds, these will to ensure you don't add any fingerprints.STEP FIVE: How to Align the Vinyl
Use a grid: For small designs, my tip to is to place the glass on your Silhouette mat, or a self healing cutting mat. The benefit of this is that you can use the grid to make sure the design is aligned. Using the Silhouette mat has the added benefit of holding the glass in position, but you will need to give the front of glass wee clean once you're finished.Simple Hinge Method: Larger designs will require a bit more preparation. I used the hinge method and really recommend it for glass as vinyl sticks amazingly well to glass so positioning is a one-time event!
Start by shifting the backing paper slightly, so just a small strip of your design is exposed.
As the majority of the design is protected by the back paper you can take time to position the vinyl on your glass. I kept the exposed part folded away from the glass when placing the design into the correct position.
Once happy I gently lowered the sticky part onto the glass. In the photo below, the bottom strip with the word Roschington is stuck to the glass and the remainder of the design is still covered by backing paper.
We now have a hinge at the top of the word Roschington. From here, it's just a matter of removing the backing paper and smoothing the rest of vinyl onto the glass , much like applying a mobile phone screen protector.
Two-sided Hinge Method: For very large vinyl projects, such as word art on a wall I tend to use a variation of the hinge method described above. This time, rather than one small hinge, I tape through the centre of the design and apply the vinyl from the centre leftwards, then from the centre rightwards.
The backing paper doesn't need to be shifted, instead align your piece and tape in place vertically through the centre with a strip of masking tape. Fold back the first half of the vinyl and cut away the backing paper. It's tempting to just rip the paper, but don't do this as small fibres can get trapped under your design. Apply the vinyl to your piece, smoothing from the centre outwards.
Once you have the first half applied, remove the tape and remainder of the backing paper and smooth the vinyl on the other half.
STEP SIX: Burnish and Remove Transfer Tape
Burnish, or rub, the vinyl into the glass to ensure a good seal and remove air bubbles. I do this with the transfer tape still on, so that I don't damage the vinyl.Now remove the transfer tape by rolling it back on itself.
STEP SEVEN: Tips for Removing Rogue Air Bubbles
Most of the time, a few passes of the the Silhouette universal scraper will remove any stray air bubbles. If you leave for a couple of days, the air bubbles will also naturally smooth out.Other tips include leaving near a radiator or a gentle pass of a hairdryer as vinyl will relax under heat.
If you have an air bubble in the middle of a large section of vinyl, a small pin prick will likely do the trick too!


Thank you very much, it's pretty!!!
ReplyDeleteBrill idea, will defo be having a go x
ReplyDelete