Hey there, Niki here today with a tutorial on how to Print ad Cut ANYTHING! I think the Print and Cut feature is brilliant and it means that I can print anything and also cut it out perfectly very easily. So here's a quick tutorial on how to do that.
I wanted The Hungry Catapillar embellishments for this layout. I looked in the Design Store and there wasnt anything - I wasn't really expecting there to be any. So I went on to Google and downloaded a few images that were of reasonable resolution. I opened them up in Silhouette Studio.
I started with the fruit. I clicked on the 'trace' icon (butterfly) and dragged a box over the fruit. I made sure they were all yellow by adjusting the Threshold slider and as soon as they were completely yellow, I clicked Trace.
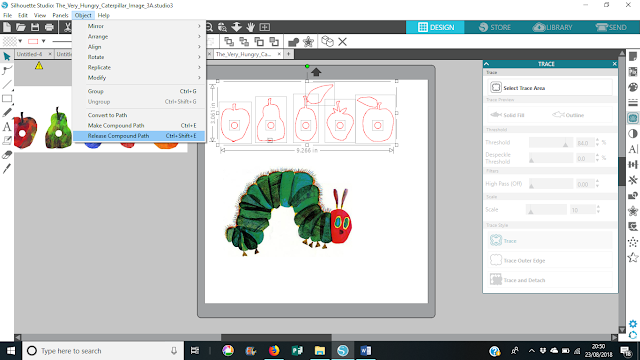
This gave me red cut lines around the very outside of the fruits. I wanted to remove the circles from the middle of each piece so I selected the fruit and Released the Compound Path. I then deleted the inner circles.
Now I need to create an offset - this is an outline around the edge of the exisiting cut lines. The reason for this is that I want my cut lines to leave a small white border around the fruit, rather than cut exactly on the edge. I selected the fruit and went to the 'offset' icon (star). I clicked 'offset' and narrowed the size using the 'distance' arrows and then clicked 'apply.
I now have a lovely offset around my pieces of fruit but the inner cut lines still remain, so I simply deleted them.
I could then movet he fruit image back onto the screen and now each piece sits perfectly within those cut lines.
OK, on to the catapillar. The same steps apply - I traced him using the Trace icon and I had to fiddle with the Threshold icon to get him to mostly go yellow. All those hairs were a bit tricky but eventually I was happy with how yellow he was. His eyes were not completely filled in but I could deal with that later.
You can see below that lots of the hairs have individual cut lines, and his eyes have cut lines too. I selected the whole lot and went to the Offset menu. I selected the Catapillar and clicked 'offset'. I narrowed the distace a little but too much and the offset would try to go around each of the indivdual cut lines of the hairs, rather than around the catapillar as a whole - the bigger the offset, the less detail the offset will pick up on. Experiment with this next time you use the Offset tool.
Once happy with my offset I clicked 'apply'. I then moved the offset cut line off screen and deleted all of the original cut lines - including the eyes and all the hairs. I then moved the offset back onto screen and moved the catapillar images back within the offset.
Here they are ready to be cut.
So to actually print and cut them, I chaged my page size to A4 (as my printer is A4) and I turned on the Registration marks.
The Registration marks are the most important part here as those are what the Cameo reads in order to match up the cut lines with the printing.
I resized and duplicated my images and cut lines onto the A4 size, and then when happy, I went to File, Print and printed this sheet via my home printer. It prints with the Registration marks too. I could then put the printed sheet onto my cutting mat and send it to cut. The cameo then reads the Registration marks and perfectly cuts out the printed images.
Cute embellishments hey!
I could then make my layout using the Print and Cuts as embellishments. I added other embellishments too of course.
Thanks so much for joining me today, I hope you've found that useful and that you will have a go at using Print and Cut! Happy scrapping xx


No comments:
Post a Comment