What you will need:
- A4 green backing card
- Silhouette CAMEO®
- A4 sheet of brown corrugated card
- Black silhouette sketch pen
- Glue stick
- Accent papers I used all occasions 12 x 12 from GraphTec
- Silhouette file fall leaves by Deborah Stine Design ID #66798
- Font snf Marmalade by ScrapNfonts Design ID #8758
Step one:
Download the file from the Silhouette Design Store and open in Silhouette Studio®. Select the shapes and 'ungroup' them so that you can separate the leaves from their squares. Then place the leaves at the top of the design space and resize so you have some large leaves and some small leaves of each type. I then cut the leaves design out of the accent papers.
Step two:
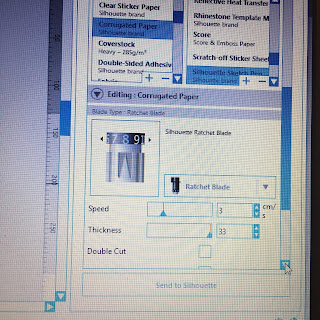
To add texture to the card I opted to use the Silhouette Corrugated Self Adhesive Card. This was a great material to use and created a great overall autumn look to the card. It was very simple to use, simply load the card onto the cutting mat at normal, then select 'corrugated paper' from the menu. This will automatically set your blade to 8, speed to 3 and thickness to 33. I found that the cut settings were very accurate and the design cut first time.
 |
| Corrugated paper settings |
|
Leaves cut from the corrugated card
|
Step three:
As part of the card I wanted to add a sentiment within one of the leaves. To do this I used the Silhouette Sketch Pen feature. Firstly I took one of the leaf shapes and enlarged it so that I could fit my message inside. Selecting the font tool I typed my message inside the leaf. I then placed the black Silhouette Pen into the holder and with the Silhouette Pen tool selected sent the design to Silhouette to be drawn. After the sentiment had been drawn I cut the leaf shape out as normal.
 |
| Card elements cut out and ready for assembly |
Step four:
Now that all of the elements of the card are cut out all you need to do is assemble it. I started out by folding my A4 card to make an A5 sized card then used a 20cm by 13.8cm accent paper for the first layer or matting and layering on the card. Arrange the leaves and sentiment on the front of the card until you are happy with the overall look of the card. Once you are happy with the position of all the leaves use a glue stick to attach them or the adhesive backing for the corrugated card.
 |
| Finished card |
Thank you so much for reading my blog post. If this project inspired you please leave me a comment below or share this post :)


Welcome to the Silhouette UK Design Team Helen. I love your card and the easy to follow instructions. You’ve inspired me to use the corrugated media to made a leafy project too. I’ll share it later in the week.
ReplyDeleteThanks Janet! I'm loving being part of the team and getting to use all the exciting new products! Cant wait to see your project :)
Delete